D.I.Y.
D.I.Y. drums, hardware, cymbals, sticks and stuff D.I.Y.
D.I.Y.
Copy and Paste or, Hi-lite and Right click on any links
My father was a great DIYer. He renovated a couple homes we lived in, and a couple restaurants he and my mom ran. He built furniture for them, with just hand tools. I watched him go through hours and hours of painstaking details. Plenty of frustration, too. Power tools were certainly around back then but, he just liked the feel of hand tools. He built sheds and other things, like a small concrete dam and waterfall. He dug out a mudhole by hand and turned it into a pond.
On the musical side of things, he taught himself how to play chords and tunes on piano and this little Magnus organ he got for himself. If we visited anyone who had a piano or organ, sooner or later he wandered over to it and began to play something. My mom was a great cook but, musical? Not so much.
So, for me, doing things yourself was just a way of life growing up. I really wasn't into woodworking when young. I watched and learned enough to mess around with things, and by my late teens and early 20s, I found things to do with drums involving stuff I learned. The late 60s, early 70s is when everything really began and by the time Legend formed I was getting into it a lot more seriously.
Back then there were no DIY merchants I knew of, if any even existed but, today? Several are out there, and help for DIYers is available on various forums and sites. This one has it all:
https://pdgood.us/drumshed/index.html
Some of the pics here are on other pages on the site, like the Pics, Instruments, "Concepts" Recording and Drum Shell pages but, for those who aren't interested in those particular topics, I decided to make a DIY page for stuff I get into and save some money in the process; and I hope you find things interesting and even inspirational to get into DIY, when it comes to drums and drumming. There days, saving money is a huge influence for doing things ourselves. You'll also see examples on my YT channel, REFondrums.
For really adventurous DIY, Carl Palmer and Billy Cobham had a great impact on me. Their sets were enormous and involved a lot of different sounds, carrying on the tradition of Big Band drummers in the era before them. For both instruments and how to set them up, they hold a lion's share of influence for me but, before them, I suppose I must mention Ginger Baker. He influenced tens of thousands of players getting into large drum sets with Cream but, one thing long forgotten by players was his use of traditional cymbal stands back then and putting two cymbals on each. Drummers around the world began doing it, including Carl Palmer when he was using a 5pc kit. Once the stands with larger pipes came into use, the idea faded and was rarely seen unless someone was using "vintage" hardware.

|
|

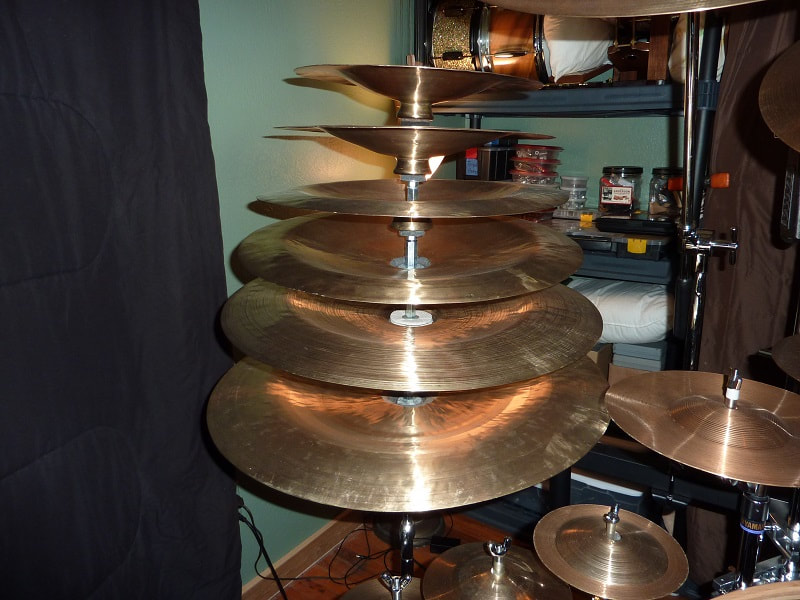
In seeing pics and film of Baker's set-up back then, it seemed a brilliant idea. The upper rods of the old stands from Ludwig and Slingerland were 3/8" diameter and could easily slide through the 1/2" bell hole. Today, Tama makes stands with that smaller upper rod and I continue to take full advantage of them.
In my current set-up I'm using 4 Tama stands that accommodate lower cymbals. In the case of the first pair, I got a 3' stainless steel rod for extra height, and mounted an old Slingerland tilter on it, as well as one of those old spring mounts. I haven't checked but, I don't think they make those anymore. Gibraltar sells stand alone tilters to accomplish the task if you make your own upper rod.
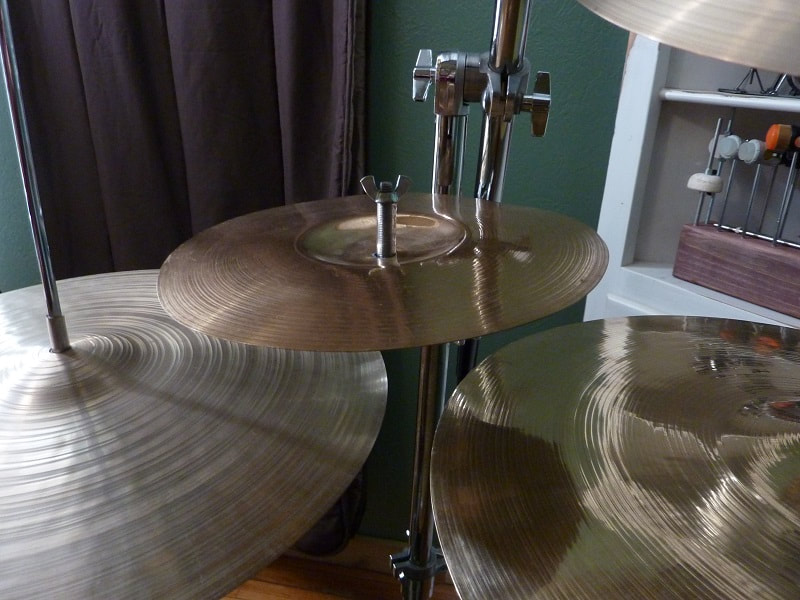
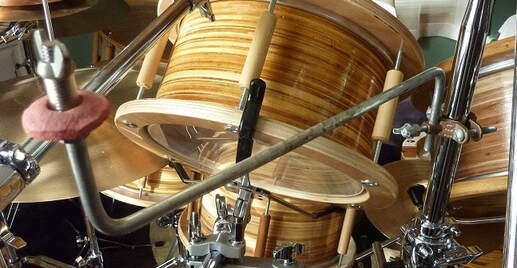
Baker didn't care about cymbals rubbing on the stands (as far as I can tell from pictures and film), which can either or both mar the chrome and keyhole a cymbal bell so, I worked out a simple solution for a couple issues that can develop. The first, you can either stack a bunch of felts to get the cymbal above the wing nut or, like I do, use a piece of 1/2" PVC, put some aluminum tape on it to give it a metallic look, than a washer, felts or rubber disk (I'll get to those later), and vinyl tube.
Baker didn't care about cymbals rubbing on the stands (as far as I can tell from pictures and film), which can either or both mar the chrome and keyhole a cymbal bell so, I worked out a simple solution for a couple issues that can develop. The first, you can either stack a bunch of felts to get the cymbal above the wing nut or, like I do, use a piece of 1/2" PVC, put some aluminum tape on it to give it a metallic look, than a washer, felts or rubber disk (I'll get to those later), and vinyl tube.
If you look a little closer you can see the tape covered PVC on the next two stands in line, each cut longer to get each cymbal up higher so they can be placed closer to each other and also get above the rise of the larger floor tom angles.
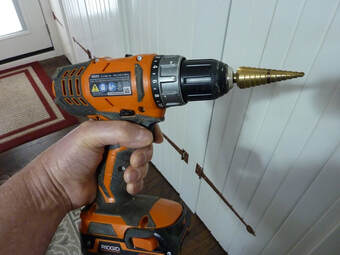
This is as good a place as any to get into more stuff for cymbals. Vinyl tubing can create a screeching sound as a cymbal rocks against it. It also happens with those molded black plastic cymbal cup and sleeve-in-one things that are widely used. Back in the 90s I decided to do something about that. Rubber tubing/automotive hose. Then I came across an even better solution, water lines used for hooking up faucets, etc. But, to be able to place cymbals over them I had to slightly increase bell holes from 1/2" to 9/16." For that, I used to just use a 9/16" drill bit. Then I got a cone bit which produces a nicer edge in the cut. Been doing that for probably 30 years now. A little Vaseline helps the sleeves slip on easier on today's cymbal tilters.
There is a coating on the water line hose that I rough up with a little sand paper. Otherwise they can screech a little, too. Their indestructible nature is what makes them so good.
There is a coating on the water line hose that I rough up with a little sand paper. Otherwise they can screech a little, too. Their indestructible nature is what makes them so good.
|
|
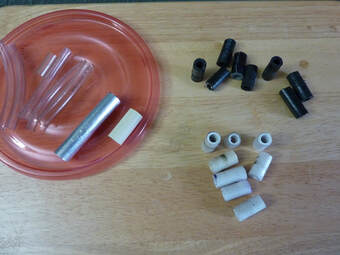
I guess that leads to cymbal felts. I rarely use them. They mash down and the angle you place a cymbal at changes as the felt squashes down. Remedy? Rubber. Baseballs, to be exact.
Take a baseball and just cut them up into disks. As you can see they come in various colors as well as overall density.
The hole is simply made with a piece of metal coupler given a sharp interior edge with a drill bit. Then I just use it as a punch, with a hammer. Some kind of press would work better but, the hammer and "punch" works fine, although as you can see, I don't always get the hole dead center. Plus, you are looking at alternative 'felts' that sit in a container. All the good ones are in use, though the white rubber baseballs make the best ones, as you can see. Do you see the one with black on it? Rubber is a petroleum product and constant friction produces that blackness but, those pink "felts" are probably 20 years old. Yeah, they last a looonnnggg time. Same as the rubber sleeves. Virtually indestructible. I've been using them for 25-30 years, and the newer, faucet lines for 10.
I cut the baseballs with either a very sharp knife or an electric knife. The electric knife makes a cleaner cut and everything stays more even in size, overall. Electric knives are great for cutting a whole lot more stuff than a Turkey on Thanksgiving.
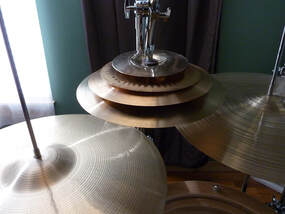
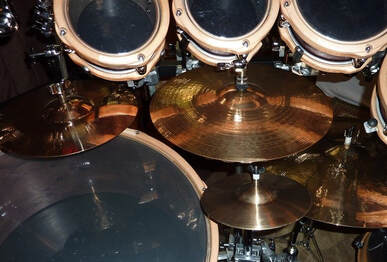
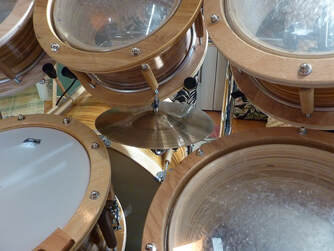
All of these ideas work for stacking cymbals, something I began doing back in the '70s. I never particularly liked the "white noise," dry sound of cymbal upon cymbal but, cymbal trees? Yeah, I love those. But, I do make stacks that maintain slight spaces between the cymbals, for a broken glass, kind of 'shatter crash,' I call them.
The hole is simply made with a piece of metal coupler given a sharp interior edge with a drill bit. Then I just use it as a punch, with a hammer. Some kind of press would work better but, the hammer and "punch" works fine, although as you can see, I don't always get the hole dead center. Plus, you are looking at alternative 'felts' that sit in a container. All the good ones are in use, though the white rubber baseballs make the best ones, as you can see. Do you see the one with black on it? Rubber is a petroleum product and constant friction produces that blackness but, those pink "felts" are probably 20 years old. Yeah, they last a looonnnggg time. Same as the rubber sleeves. Virtually indestructible. I've been using them for 25-30 years, and the newer, faucet lines for 10.
I cut the baseballs with either a very sharp knife or an electric knife. The electric knife makes a cleaner cut and everything stays more even in size, overall. Electric knives are great for cutting a whole lot more stuff than a Turkey on Thanksgiving.
All of these ideas work for stacking cymbals, something I began doing back in the '70s. I never particularly liked the "white noise," dry sound of cymbal upon cymbal but, cymbal trees? Yeah, I love those. But, I do make stacks that maintain slight spaces between the cymbals, for a broken glass, kind of 'shatter crash,' I call them.
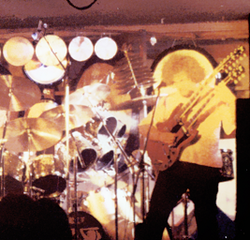
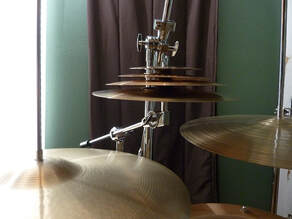
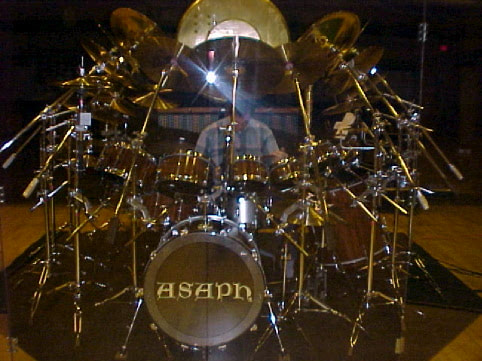
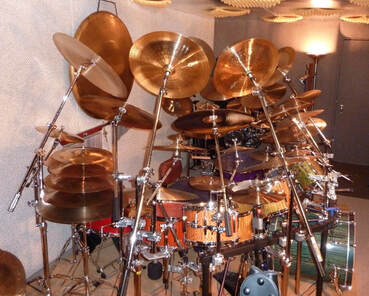
If you look closely, though the enlargement of the image is blurry, you can see one of my cymbal trees to the left of Kevin's head. I have made more cymbal trees than I can remember, large and small.
|
|
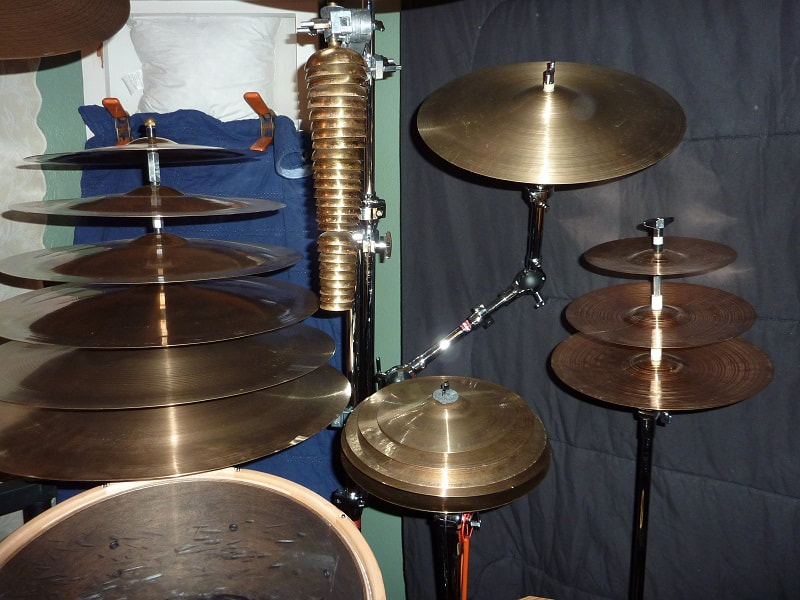
Above/right is the Wuhan china tree. Directly above is the Sabian, Flat China tree, as well as an open stack of Alpha splashes, and the shatter crash; small cymbals, either splashes or cut down cymbals mounted around 1/4" to 1/2" apart. All those cymbals are on one tilter, one with enough height to accommodate all the cymbals with felts, tubing and washers between them.
The basic idea is seen in the hardware I use for the big trees. Threaded rod sections, couplers, washers, felts, and repeat. Drop the whole thing into a stand pipe that accommodates the size of the rod or the coupler. In the case below, an old Gretsch/Remo combo and a Slingerland stand. The flat felts are used to address Wuhan's unique cymbal cups, which were actually used like handles in ancient times when cymbal players made up front lines of armies to scare the pants off an opposing force. The felts also go inside the cups to keep the cymbals in better lateral order. Wuhan cymbal cups can be less than evenly hammered flat and the cymbals can sit pretty wonky as a result. With felts inside the cup, the next washer and coupler will press down on them enough to keep the cymbal level.
The sound of a mallet roll on the big trees is pretty impressive. Waves of the sea shore kind-of-thing. Like architects and contractors know, it costs less to build up than out, so in the same column of space I have 6 cymbal tones to choose from on single strikes. Any combination of cymbals can be stacked in a tree.
You'll notice some different felts on the stand on the right. If I do use them for something, I also use more than the black or gray felts that come with hardware. I'll use any kind of disk that does the job better, like the kind of felts used for floor protection, which have a solid surface attached to them on one side. They're quite big, and in the case of large cymbals on a tree, they work better to keep things in place.
While I do use typical cymbal cups, Fender washers come in all sizes and thicknesses and most of my cymbals sit on them, because the rubber baseballs sit on them better than a typical cymbal cup. That said, Chinas nest in the underside of a chrome cup better, bell to cup so, they still come in handy more than flat washers. I tend to use regular felts for them because, again, the felt will change shape; in that case, fitting the shape of the underside of a cymbal cup and the shape of the cymbal's bell. That's something a sharp knife or electric knife is good for, too; cutting up felts. Some of them come extremely thick and in some cases, I'll want something extremely thin for it's purpose.
One of the current shatter crashes I am using is a set of various splashes popped inside out. And a cymbal that never leaves any set-up I put together is an old Sabian B8 Pro 12" splash I cut down to a 10 and popped inside out. That thing is 25 years old by now. It screams. If you have never popped a cymbal inside out, it's quite easy to do for smaller cymbals. The bigger they get, the more difficult it is but, I've done it to 20" cymbals. It creates an instant "China-type" sound. It doesn't hurt the cymbal, though I definitely would not do it back and forth, over and over. Any metal bent back and forth, over and over will develop stress cracks and snap at some point. Bronze is pretty malleable, though. Especially is that the case with thin cymbals.
One "stack" I do employ is pairing small hi-hat sets. I've done that since the 70s, as well.
|
|
|
|
|
I've been using those hats by the snare for a while now and having a lot of fun with them. They're 10" cymbals which are cut down from larger, cracked cymbals I've picked up for experimenting with.
That's another DIY thing for me: salvaging cymbals. Over the decades me and my trusty saber saws have cut down more cymbals than I can recall. The most interesting result, for my ears, is cutting down ride cymbals or heavy crashes and hats. You end up with this China Bell sound that pierces through anything. The stress on the bow of the cymbal causes it to curl upward when cut in spots closer to the bell. The thickness creates some high pitched, beautifully different sounds. I find cracked or inexpensive cymbal lines and go to work. I have a bunch of these I always have in every set-up. I have always employed lots of accent cymbals in my set-ups far back as I can remember, including aluminum pot tops (look closely). My mom always wondered where they went until she saw them one day. "Raymond Frigon!!!" I painted dragons on them and other stuff.
That's another DIY thing for me: salvaging cymbals. Over the decades me and my trusty saber saws have cut down more cymbals than I can recall. The most interesting result, for my ears, is cutting down ride cymbals or heavy crashes and hats. You end up with this China Bell sound that pierces through anything. The stress on the bow of the cymbal causes it to curl upward when cut in spots closer to the bell. The thickness creates some high pitched, beautifully different sounds. I find cracked or inexpensive cymbal lines and go to work. I have a bunch of these I always have in every set-up. I have always employed lots of accent cymbals in my set-ups far back as I can remember, including aluminum pot tops (look closely). My mom always wondered where they went until she saw them one day. "Raymond Frigon!!!" I painted dragons on them and other stuff.
|
|
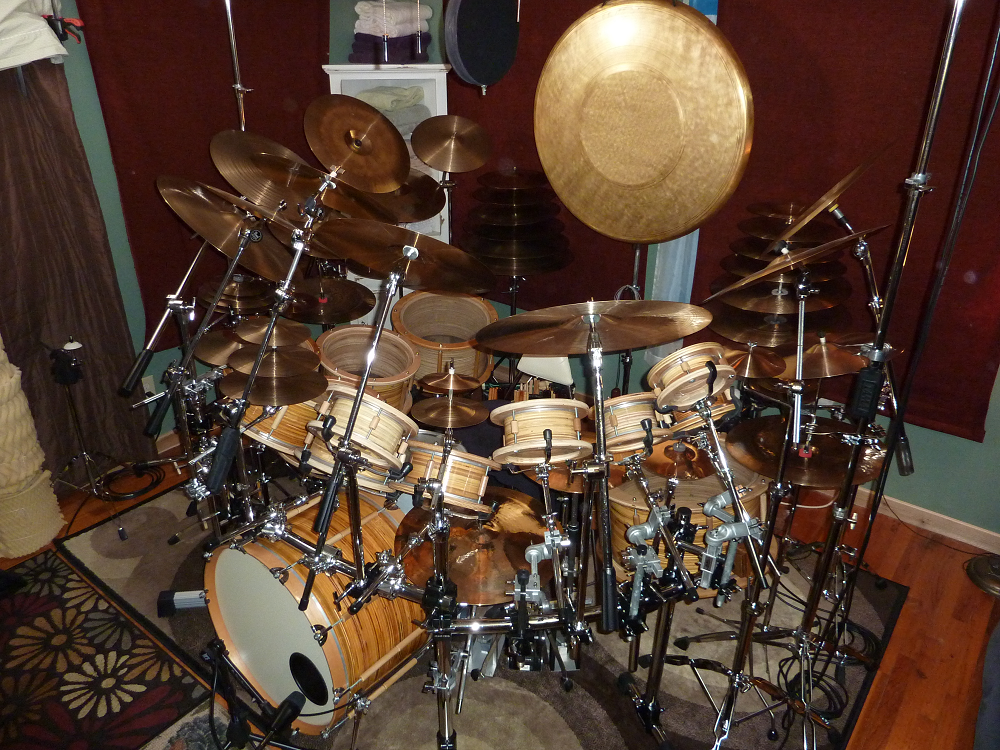
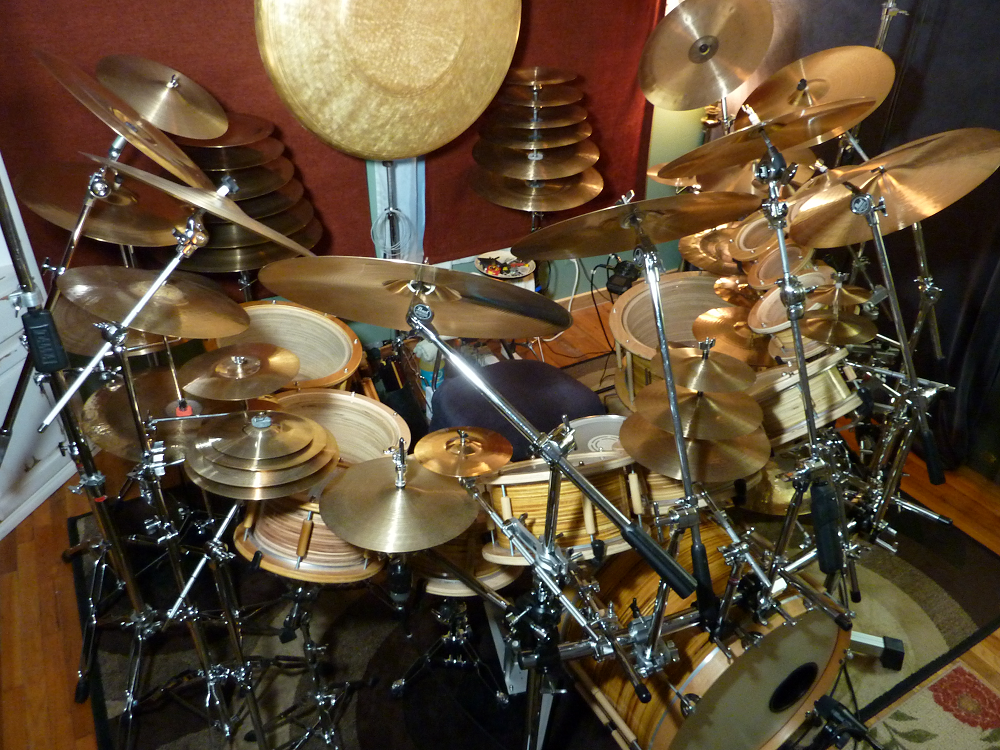
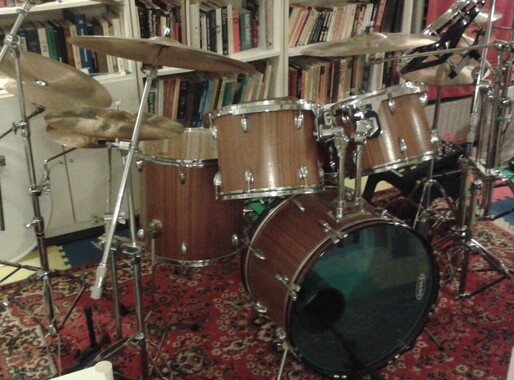
The easiest way to mount stuff like that, unless you're squeamish about drilling extra holes in drum shells, is a tom bracket on the drum and bent rods for using a bass drum cymbal mount sleeve or threading a rod, or, for a less pro but, functional look, just using and bending a threaded rod. You can put aluminum tape on them and from a distance no one would know. Believe it or not, having seven cymbals attached to one floor tom didn't change the sound of it at all. That's all on an 18" tom. Later I added a 20" tom and did the same on it. I ended up selling the fiberglass tymp because I just never used it much.
Yeah, I know. Some Vintage aficionados would shoot me for covering Ludwig Pink Champagne with flocked wallpaper but, I was really into the whole knight and armor thing, and when the set was ready to go with Legend, it employed a few odd drums with different finishes (like a red sparkle second bass drum I picked up), so the wallpaper was a practical fix and already had a good look for the band's concept before we started the group.
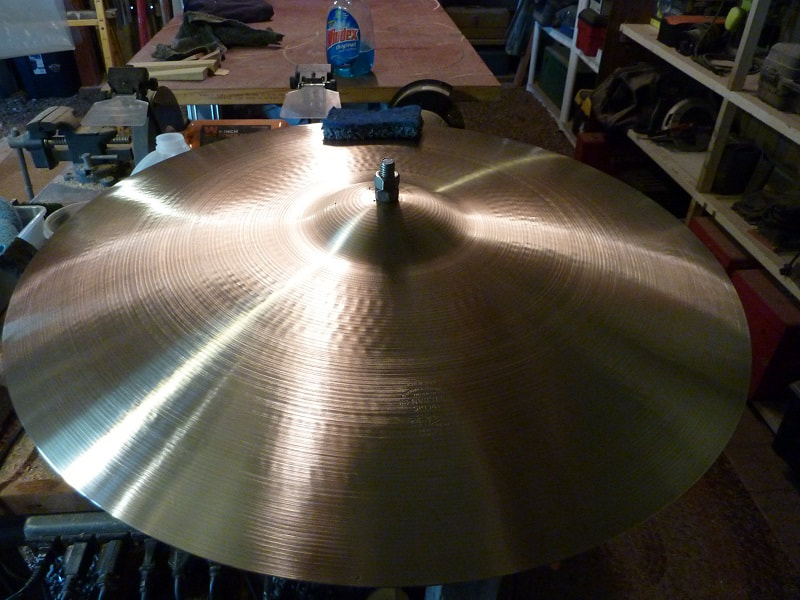
I should also mention lathing cymbals, or rather, re-lathing them, to modify their sound. Just a half inch drill, stabilized in a vice, mount the cymbals on a threaded rod and clamp them down well, nuts and washers on each side of the bell, turn the drill on and use hand held carbide bits to remove material. I go slow and while I am no cymbal smith, I've achieved a lot of satisfactory results. Videos of that on my YT channel, as well:
https://www.youtube.com/watch?v=FAZFRYljO88
If you check out the videos I've uploaded, you'll see it isn't a difficult process but, you just have to be careful. If I had a voltage regulator to adjust speed I would use two hands but, I don't rework cymbals enough to purchase one, and just use one hand on the drill and the other to lathe. Works okay.
I have lathed heavy cymbals on that 1/2" drill, up to 22" in diameter, and 20 years later the thing still works.
There's a fair amount of video available on YT about lathing cymbals. General rules: don't get a cymbal too hot, you can change the timbre of the metal. The more weight you take off, the lower the overall pitch the cymbal be. And we are talking grams here.
For me, it was a process of weighing cymbals on a scale that has a gram selection mode, then checking the web to see what general cymbal weights are. Not enough merchants place gram weights for cymbals they sell, which is unfortunate but, Gerry, at Hazelshould.com, sells used cymbals and gram weights each one. It's a great site, and it used to just have audio samples of each cymbal. He makes videos now. You'll get a real education on weight/tone character, which helps to understand things.
In some cases I will remove material from the entire surface of a cymbal. In other cases just a particular section towards the edge. Sometimes on top or bottom or both sides. I've turned large rides into crash rides that way.
Anybody who looks at pics of my drum sets knows by sight I am more into cymbals than drums. To me, a drum is a drum. I just want wide open, clean tone and generally, as much resonance and sustain as I can get and I'm happy. With cymbals, it's a world of sound features and character far surpassing the sound dimensions of drums.
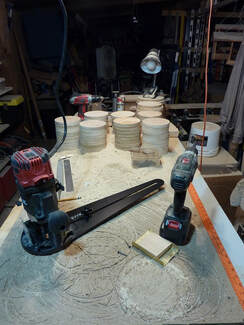
*I found some pics of my cymbal cleaning process.* Half-inch drill stabilized in a vice, w/the 1/2" threaded rod and nuts and washers (sometimes I don't use the washers). I use various sponges and scrubbing pads with various powder and liquid cleansers for regular and brilliant finishes. Yes, logos generally come off. I take them off my cymbals anyway. Having huge logos from 7 different companies looking back at me would drive me nuts. Frankly, any large logos looking at me are unwanted. Cymbals, heads, I don't care. They all come off. I know what I'm playing. I don't need the advertising. Some players love them. Endorsers have to have them. Not my thing.
Yeah, I know. Some Vintage aficionados would shoot me for covering Ludwig Pink Champagne with flocked wallpaper but, I was really into the whole knight and armor thing, and when the set was ready to go with Legend, it employed a few odd drums with different finishes (like a red sparkle second bass drum I picked up), so the wallpaper was a practical fix and already had a good look for the band's concept before we started the group.
I should also mention lathing cymbals, or rather, re-lathing them, to modify their sound. Just a half inch drill, stabilized in a vice, mount the cymbals on a threaded rod and clamp them down well, nuts and washers on each side of the bell, turn the drill on and use hand held carbide bits to remove material. I go slow and while I am no cymbal smith, I've achieved a lot of satisfactory results. Videos of that on my YT channel, as well:
https://www.youtube.com/watch?v=FAZFRYljO88
If you check out the videos I've uploaded, you'll see it isn't a difficult process but, you just have to be careful. If I had a voltage regulator to adjust speed I would use two hands but, I don't rework cymbals enough to purchase one, and just use one hand on the drill and the other to lathe. Works okay.
I have lathed heavy cymbals on that 1/2" drill, up to 22" in diameter, and 20 years later the thing still works.
There's a fair amount of video available on YT about lathing cymbals. General rules: don't get a cymbal too hot, you can change the timbre of the metal. The more weight you take off, the lower the overall pitch the cymbal be. And we are talking grams here.
For me, it was a process of weighing cymbals on a scale that has a gram selection mode, then checking the web to see what general cymbal weights are. Not enough merchants place gram weights for cymbals they sell, which is unfortunate but, Gerry, at Hazelshould.com, sells used cymbals and gram weights each one. It's a great site, and it used to just have audio samples of each cymbal. He makes videos now. You'll get a real education on weight/tone character, which helps to understand things.
In some cases I will remove material from the entire surface of a cymbal. In other cases just a particular section towards the edge. Sometimes on top or bottom or both sides. I've turned large rides into crash rides that way.
Anybody who looks at pics of my drum sets knows by sight I am more into cymbals than drums. To me, a drum is a drum. I just want wide open, clean tone and generally, as much resonance and sustain as I can get and I'm happy. With cymbals, it's a world of sound features and character far surpassing the sound dimensions of drums.
*I found some pics of my cymbal cleaning process.* Half-inch drill stabilized in a vice, w/the 1/2" threaded rod and nuts and washers (sometimes I don't use the washers). I use various sponges and scrubbing pads with various powder and liquid cleansers for regular and brilliant finishes. Yes, logos generally come off. I take them off my cymbals anyway. Having huge logos from 7 different companies looking back at me would drive me nuts. Frankly, any large logos looking at me are unwanted. Cymbals, heads, I don't care. They all come off. I know what I'm playing. I don't need the advertising. Some players love them. Endorsers have to have them. Not my thing.
|
|
|
|
Great story I have mentioned elsewhere on the site. That cymbal is one of many I sold with my Legend set to a friend, back in 1979. He still has the receipt. He still has the set and the cymbals!!! Same heads!!! I was totally blown away when I found out back in 2019, when we reconnected. He offered to let me use the entire set-up for the Legend performance in Germany, at the Keep It True festival. Shipping that would cost a few times more than the entire set is worth so, I asked him to send me three of the rides: the 22, 24 and 26" Med. Heavy Pings. I used the 24" as my main ride on From the Fjords but, I wanted to hear the other 2, as well. Almost all of my main cymbals were M-H Pings, 16" - 26." I know, sounds crazy but, they had a different tone back then, were very loud, and worked well with the music. He had not cleaned them in 40 years. I reunited with those old friends and decided to polish them up.

So, on to Drums, then. Aside from the wallpaper being one of the first things I got into (you'd be amazed at the incredible wallpapers that are produced), and stuff I did with cymbals and effects, I began to modify drums.
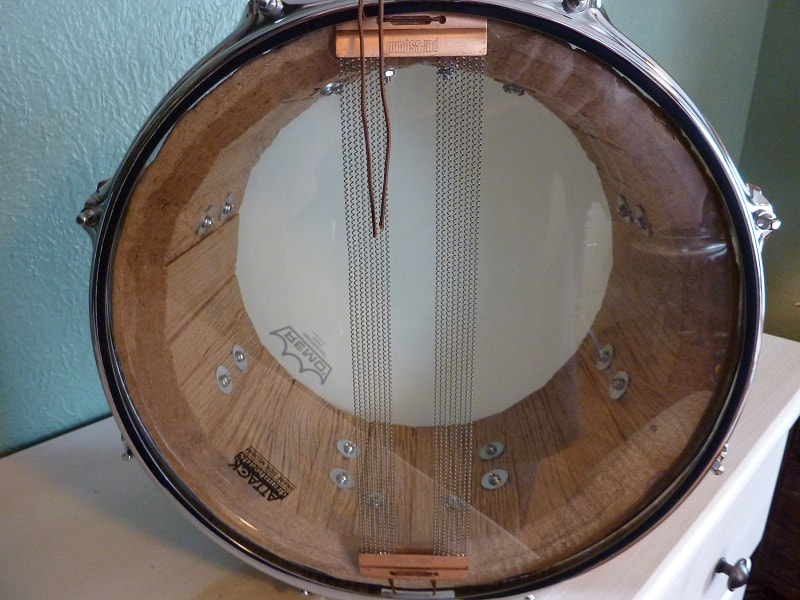
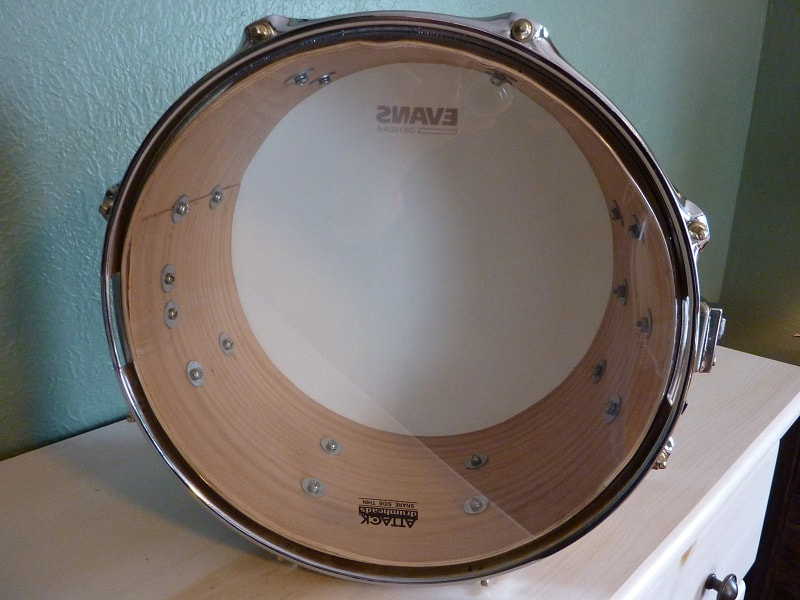
In a couple of the above pics you can see an 11x15. Ludwig didn't make an 11x15. 12x15 was the common size, which was the size of parade drums; marching snares. A 12x15 made no sense to me and it always sounded weird. I took my father's saber saw and cut an inch off. Then I separated the re-ring from the shell piece and reinstalled it. I redid the bearing edge with hand files and sand paper. The tone became far more pleasing to my ears and the size followed the rest of the mounted tom traditional dimensions - 8x12, 9x13, 10x14, 11x15.
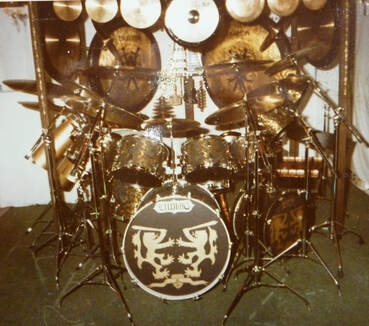
Then came that cannon bass drum, a 24x26. A friend had this old, vintage 10x26 parade drum in his attic and I bought it, flattened an edge of each drum, glued them together and away I went. I hand painted the hoops, the crests on the bass drum heads, as well as a crest on the big gongs. I painted the inside of the concert toms. I hooked up seven of them to one stand. That was the double tom bracket gig. I went from 3, to 5, and finally 7 drums. I wish I had a picture of a kit I used in a Top40 club band Kevin and I were in; Golden Lady. I took the 7 toms on their wooden platform and put the pipe in a tom holder on the bass drum. People found that pretty wild at the time.
The 7 concert toms on one stand was tricky but, it freaked people out to see such a rig.
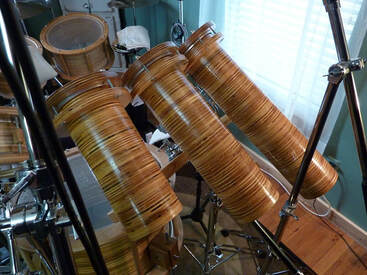
Then came PVC tube drums... and away I went into actually making my own drums.
In a couple of the above pics you can see an 11x15. Ludwig didn't make an 11x15. 12x15 was the common size, which was the size of parade drums; marching snares. A 12x15 made no sense to me and it always sounded weird. I took my father's saber saw and cut an inch off. Then I separated the re-ring from the shell piece and reinstalled it. I redid the bearing edge with hand files and sand paper. The tone became far more pleasing to my ears and the size followed the rest of the mounted tom traditional dimensions - 8x12, 9x13, 10x14, 11x15.
Then came that cannon bass drum, a 24x26. A friend had this old, vintage 10x26 parade drum in his attic and I bought it, flattened an edge of each drum, glued them together and away I went. I hand painted the hoops, the crests on the bass drum heads, as well as a crest on the big gongs. I painted the inside of the concert toms. I hooked up seven of them to one stand. That was the double tom bracket gig. I went from 3, to 5, and finally 7 drums. I wish I had a picture of a kit I used in a Top40 club band Kevin and I were in; Golden Lady. I took the 7 toms on their wooden platform and put the pipe in a tom holder on the bass drum. People found that pretty wild at the time.
The 7 concert toms on one stand was tricky but, it freaked people out to see such a rig.
Then came PVC tube drums... and away I went into actually making my own drums.
|
|
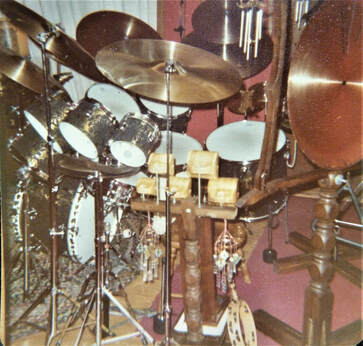
As you can see above I had a percussive paraphernalia paradise back in the day. Cup hooks and wire all over the place to hold things hanging all around the set. My parents were always out antiquing on weekends and when I went along I was always looking for old bells, triangles, and other types of antique percussion. Back then, if LP made it, I had one and found ways to use it. I remember selling the steel drum. I don't know what happened to the the slit drum. I got into making those in the early '90s, 20 years later. That 20" bass drum is the red sparkle one. Just a no-name drum I picked up used at music store that had all kinds of used stuff upstairs. None of it was priced, iirc. If you saw something you liked, bring it down stairs, offer the guy a price and you might walk out with a new "treasure."
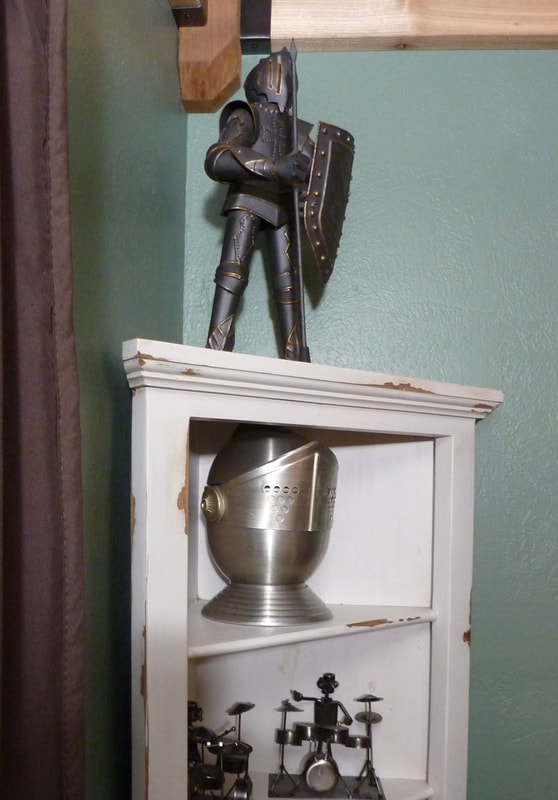
In the above pic on the right, you'll notice a small suit of armor and the knight is holding a spear and shield. I got that when I was 15. I found it in some kind of second hand store, and still have that trusty little statue today. The helmet is actually an ice cube tray :-) It's filled up with felts and rubber disks.
In the above pic on the right, you'll notice a small suit of armor and the knight is holding a spear and shield. I got that when I was 15. I found it in some kind of second hand store, and still have that trusty little statue today. The helmet is actually an ice cube tray :-) It's filled up with felts and rubber disks.
I got into mounting drums to drums with two tom brackets and bent rods to connect them. You can just make out a couple bent rods above on the concert toms. 2-6, 2-8, 2-10 and a 12 went on one stand; the foundation being a piece of shaped 2x4 I stained and mounted to a cymbal stand. Then a 6, 8, and 10 connected to its twin, connected to the stud, all with Ludwig tom brackets. The same for the 15" which ended up connected to the 16" floor tom, bracket to bracket with a bent rod between them. A lot of that was time consuming, trying to get all the angles and spacing correct. I lived at hardware stores!

You get a better idea in the above picture when I began with 5 toms on one stand. Then it went to 7.
Carl Palmer, such a big influence. When I was still in my teens, I had the smaller Turkish gongs and stands I built and a big iron bell; shamelessly copying Palmer's use of one on some of the big ELP tours. I never played out with that rig. Just shows what DIY can come up with, though. Yeah, my parents let me use their cast iron bell they had on a post outside. I actually called a foundry, in CT, and asked how much it would cost to have them make a small one. Way too much for my wallet back then.
Carl Palmer, such a big influence. When I was still in my teens, I had the smaller Turkish gongs and stands I built and a big iron bell; shamelessly copying Palmer's use of one on some of the big ELP tours. I never played out with that rig. Just shows what DIY can come up with, though. Yeah, my parents let me use their cast iron bell they had on a post outside. I actually called a foundry, in CT, and asked how much it would cost to have them make a small one. Way too much for my wallet back then.

You may notice lots of wind chimes all around the set. I had all kinds of them, as well as little bells. When I struck the gongs all kinds of sound was swirling around.
|

|
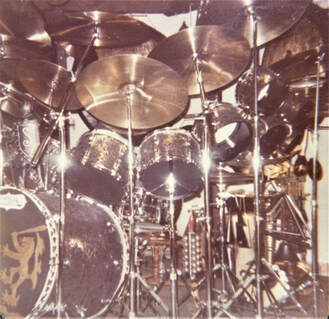
2 - 6" Roto toms were attached to the 3- 8" PVC pipes. Billy Cobham was the first I heard to use Tama Octobans.

DIY answer? PVC. If you look at the pic on the lower right above, again blurry but, the only pic I have of the 2 - 12" PVC 90 degree elbows I had to my left, seen by Kevin's right leg. They sat on 3 legs for balance. My version of North Drums back then.
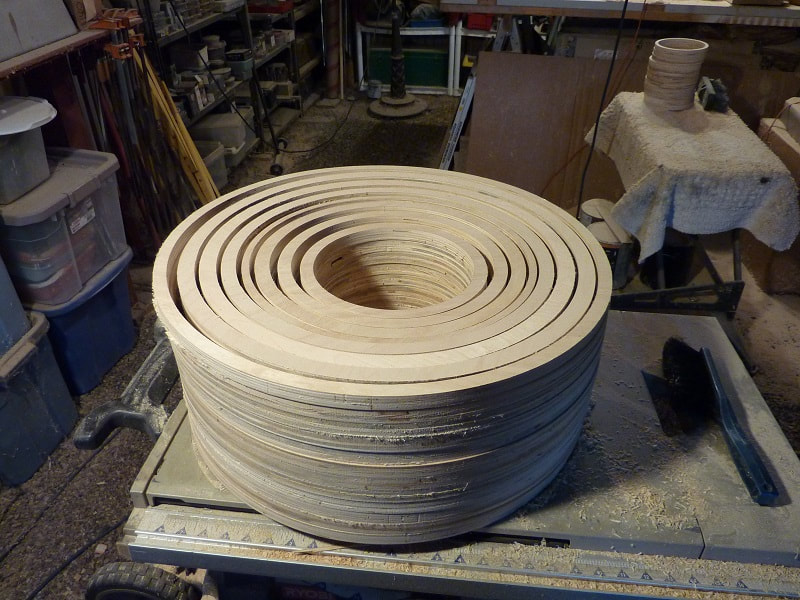
I also made tube drums out of Sona tubes (concrete form tubes made of impregnated, compressed paper). In the late 90s I had a set-up of 5 on one stand. I never took any pictures of them but, I did make videos back then and here's a less than crisp screen shot of a Concepts for Solo Drum Set VHS. They were all 6" diameter, 6, 12, 18, 24, 30" deep, and a 10x24 on legs in front of them. Like the rest of the drums, Keller maple shells, I covered them with Rosewood veneer and nobody ever guessed they were concrete form tubes. Nothing could be easier to make. I didn't even use any re-rings. I just coated the edges with the finish I used on the veneer, Tung oil, that hardened them.
I also made tube drums out of Sona tubes (concrete form tubes made of impregnated, compressed paper). In the late 90s I had a set-up of 5 on one stand. I never took any pictures of them but, I did make videos back then and here's a less than crisp screen shot of a Concepts for Solo Drum Set VHS. They were all 6" diameter, 6, 12, 18, 24, 30" deep, and a 10x24 on legs in front of them. Like the rest of the drums, Keller maple shells, I covered them with Rosewood veneer and nobody ever guessed they were concrete form tubes. Nothing could be easier to make. I didn't even use any re-rings. I just coated the edges with the finish I used on the veneer, Tung oil, that hardened them.
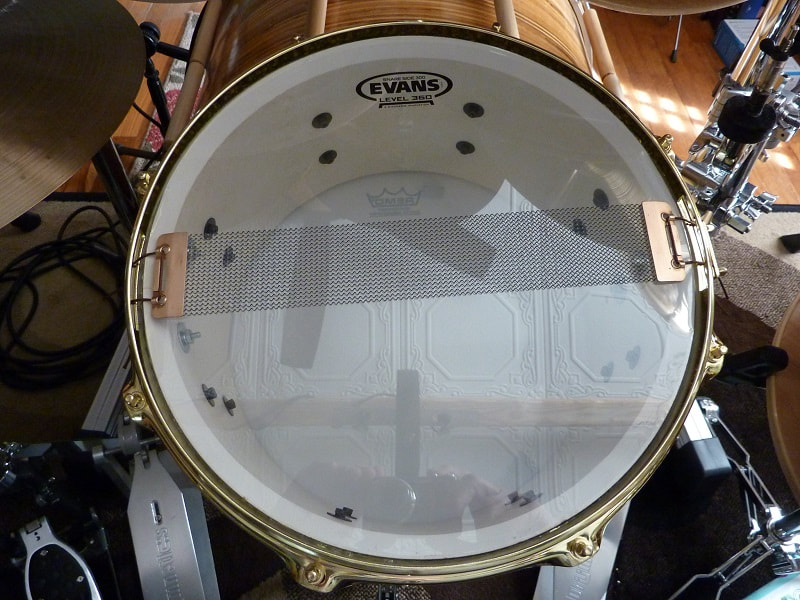
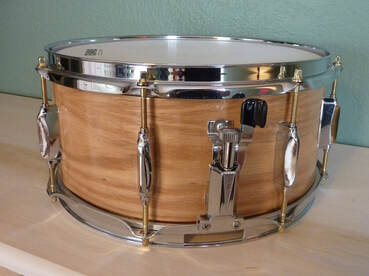
A recent PVC drum is a 6.5 x 13 snare I made. The stuff is easy to work with, though it can be a dog dealing with dimensions PVC comes in, which are established by interior diameter, not exterior. In the case of a 13" drum, getting 12" pipe, with .5" side walls makes a perfect shell.
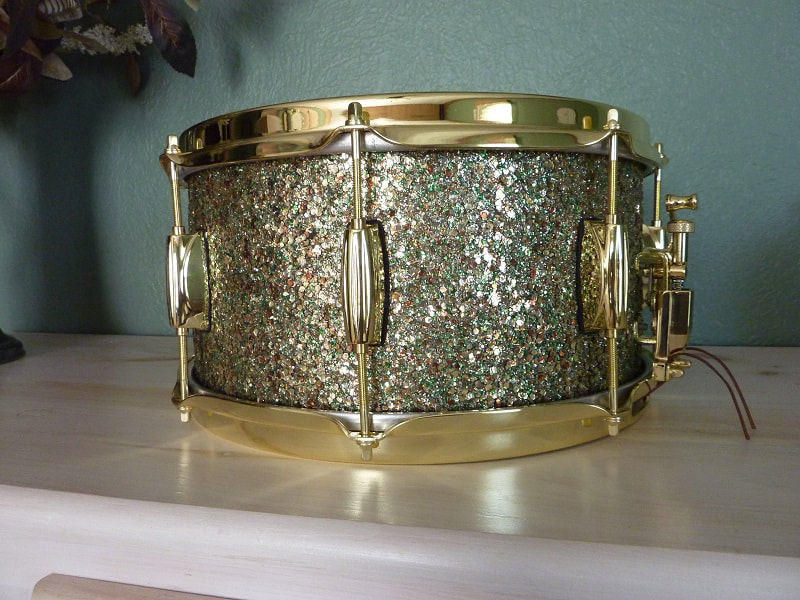
Just for contrast, a pic showing the drum with black hardware, my first choice because it was all I had to work with at the time I made the drum, for one of my YT videos on drum shells. I like the brass look a lot more. The sparkles were just an idea to try. Multiple layers of various size flakes and colors. Then multiple coats of spray gloss.
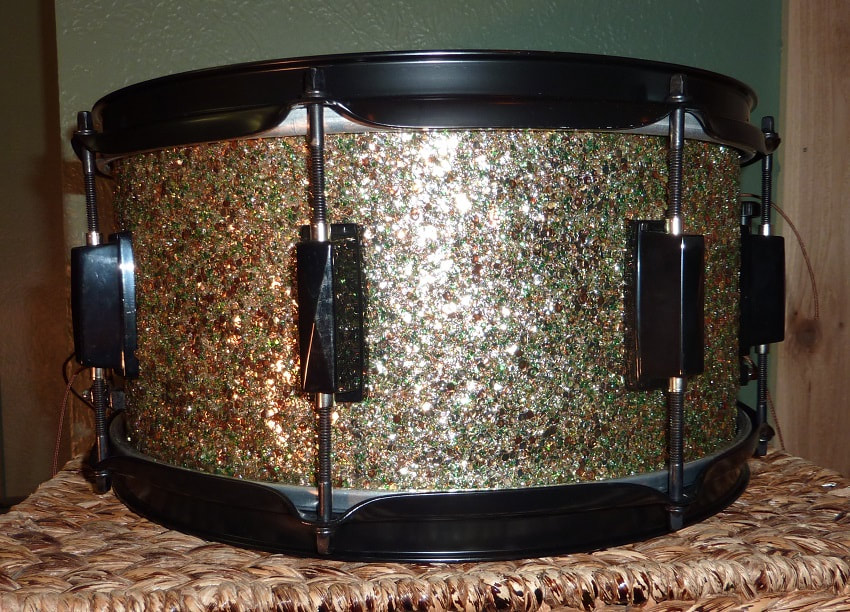
And a pic of the interior shell wall. It's a fairly heavy drum. Very dense material.
Back in '91 I made my first component drum set from purchased Keller shells and used lugs and stuff from a full set of Remo Legero drums I was playing at the time. Then later in the '90s I got into making snare drums: standard plywood shells, soft and hardwood stave drums, sheet metal, and other materials. Pics all over the site but, a few of them here, and their interiors which, if you look closely, are not lathed round, because I don't have a lathe and never felt like making any kind of router jig to do it because the drums sound no different than fully rounded shells.
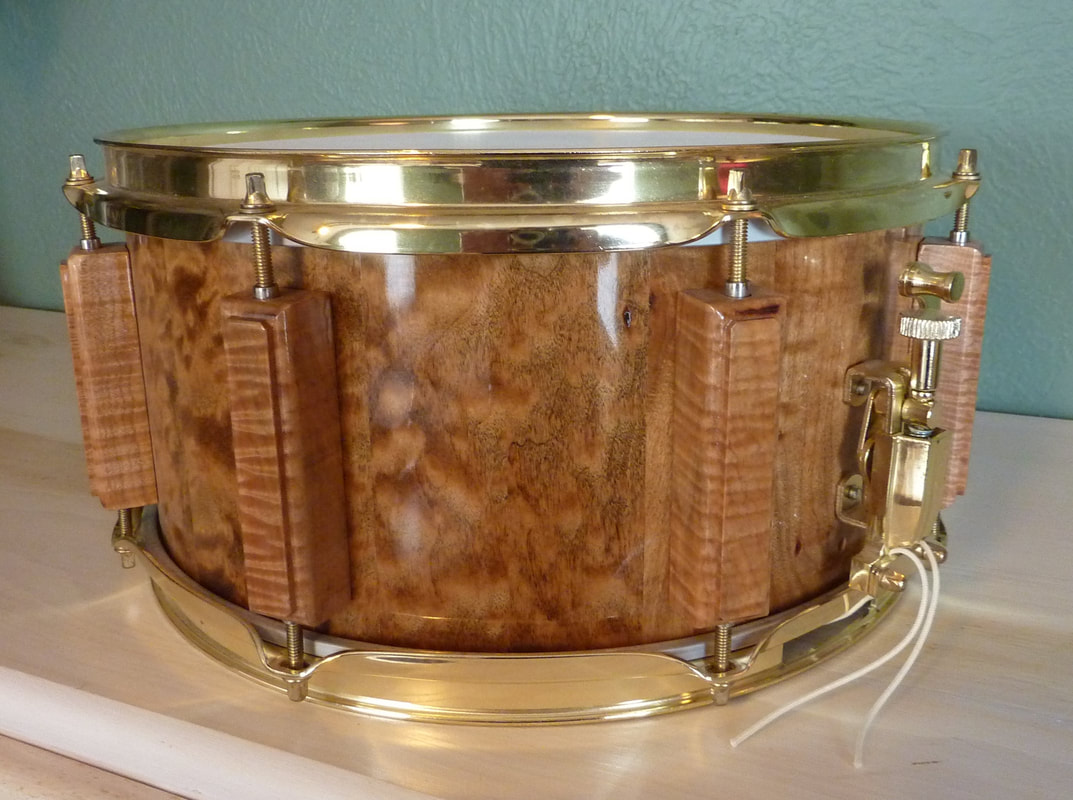
I made some wood lugs a long time ago. I stopped with two sets because they're too labor intensive. This drum combined 1" thick Quilted Maple staves with Fiddleback Maple lugs. The next pic shows the interior.
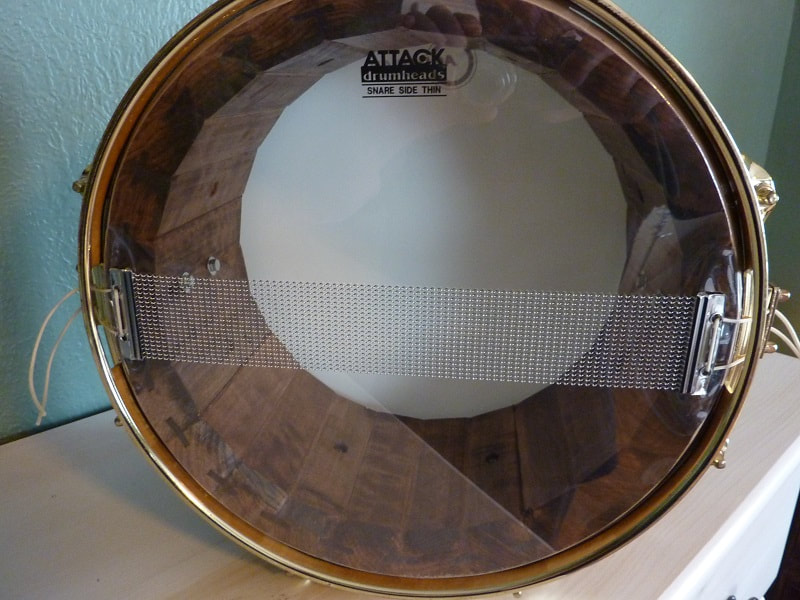
As you can see, flat staves on the inside. I rounded all my stave drums, carefully, using a belt sander. How about a drum with flat exterior staves? Yeah, quite doable, and to prove some points about the super-hype of shell design in the drum manufacturing industry, I used a material nobody uses...
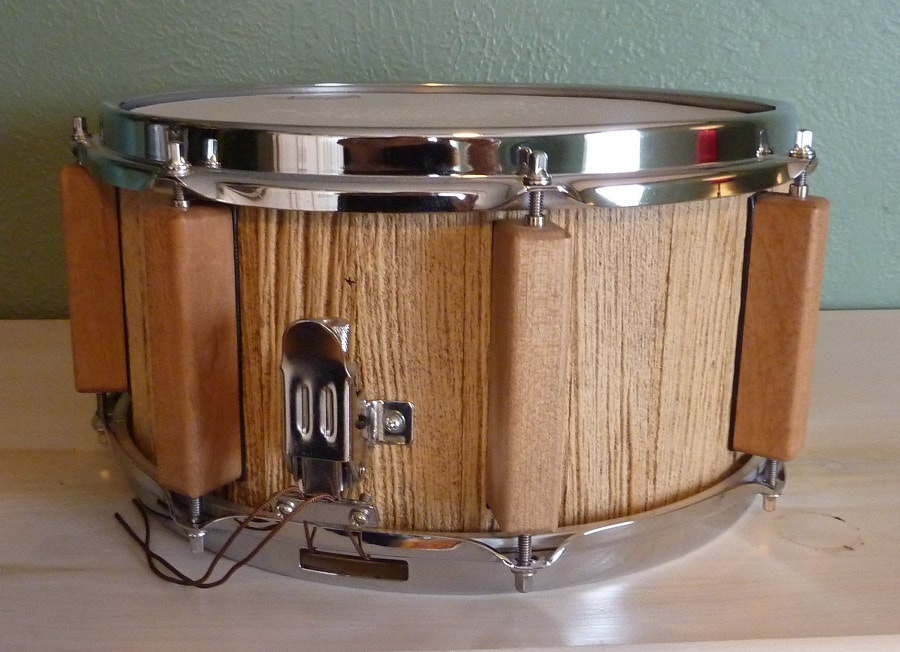
Yep. MDF hardboard exterior siding material. The staves are flat. Not even close to a perfect bearing edge, save for the very apex of the edge, and even that is all over the place, really because the router bit went in and out of every nook and cranny of the molded faux-wood form. Here's the interior:
I glued two pieces together to make a 7/8" shell wall. I made as sharp an edge as possible. Flat staves. The sound? No different than any other very dense wood snare drum. I used my other set of wood lugs for it. I almost bottomed out the hoops on them. Just look at the way light shines through the wavy form of the stave exteriors. The drum should sound awful, right. Nope. As long as a drum head can seat correctly, a drum, any drum will sound good.
One more, because it's another shot upside the head for industry hype. The Frankenstein drum.
One more, because it's another shot upside the head for industry hype. The Frankenstein drum.
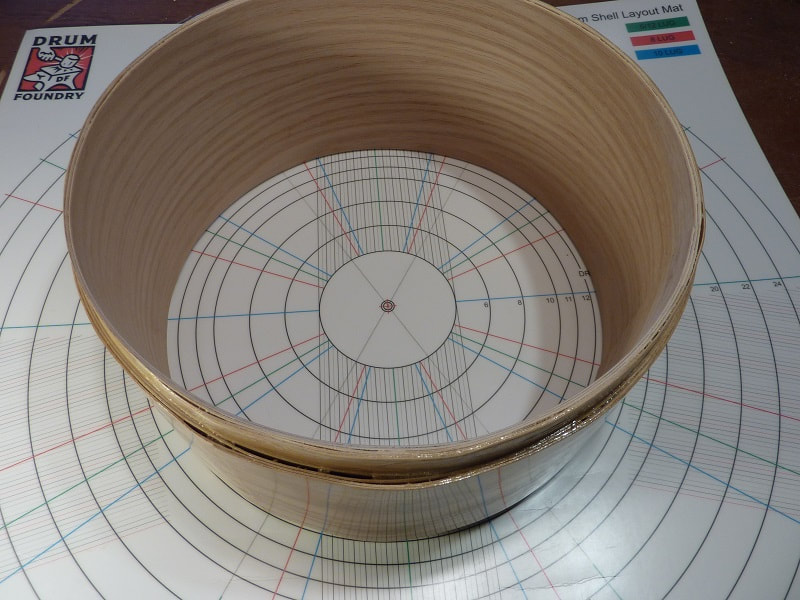
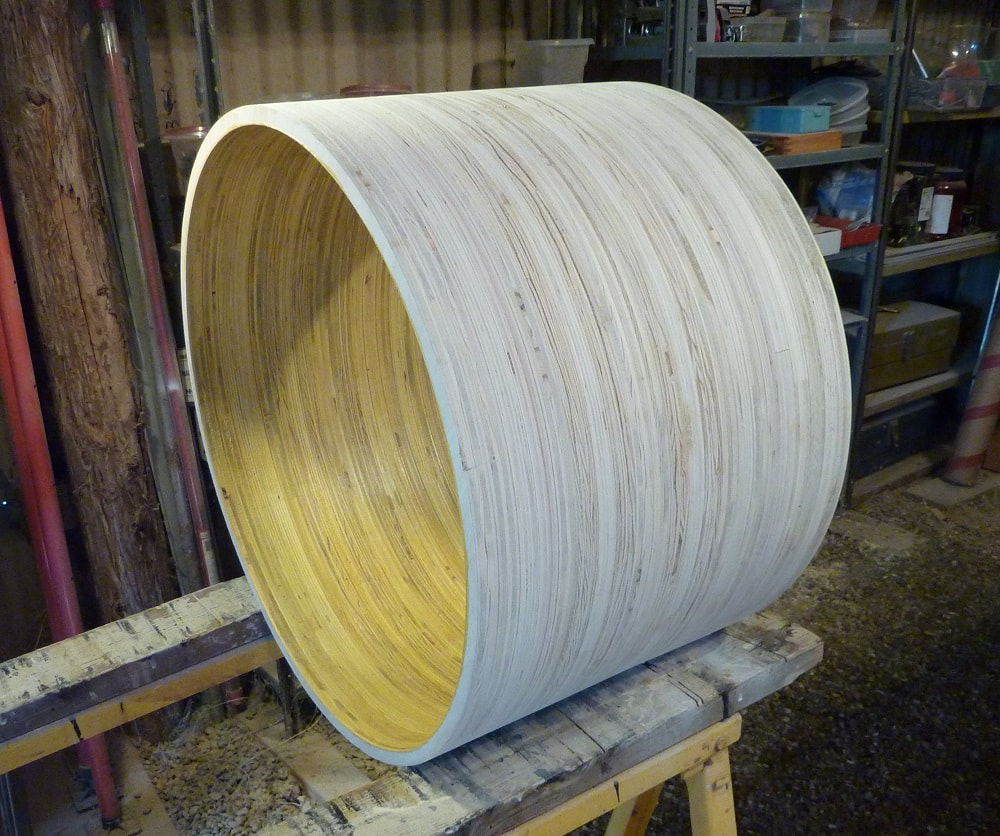
If you want to get into making drums, a layout mat makes things incredibly easy. Shown on the mat is a drum shell made from just rolling up glued pieces of veneer. I just took some Oakwood BFV (bubble free veneer), cut three pieces to the right width, glued them, rolled them, left them to dry and harden. Yeah, Frankenstein, right? Must sound like garbage. Nope. Don't believe me? Check out the video I made for the shell series on my YT channel:
https://www.youtube.com/watch?v=1t_FMTsNRMI
The shell's faults are so obvious anything so screwed up cannot possible sound okay. I hate to burst your bubble but, check out the video. I had to do some crazy things to get the heads to seat correctly but, they do, and in doing so, provides surfaces for the heads to do their thing.
A couple more pics of the drum.
|
|
Just some very old lugs I had, a typical inexpensive strainer, a few coats of poly. You can even see the shell got dented, in the interior picture. The drum had a 40 strand wire set which I took off for use on another drum. In the 16 video series, #13, I show these drums and how they compare with other snares I have made or bought.
Seriously, if I had the veneer, a vacuum press and properly made molds for rolling out the veneer, an entire drum set could be made and it would sound fine, as long as the heads seat correctly on a bearing edge. Even take away the press and just do the process I did for this drum. As Frankenstein as a drum would get shell-wise, that each drum would end up, an entire set would sound good. Drums are not rocket science. Anybody can make a set of drums from component parts if they can handle a drill. Bearing edges can be pre-done by most merchants selling parts. If you work with wood and own a router table or make one, bearing edges are easy to do. The PD Good site has a lot of information.
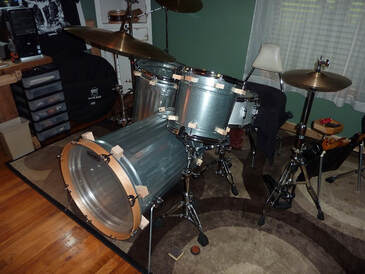
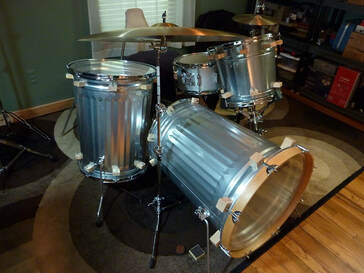
And then there are other cases to make the point, like my trash can set:
Seriously, if I had the veneer, a vacuum press and properly made molds for rolling out the veneer, an entire drum set could be made and it would sound fine, as long as the heads seat correctly on a bearing edge. Even take away the press and just do the process I did for this drum. As Frankenstein as a drum would get shell-wise, that each drum would end up, an entire set would sound good. Drums are not rocket science. Anybody can make a set of drums from component parts if they can handle a drill. Bearing edges can be pre-done by most merchants selling parts. If you work with wood and own a router table or make one, bearing edges are easy to do. The PD Good site has a lot of information.
And then there are other cases to make the point, like my trash can set:
|
|
Made a video of those, as well. Because of their lack of shell wall density and extremely long depths, obviously no special bearing edges to speak of, just some wood block lugs... I mean, they're trash cans!!!... the drums are kind of dry but, they sound like drums and if no one saw what they were, they'd not know the difference. Take a look at the comments and some viewers actually really like the sound of the drums, especially the bass drum.
https://www.youtube.com/watch?v=7g-Ve-ehyzo
They were kind of a pain to make but, I was pleased with what they were and how they sounded, all things considered. Yeah, I took them apart soon after I made the video. Back to trash cans.
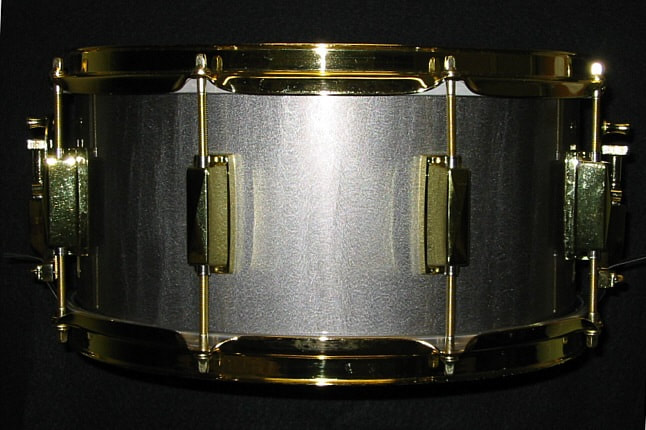
Speaking of thin metal, this is the only pic of one of the sheet metal snares I made back in the '90s. 6.5 x 13, 10 lugs. I loved that drum and should never have sold it. Could always make another but, just never have. 18 gauge metal, rolled by the shop, and welded, though some not even welded. I just closed the seam with tiny machine screws and nuts. Just the shell thickness for a bearing edge, rounded with a metal file. Never hurt the heads and sounded great. More, it just felt great to play. I sold the other sheet metal drums I made, as well. There is a metal shop not far away and maybe I'll have them form another shell for me someday. I have too many snare drums as it is.
https://www.youtube.com/watch?v=7g-Ve-ehyzo
They were kind of a pain to make but, I was pleased with what they were and how they sounded, all things considered. Yeah, I took them apart soon after I made the video. Back to trash cans.
Speaking of thin metal, this is the only pic of one of the sheet metal snares I made back in the '90s. 6.5 x 13, 10 lugs. I loved that drum and should never have sold it. Could always make another but, just never have. 18 gauge metal, rolled by the shop, and welded, though some not even welded. I just closed the seam with tiny machine screws and nuts. Just the shell thickness for a bearing edge, rounded with a metal file. Never hurt the heads and sounded great. More, it just felt great to play. I sold the other sheet metal drums I made, as well. There is a metal shop not far away and maybe I'll have them form another shell for me someday. I have too many snare drums as it is.
Ah. Found another pic of a similar drum but, with some brass hardware. Gave that drum to a friend.
Another DIY experiment... my tabletop drums, or pancake drums, as they can be called. Videos of those on my channel, as well. Here's the link for the playlist; from single heads to dble headed configurations.
https://www.youtube.com/watch?v=8fuRezKE4mU&list=PLRvd-mVMdjwLJTM9AN9ubGdWuMCUA-G87
Pictures of the evolution of those rigs on the "Pics" page. The idea was to see just how much sound a single head could make, attached to a 1.5" "shell", all set up on a sheet of 3/4" plywood. I played those rigs for quite some time, refining as I went along and still have ideas to venture into but, plywood has increased in price so much I refrain for now. Super easy to make though, and they sound great. You just have to be careful with layout spacing. It takes some time but, for a traveling gig set, smaller than the one shown below: perfect for weddings and small clubs. A 4 pc. could be set up on a snare stand and then the pancake kick drum. A 5 pc. kit you can carry with 2 hands.
Pictured is the last rendition I made. Deeper shells, covered with veneer. In fact, the 6" tom shell is just the rolled and glued veneer idea. Worked fine.
You can see height variation by using the taller shells for "rack" toms and placing them underneath the table for the "floor" toms.
Lug nuts are pressed right into the drilled holes in the plywood. Make the holes a tight fit, though.
Yeah, the bass drum is really quite loud and punchy. Feels a bit different, being just 5.5" deep.
The port is a bass tube used for stereo speakers. I decided to try and make my own "Kickport." Just the 4, 5, or 6" tube, affixed to the heads with some silicone. Done. In the case below, I cut the 6" depth back to 3." While I do notice a slight difference in low end frequency using them, it can easily be attributed to the weight of the tube and the silicone lessening the vibration of the head. A Kickport, even more so. Of course, the other aspect for using one is for mics.

It's a pretty heavy unit altogether. You can see I drilled holes for my hands to pick the thing up. And a hole for a drum key. I thought about making a hole for a cup holder or water bottle.
On thing I noticed is that the 10" tom, in the middle, never seems to have the same sustain as the other drums, size to size. I found out it's the added weight of the snare drum on the plywood. Removing the snare drum allowed the tom to open up more. Future prototypes will only have toms. I have one more experiment to try.
The single angle for all the drums takes a bit of getting used to but, actually gets easier to play, because of the consistency, than a typical set of drums. Once you get the flow down, it's actually quite easy to maneuver.
Obviously, as a full drum set it has its pros and cons where space and components come in. That's why the elongated hole is there for the hats. Pictured are 12 or 13" hats. If I used 15s I'd have an issue with trying to strike the 6" tom.
I would gladly take that rig out to a gig, though. Set-up time is negligible. There's no noticeable difference in volume, and mics and PS systems make that pretty moot anyway.
The stacked plywood-ring drums began as a 3 pc kit - 10, 15, 20. The simplicity with which the drums can be made just made it too easy to keep making drums and the set kept getting bigger. Today I have 20 drums and rings for another 5 or 6 shells out in the shop. The process began with a jig saw and tons of sanding, and then I got a plunge router and circle cutter and went to town. I use both construction and cabinet grade plywood. Construction grade, Southern Yellow Pine makes a slightly heavier shell. Cabinet plywood is mostly a Poplar core, and lighter. Sanding is the most difficult part. Butt end plywood is very hard. Because they are rustic looking, I never have tried to get a perfectly smooth surface. It isn't flat cut veneer and it just isn't feasible. Butt-end plywood is butt-end plywood. So many grains and textures to try and get smooth. I have my limits on how much sanding I'll do.
The concept is pretty simple. Cut, stack and glue your rings one at a time, using some kind of guides for keeping things vertically correct. I used to just use squares, then I made the guides I screw to the work table. Add some weight on top of your glued stacks. Twenty-four hours later, remove your shells and scrape off glue drips and stuff. Then the sanding. I used to use drill-mounted drum sanders then I got an inexpensive WEN spindle sander.
https://www.homedepot.com/p/WEN-3-5-Amp-1-2-HP-Oscillating-Spindle-Sander-6510T/307868273
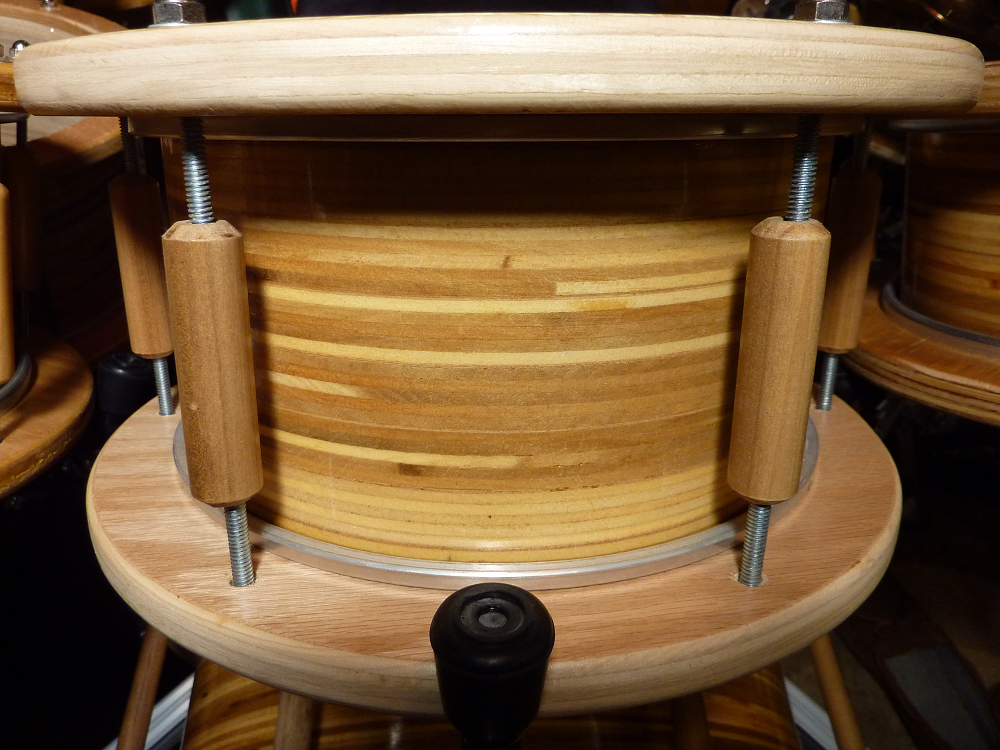
Wow, what a difference. I sand each ring before gluing up, then finish with pad sanders and hand sanding. Router your bearing edges, round over your hoop edges, add finishes. Take 1/4" threaded rods, carefully cut to size. Add an acorn nut, set with Loctite Red. Add a washer, run down through the holes into the Tee-nut, tighten, done. You could also use a threaded insert nut, to have an invisible look but, the Tee-nuts are easier and I don't see them, nor are they really visible from the audience side, and I don't perform for audiences anymore, anyway so, it's moot, for me.
I make the decorative dowels, which is tricky to drill pass-through holes. I rarely get them perfectly vertical. It would add some weight but, you can also take coupling nuts and tighten them down or two against each other with a lock washer in between, and that gives a "lug" look, or free-floating look. If you wanted to use traditional lugs and metal hoops, that's fine. I haven't done that simply because the drums sound great just as they are.
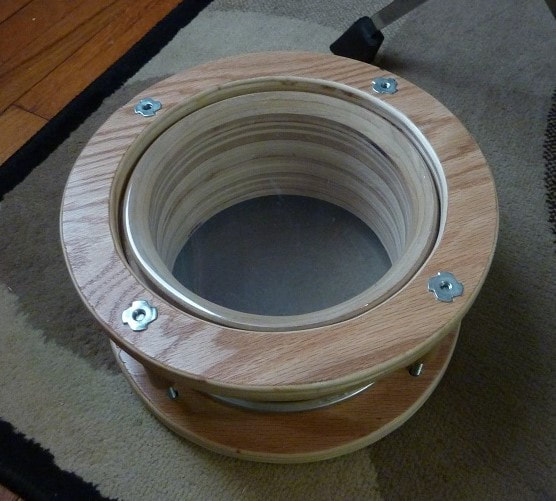
Or, make the extension ring that doubles as your rod receptor. Add and drill your layout holes for the tension rods first, before gluing. Drilling after assembly would be a real pita. You'll see an example of the extension ring, below.
Bass drums can be made the same way as toms but, with a slightly wider hoop for stress. I used a piece of typical bass drum hoop affixed to the plywood hoop with Gorilla glue. I never had a problem hitching a pedal up to it.
This last time I tried using traditional bass drum hoops and used the same system of rods and acorn nuts with claws and used a large sheet metal nut on the reso head end. The same dual tension applies and it has worked well on the 24" kick.
The nice thing is the ease of tension. No perfect lug alignment necessary. Just make sure to drill both hoops at the same time and mark two holes so you know what sits over what. Then all your rods will move easily to their destinations into the Tee nuts.
Typical tension rods and lug nuts are 12-24. I have not been able to find 12-24 threaded rod so, 1/4" gets the job. If you employed the extension ring just 2 or 3 layers down the shell, you could probably use 1/8" rod and nuts. I thought about doing that for the tube drums but, I had plenty of 1/4" parts to use so, stayed with that.
The drums sound as good as any plywood or solid-shelled drum out there. The cost, even with today's high plywood prices, is so minimal compared to typical drum sets, I would never make another Keller-shelled kit again. If you don't like the look of the plywood layers, you can always cover them with traditional wrap or wood veneers. You just have to take the extra time to really do the fine sanding necessary for a smooth surface underneath for gluing. Oakwood BFV is more forgiving for imperfections on your substrate. Vinyl, as well, and if you have voids, which you will because plywood manufacture is not something anyone cares about small voids between layers, especially in construction plywood so, you will be filling holes, and sanding, and applying a covering of some kind will be fine.
Bearing edges should be done slowly. I have found some plywood manufacturers don't use glues that can withstand 25000 rpm and material can tear away when you get close to the apex of your edge.
When asked about shell wall thickness, I just stick with 1/2 - 5/8." In the picture below you'll see some thinner rings. Those are 14" rings and it's just what the router left me, as I went down the line of concentric cutting. I'll make a snare drum out of those and see what 3/8" does when glued up. Should be okay but, the bearing edge might not make it. We'll see. I'll have to go in very small increments and might just do a double round over, 'baseball bat' edge.
The process in pictures :
On thing I noticed is that the 10" tom, in the middle, never seems to have the same sustain as the other drums, size to size. I found out it's the added weight of the snare drum on the plywood. Removing the snare drum allowed the tom to open up more. Future prototypes will only have toms. I have one more experiment to try.
The single angle for all the drums takes a bit of getting used to but, actually gets easier to play, because of the consistency, than a typical set of drums. Once you get the flow down, it's actually quite easy to maneuver.
Obviously, as a full drum set it has its pros and cons where space and components come in. That's why the elongated hole is there for the hats. Pictured are 12 or 13" hats. If I used 15s I'd have an issue with trying to strike the 6" tom.
I would gladly take that rig out to a gig, though. Set-up time is negligible. There's no noticeable difference in volume, and mics and PS systems make that pretty moot anyway.
The stacked plywood-ring drums began as a 3 pc kit - 10, 15, 20. The simplicity with which the drums can be made just made it too easy to keep making drums and the set kept getting bigger. Today I have 20 drums and rings for another 5 or 6 shells out in the shop. The process began with a jig saw and tons of sanding, and then I got a plunge router and circle cutter and went to town. I use both construction and cabinet grade plywood. Construction grade, Southern Yellow Pine makes a slightly heavier shell. Cabinet plywood is mostly a Poplar core, and lighter. Sanding is the most difficult part. Butt end plywood is very hard. Because they are rustic looking, I never have tried to get a perfectly smooth surface. It isn't flat cut veneer and it just isn't feasible. Butt-end plywood is butt-end plywood. So many grains and textures to try and get smooth. I have my limits on how much sanding I'll do.
The concept is pretty simple. Cut, stack and glue your rings one at a time, using some kind of guides for keeping things vertically correct. I used to just use squares, then I made the guides I screw to the work table. Add some weight on top of your glued stacks. Twenty-four hours later, remove your shells and scrape off glue drips and stuff. Then the sanding. I used to use drill-mounted drum sanders then I got an inexpensive WEN spindle sander.
https://www.homedepot.com/p/WEN-3-5-Amp-1-2-HP-Oscillating-Spindle-Sander-6510T/307868273
Wow, what a difference. I sand each ring before gluing up, then finish with pad sanders and hand sanding. Router your bearing edges, round over your hoop edges, add finishes. Take 1/4" threaded rods, carefully cut to size. Add an acorn nut, set with Loctite Red. Add a washer, run down through the holes into the Tee-nut, tighten, done. You could also use a threaded insert nut, to have an invisible look but, the Tee-nuts are easier and I don't see them, nor are they really visible from the audience side, and I don't perform for audiences anymore, anyway so, it's moot, for me.
I make the decorative dowels, which is tricky to drill pass-through holes. I rarely get them perfectly vertical. It would add some weight but, you can also take coupling nuts and tighten them down or two against each other with a lock washer in between, and that gives a "lug" look, or free-floating look. If you wanted to use traditional lugs and metal hoops, that's fine. I haven't done that simply because the drums sound great just as they are.
Or, make the extension ring that doubles as your rod receptor. Add and drill your layout holes for the tension rods first, before gluing. Drilling after assembly would be a real pita. You'll see an example of the extension ring, below.
Bass drums can be made the same way as toms but, with a slightly wider hoop for stress. I used a piece of typical bass drum hoop affixed to the plywood hoop with Gorilla glue. I never had a problem hitching a pedal up to it.
This last time I tried using traditional bass drum hoops and used the same system of rods and acorn nuts with claws and used a large sheet metal nut on the reso head end. The same dual tension applies and it has worked well on the 24" kick.
The nice thing is the ease of tension. No perfect lug alignment necessary. Just make sure to drill both hoops at the same time and mark two holes so you know what sits over what. Then all your rods will move easily to their destinations into the Tee nuts.
Typical tension rods and lug nuts are 12-24. I have not been able to find 12-24 threaded rod so, 1/4" gets the job. If you employed the extension ring just 2 or 3 layers down the shell, you could probably use 1/8" rod and nuts. I thought about doing that for the tube drums but, I had plenty of 1/4" parts to use so, stayed with that.
The drums sound as good as any plywood or solid-shelled drum out there. The cost, even with today's high plywood prices, is so minimal compared to typical drum sets, I would never make another Keller-shelled kit again. If you don't like the look of the plywood layers, you can always cover them with traditional wrap or wood veneers. You just have to take the extra time to really do the fine sanding necessary for a smooth surface underneath for gluing. Oakwood BFV is more forgiving for imperfections on your substrate. Vinyl, as well, and if you have voids, which you will because plywood manufacture is not something anyone cares about small voids between layers, especially in construction plywood so, you will be filling holes, and sanding, and applying a covering of some kind will be fine.
Bearing edges should be done slowly. I have found some plywood manufacturers don't use glues that can withstand 25000 rpm and material can tear away when you get close to the apex of your edge.
When asked about shell wall thickness, I just stick with 1/2 - 5/8." In the picture below you'll see some thinner rings. Those are 14" rings and it's just what the router left me, as I went down the line of concentric cutting. I'll make a snare drum out of those and see what 3/8" does when glued up. Should be okay but, the bearing edge might not make it. We'll see. I'll have to go in very small increments and might just do a double round over, 'baseball bat' edge.
The process in pictures :
|
|
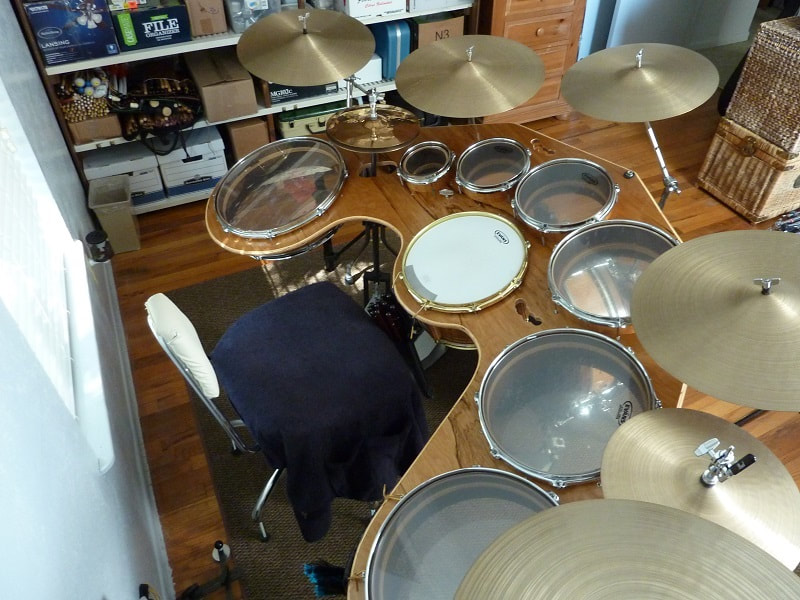
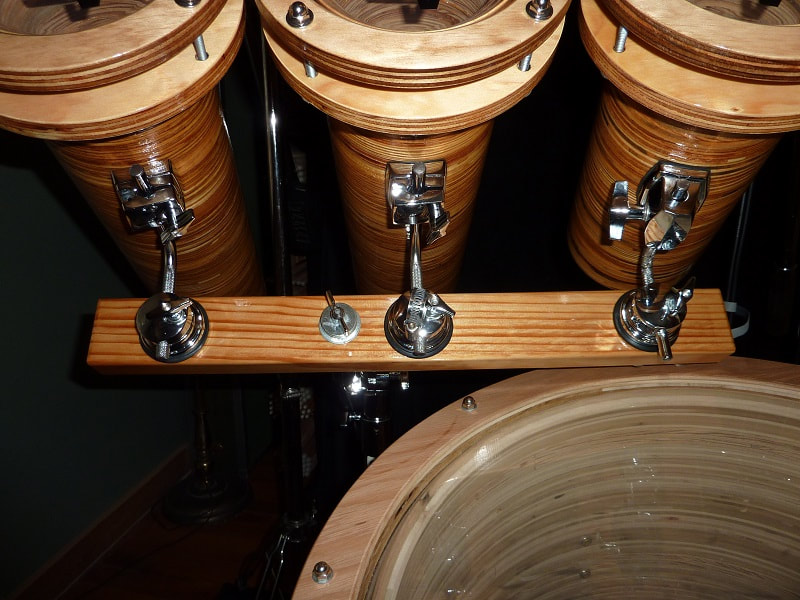
That's the current set-up and yes, I just added three new drums: tubes - 6x12, 18, 24. Also added a 16x24 bass drum and an 8.5x13 snare, which feels really nice. The tube drums are different. One of the rings also acts as a catch for the tension rods, kind of like the discontinued Peavey Radial bridge drums. The mounts go back to the simplicity of my 1970s drums: tom brackets and bent rods. In this case bent and cut off floor tom legs. They sound just like any 6" tube drum out there. It's a lot of weight on one cymbal tilter so, I offset the mounting hole for the extra weight and it seems to balance okay, so far.
|
|
I took the 20" kick and turned it into a floor tom on legs and made my own wooden brackets and steel legs for the drums. They work really well. Just as secure as metal ones. The drum explodes.
And a pic of the two snare drums, which tension the same as the toms; both heads at once. The 5.5 has a Walnut hoop protector and the 8.5 has a Maple protector, which I also made for 4 lug points instead of 3, which keeps it in place better. Rim shots pack a lot of force. The thing moved just enough to change the hole spacing to get my wrench nut in it for tuning. Four holes makes for a better resistance to slight movements from constant impact.
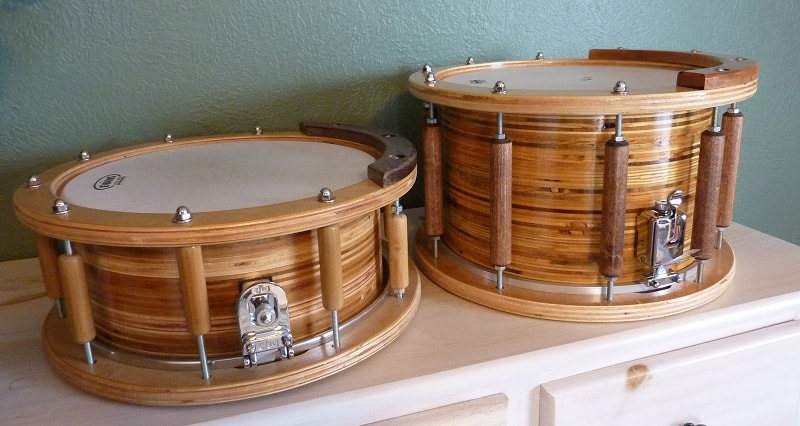
My intention was to use brass hardware on the 8.5 but, couldn't find brass strainers in the model shown. If I find some, I'll switch to brass for the rest. You'll also notice, even though the decorative dowels are friction fit, playing the drum moves them all over the place, up and down. On the 8.5, I tightened them in place with nuts. I actually did it on two dowels on the 5.5 but, as you can see, they loosened up. Not tight enough. It's a lot of impact force and the hoops would get destroyed if I didn't use hardwood protectors.
All the plywood ring drums tension so easily, it's unbelievable. The snare drums... I wasn't sure about them tuning up that way but, for me, liking my heads on the tight side, it works great.
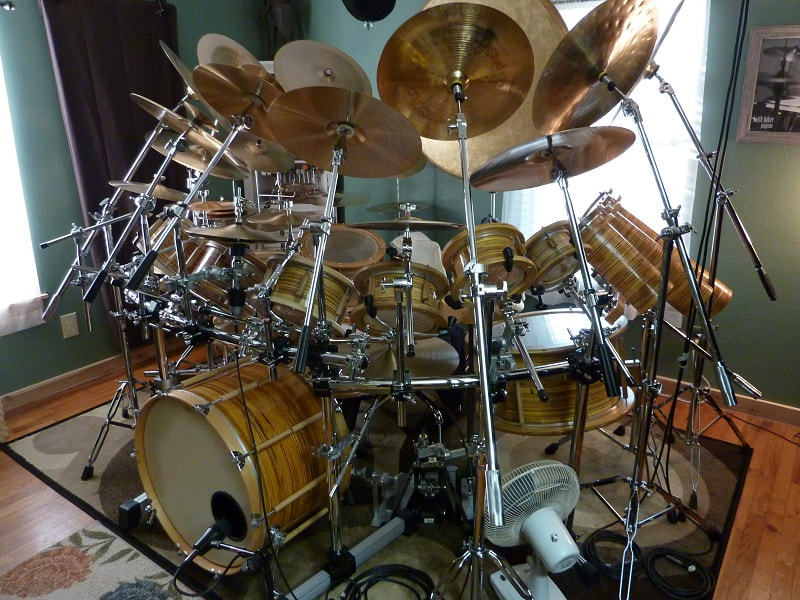
I change things up on this set every few months, it seems, moving things to different positions. If I had a bigger space for them, I'd have all the drums set up somehow.
I had this set-up, below, for recording the 2nd, Concepts for Solo Drum Set CD, already pictured above, back a ways. Here's another angle.
I love the whole rig but, it leaves so little room to move around the set it drives me crazy. My big feet are always catching something.
All the plywood ring drums tension so easily, it's unbelievable. The snare drums... I wasn't sure about them tuning up that way but, for me, liking my heads on the tight side, it works great.
I change things up on this set every few months, it seems, moving things to different positions. If I had a bigger space for them, I'd have all the drums set up somehow.
I had this set-up, below, for recording the 2nd, Concepts for Solo Drum Set CD, already pictured above, back a ways. Here's another angle.
I love the whole rig but, it leaves so little room to move around the set it drives me crazy. My big feet are always catching something.
The drums are on the tough side to finish because butt end plywood soaks up a lot of liquid. I've experimented with both oil and water-based finishes so, the drums have some different looks to them, depending. You can put sanding sealer on them and it will soak through to the inside of the shell!
Aside from using traditional vinyl wraps, wallpapers, domestic and exotic wood veneers, and tooled leather for finishes, I got into using dyes, as well. Man, that is fun.
Aside from using traditional vinyl wraps, wallpapers, domestic and exotic wood veneers, and tooled leather for finishes, I got into using dyes, as well. Man, that is fun.
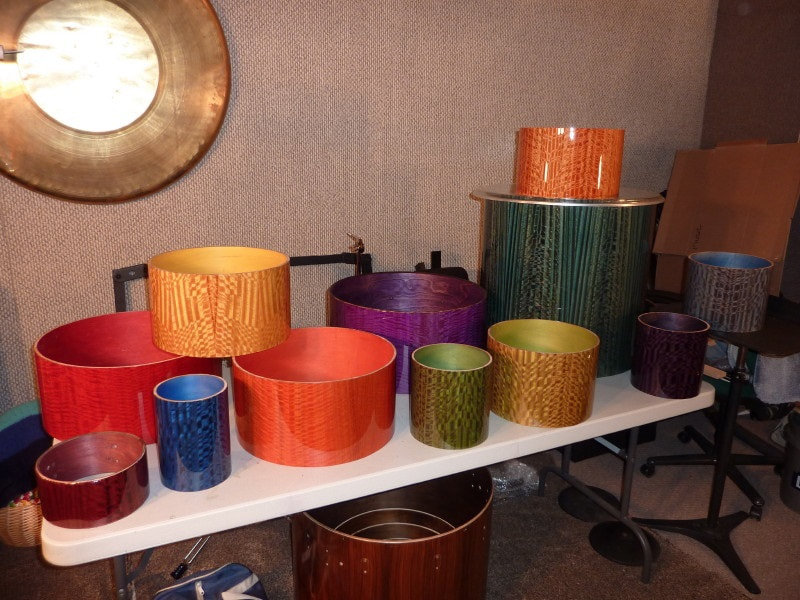
I love color and decided to make a set in rainbow hues. The rainbow is God's promise. The LGBT movement pretty much hijacked it and that's what people think of when they see rainbow stuff today but, it goes back to ancient times for use as a symbol of God's care.
The above shells were a concept kit, one I have done in the past, where all the tom shells are the same depth, in this case, 8" deep. I had done a 10" deep set back in the later '90s, and even the kick, a 10 x 26, joined the farm. Below the table are shells from a set with Walnut veneer on them. On the table are shells with figured Eucalyptus veneer.
If you go to the Oakwood veneer site; for woodworkers, it is mouth watering. They have climbed in price quite a bit from when I began veneering shells so, that's prohibitive but, traditional vinyl wraps cost a great deal these days, as well.
|

|

The camera really didn't pick up the depth of differences between all the colors.
The bass drum was a 20x22. Too much of an air column and the drum felt sluggish to play, for me. I like more shallow bass drums, the same as shallow toms. I cut it down to an 11x22 when I went back to a half-depth set: all drums half the depth of the diameter. Same for the 12x24.
I generally stain or dye the inside of shells, as well. The process of veneering is pretty simple, really. Cut the veneer to size (Oakwood sells in 4x8, 10 and 12' sheets); scissors work fine. Allowing for a little wider, in case of slightly off-plumb placement, and leave extra on the end for your seam. Use contact cement, heavy duty spray glue, or I've even used two-sided tape but, the industrial strength kind, not typical carpet tape. "Fastcap" sells a heavy duty tape I have used.
https://www.fastcap.com/product/speedtape?cat=2
I used it to renovate Tom's beginner drum set, which got recorded on our Miledge Muzic CDs. That's a Mahogany veneer on them with a Satin finish. New lugs, new bearing edges, heads, a couple isolation mounts, and the set felt and sounded good for what it is. I recorded 5 CDs with that set, also adding in the Roto toms on CD #3 and beyond. We still have a bunch of sessions to release. Someday.
I generally use high gloss Tung oil for finishing. Polyurethane, as well. I hand apply with brushes or sponge brushes. On the Rainbow drums? I used lacquer. IIRC, around 12 coats or more. The drums did not cure correctly and every drum developed hairline cracks. I didn't even notice until I had my reading glasses on one day. !!!!!!
I could have left them that way. Gave them an antique look but, I had grown tired of liquid finishes and decided to try something different. Plus, honestly, the Eucalyptus had too much of a snake skin look for my tastes.
They ended up meeting a heat gun for veneer removal and then I covered them with the tooled leather and that set has been that way for almost 20 years now. With Maple hoops I think it looks really cool. The long bridge lugs got replaced with the Legend lugs, which are my favorite. Long since gone from the market, though.
Hardware. Like I said, I live in hardware stores. :-)
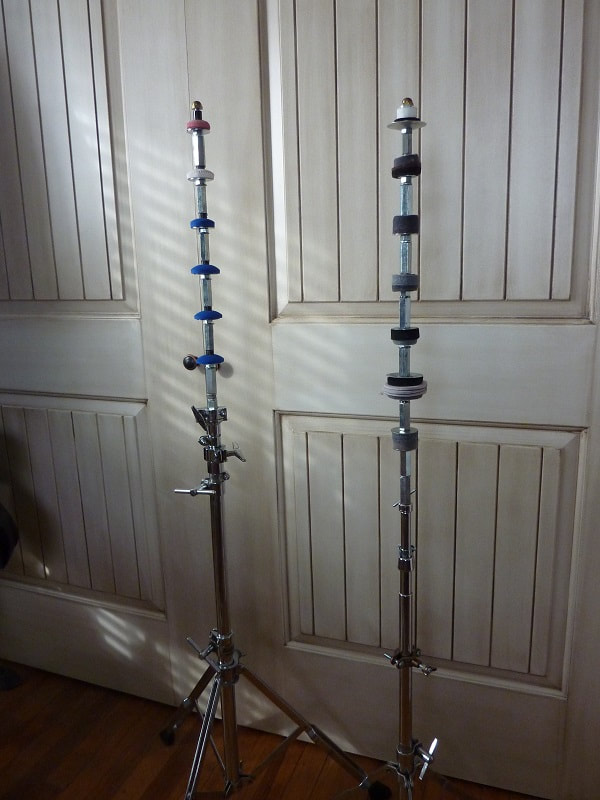
One of the most useful things for DIY is making splash mounts from steel rod. I use 5/16 " rods, plated if stores have it. If not, I generally shine them up by spinning them in a drill and wiping down with fine steel wool but, not always and they can get tarnished over time. Spraying some protective coating on them is easy, though, after I'm done. That involves length cutting, bending, and threading the ends. Attaching to clamps, which are grounding wire clamps, makes placement universal around a kit. I have a whole tub of these things.
One of the most useful things for DIY is making splash mounts from steel rod. I use 5/16 " rods, plated if stores have it. If not, I generally shine them up by spinning them in a drill and wiping down with fine steel wool but, not always and they can get tarnished over time. Spraying some protective coating on them is easy, though, after I'm done. That involves length cutting, bending, and threading the ends. Attaching to clamps, which are grounding wire clamps, makes placement universal around a kit. I have a whole tub of these things.
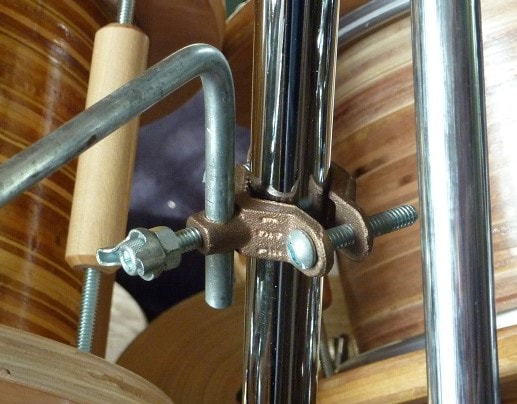
So, you have your shaped rod, which bends fairly easily using a rubber mallet and a vise. It's threaded (tap and die sets are pretty inexpensive these days), and you take a nut and drop it to the end of the threads, add a washer, cymbal "felt," vinyl tubing and a wing nut - good to go. Most clamps come with regular tightening screws but, I either make my own wing screws or buy some, if I can get ahold of real wing screws at a hardware store. Or, I buy stuff off ebay. They just allow for greater torque and ease of handling. You'll also have to enlarge the holes slightly to 5/16." I've never tried using 1/4" rods. For the really small splashes I suppose it would work okay. I've just always used 5/16" and can put up to 16" cymbals on them and small hi-hat pairings.
Modifying hardware is a drummers day job. We learn to mix and match, adapt, modify stuff. Everybody has their "hacks."
When the hardware revolution hit, and clamps and racks and universal tilting adjustments came along, and all the rest, there's a piece of hardware for every need and purpose today. In many cases, "beginner" hardware now, is just as good as what pros used in the early to mid-20th century.
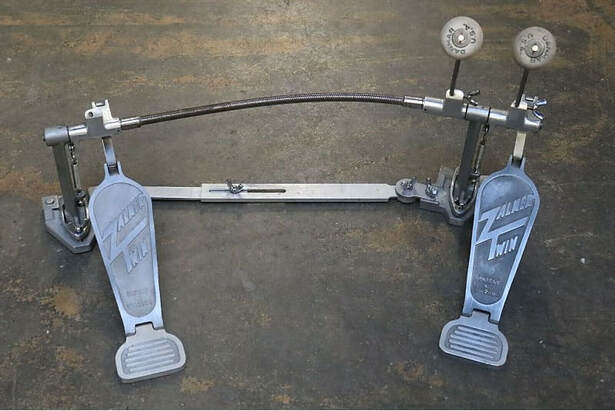
One thing I really got into was pedals. I began playing a Ludwig Speed King for all my young years. I bought a Zalmer Twin dble bass pedal in the '70s. Cool idea but, very stiff action. Should have hung on to it, though. If you can find one they're quite a collector's item.
Modifying hardware is a drummers day job. We learn to mix and match, adapt, modify stuff. Everybody has their "hacks."
When the hardware revolution hit, and clamps and racks and universal tilting adjustments came along, and all the rest, there's a piece of hardware for every need and purpose today. In many cases, "beginner" hardware now, is just as good as what pros used in the early to mid-20th century.
One thing I really got into was pedals. I began playing a Ludwig Speed King for all my young years. I bought a Zalmer Twin dble bass pedal in the '70s. Cool idea but, very stiff action. Should have hung on to it, though. If you can find one they're quite a collector's item.
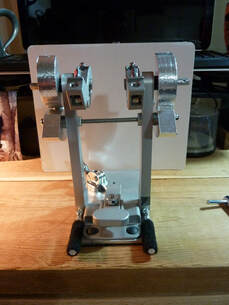
Then came the 90s and DW, Pearl, Tama, Yamaha pedals and others. Then came 2009 and my discovery of the OFF-SET pedal, invented by Charles Fisher.
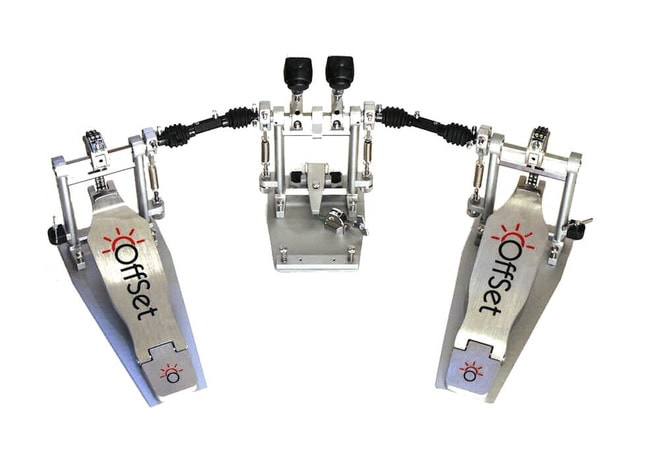
The bi-lateral design is so comfortable to play it changed everything for me. But, expansion spring pedals have always felt like I am wrestling with the pedal. I grew up on compression springs, with the Speed King. I began a search, which developed into my most viewed video on YT: my pedal test shootout.
https://www.youtube.com/watch?v=sNdjUV9D4rU
I chose the Drumnetics. Magnet actuation? Nothing like it. I own single and dble pedals now but, the bi-lateral design... I have to have it. My hips, knees and ankles feel so much less strain. DIY? Magnetize all the pedals I own, including some I bought to mess around with, and turn them all into bi-lateral designs. Drumnetics, OFFSET, Ddrum, and a modified Griffin stayed. Everything else got sold.
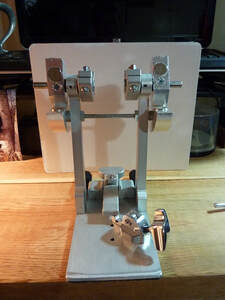
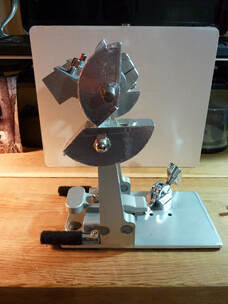
I experimented with magnets, cartridges, placements, hoop clamping, beater holders, race bearings, drive shafts, etc., etc., for around 6 months.
With Drumnetics I took some parts from other pedals not being used, bought other parts and made a center section. It worked well for quite awhile but, began to get a little wobbly in its action and make some noise.
https://www.youtube.com/watch?v=sNdjUV9D4rU
I chose the Drumnetics. Magnet actuation? Nothing like it. I own single and dble pedals now but, the bi-lateral design... I have to have it. My hips, knees and ankles feel so much less strain. DIY? Magnetize all the pedals I own, including some I bought to mess around with, and turn them all into bi-lateral designs. Drumnetics, OFFSET, Ddrum, and a modified Griffin stayed. Everything else got sold.
I experimented with magnets, cartridges, placements, hoop clamping, beater holders, race bearings, drive shafts, etc., etc., for around 6 months.
With Drumnetics I took some parts from other pedals not being used, bought other parts and made a center section. It worked well for quite awhile but, began to get a little wobbly in its action and make some noise.
|
|
|
The magnet force is pushing the upper cartridges way open. With beaters in place the weight brings them back to a close proximity. I also covered the wood cartridges with aluminum tape. Just an experiment. I wouldn't do it again. Not quite neat enough for me.
To experiment more, I got three Griffin single pedals. I was so shocked at the quality of the pedal, and its action, for the astounding price, I did a review of it on my YT channel but, I set out to totally renovate them and here's what I finished with, including experimenting with extra large wooden footboards (Walnut), and my own wooden beaters (in this case Padauk).
To experiment more, I got three Griffin single pedals. I was so shocked at the quality of the pedal, and its action, for the astounding price, I did a review of it on my YT channel but, I set out to totally renovate them and here's what I finished with, including experimenting with extra large wooden footboards (Walnut), and my own wooden beaters (in this case Padauk).
I LOVE THAT PEDAL BUT!!!, the heel hinges I used make noise. They're ball bearing door hinges. Needs more work.
I even made a totally wooden pedal, save for necessary metal parts.
I even made a totally wooden pedal, save for necessary metal parts.
All Walnut. Incredibly so, it plays well but, it's massive. Big footprint. I changed the drive shafts to decrease that but, it still takes up a lot of floor space. I mean, hey, for an experiment? It's really a DIY masterpiece, if I do say so, myself.
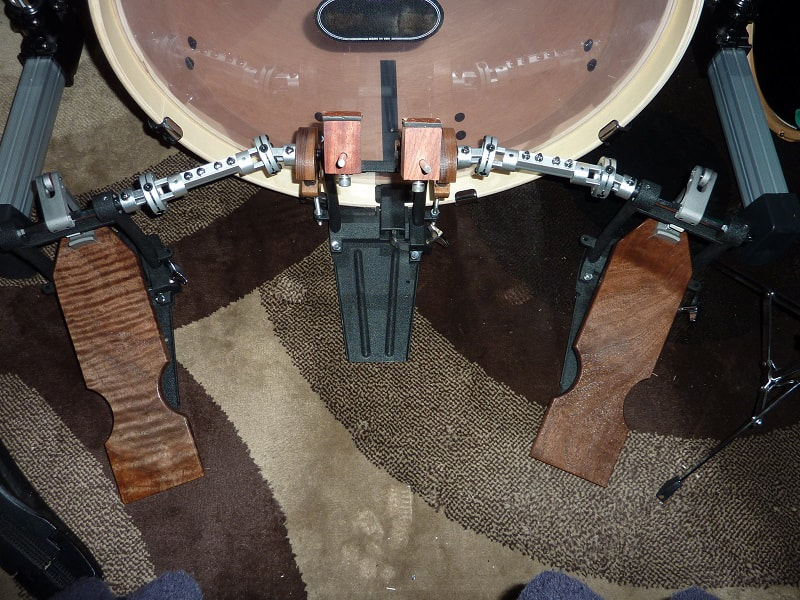
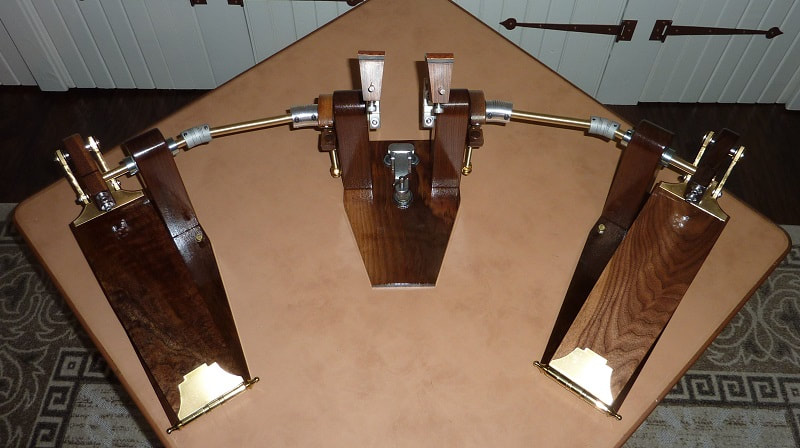
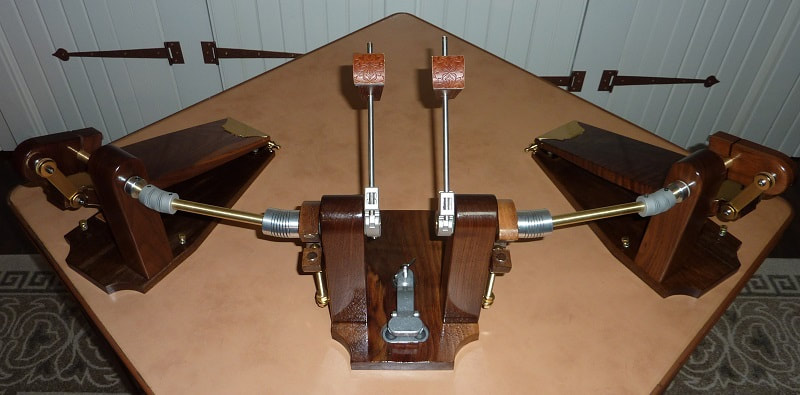
What I ultimately ended up using was a couple Drumnetics longboards, an OFFSET center section, and modified driveshafts I like the best from what I've tried out so far.
What I ultimately ended up using was a couple Drumnetics longboards, an OFFSET center section, and modified driveshafts I like the best from what I've tried out so far.
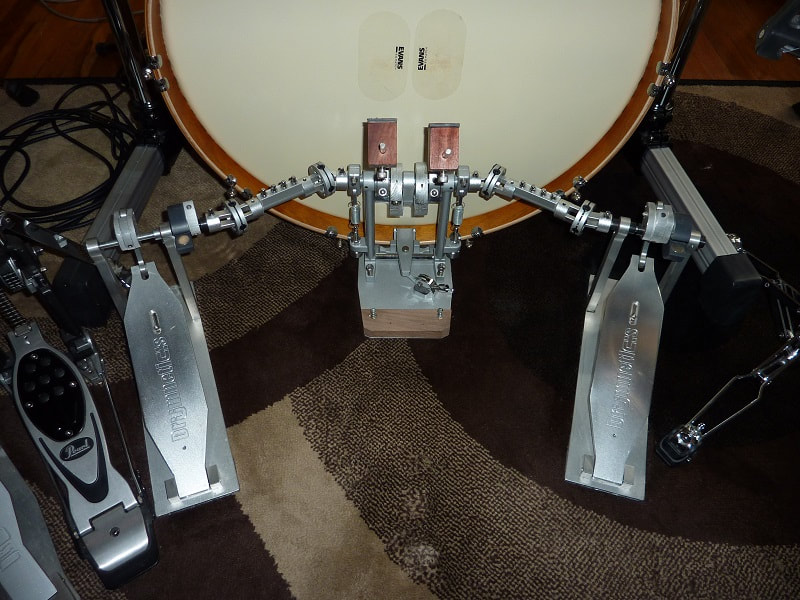
There are small modifications all over the unit. Suffice to say the two most obvious are the wooden block on the center section, and the Padauk betters.
The block is something that became necessary during recording. Generally, a master pedal is hooked up to the drum. The constant forward force of the beaters wants to push the pedal away from the drum but, a player's foot is there as an antagonistic force. With just a center section, the beaters pummeling away, in this case, the OFFSET hoop clamp design does not apply enough force to hold the unit in place and it came away several times while recording, ruining takes. The section comes with spikes but, they just go straight down. There's no resistance. So, I made the block, put threaded inserts in it, and ran some screws towards me, at an angle that creates resistance. Now the unit stays put. The tongue on the clamp is another issue but, not one I care to delve into. I did contact the new owner of the company and offered some observations and suggestions. He liked them and replied he was working with his manufacturer to make the changes for the newest run. I don't know if that has been done yet.
The pedal employs baseplate/footboard magnets, axle magnets, and magnets on the center section, as well. Marvelous feel, overall.
You'll notice springs on the center section. I placed some very light, hardware store springs just to see what that slight extra expansion force would do, and it's hardly noticeable but, I can feel it when removed so, I left them on.
One of the things that became an obvious point of observation was driveshafts. I messed around with plenty. Here's some that are modified or created from parts. The OFFSET shafts are the black ones with the U-joint boots. The chrome U-joints are modified Ahead shafts. The really "involved" ones, top left, came from a supplier in China, via ebay. He gave me a good deal. It's reminiscent of the Pearl shafts. Others use Helical couplers, an idea that developed from shafts Mike Van Dyk sold with his early Drumnetics double pedals. They are very cool. He doesn't use them anymore but, I experimented with several sizes and tensions.
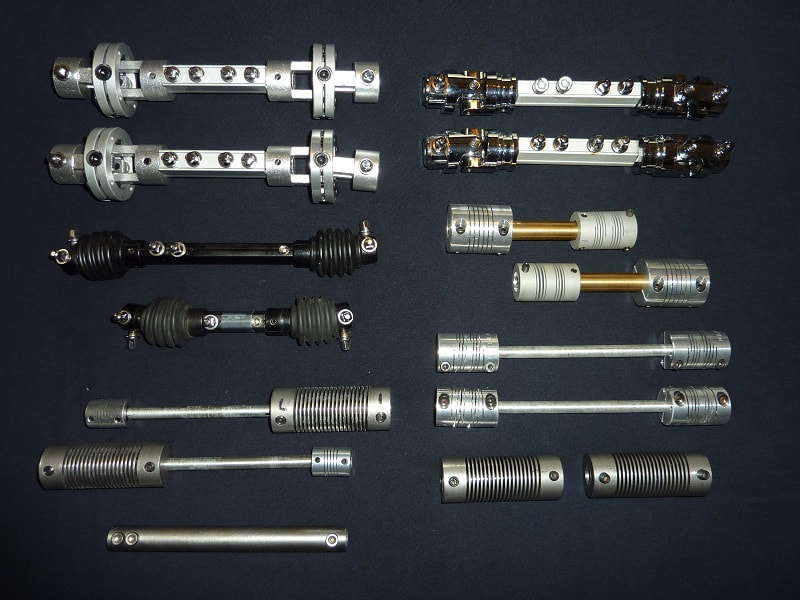
In all the work and experimenting on pedals, beaters became a logical expansion of that research and I began making my own beaters. I have modified Yamaha and Tama beaters for almost three decades. Nothing new there. Just remove the felt pads and replace with whatever: for me, normally wood of some shape. I've used dowel pieces, drawer knobs and other woodcraft pieces. I can control their length so the action of the arc is totally customizable. I like my beater to strike the head with the shaft at 90 degrees. Any more than that is extra energy and unnecessary movement. Some players like that extra distance to the head. Attaching my own or making my own beater heads can guarantee I strike the head at 90 degrees every time. For striking surface and lack of rotation I just round the head face slightly so it's always a full, solid strike.
In making new beaters I went with blocks of various hardwoods I had around, as well as composite materials, and even solid aluminum. Everything slides up and down the stainless shafts and cap screws hold them in place on the shafts. Here's my collection, sans all my felt beaters that sit in their own box. Large super hard felt can provide quite a wallop but, they never come with angle adjustments. Just chunks of felt attached to beaters that do rotate but, they lack weight for thrust. I bury my beater a lot and plastic tends to buzz and multi-strike. I use wood and patches of leather on them to dissuade the buzzing. I also use a layer of self-stick felt, which works, too.
In making new beaters I went with blocks of various hardwoods I had around, as well as composite materials, and even solid aluminum. Everything slides up and down the stainless shafts and cap screws hold them in place on the shafts. Here's my collection, sans all my felt beaters that sit in their own box. Large super hard felt can provide quite a wallop but, they never come with angle adjustments. Just chunks of felt attached to beaters that do rotate but, they lack weight for thrust. I bury my beater a lot and plastic tends to buzz and multi-strike. I use wood and patches of leather on them to dissuade the buzzing. I also use a layer of self-stick felt, which works, too.
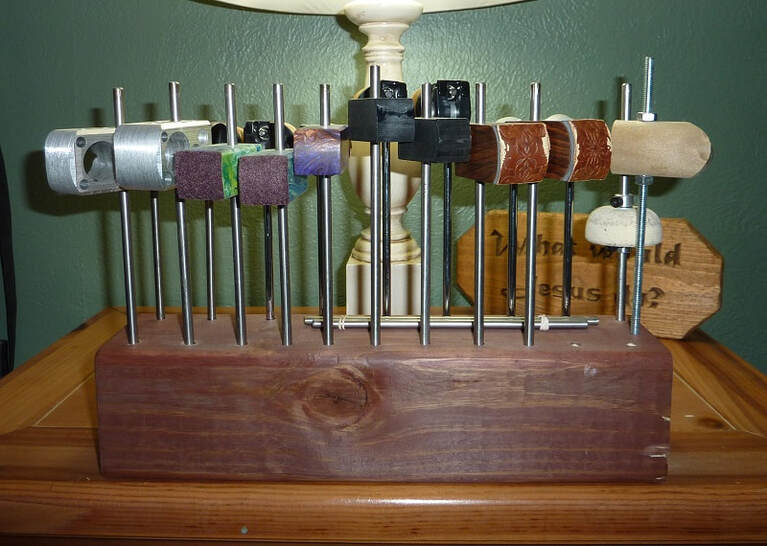

One thing I have found in most beaters is a lack of weight. Some manufacturers now offer weights to be inserted into the beater in some way, which is great design. Most manufactured beaters weigh in at around 80-95 grams. Ones I have modified with more beater length are in that range. Ones I make start at 110 and go up to about 170.
I don't stomp. I dance, and don't use a lot of force so, I like the extra weight to create the impact. The aluminum beaters are the heaviest and you can see all the holes in them to reduce the weight. Still too heavy for me, for what I play. If I was playing LZ-type stuff and a 26" kick, I'd go to those. Otherwise I'm usually between 110 and 120.
I don't stomp. I dance, and don't use a lot of force so, I like the extra weight to create the impact. The aluminum beaters are the heaviest and you can see all the holes in them to reduce the weight. Still too heavy for me, for what I play. If I was playing LZ-type stuff and a 26" kick, I'd go to those. Otherwise I'm usually between 110 and 120.
I guess I'm down to miscellaneous stuff: little things that can make a difference. Two things off the top of my head? Hose clamps. A lot of stands and hardware comes with memory locks these days. They are generally a piece of metal with enough tinsel strength to be tightened but, not break. The thing is, so many of these clamps are designed by leaving a small space in them, which allow tightening. Once they are tightened, that space has been closed and does not want to spring back when the clamp is loosened. Pearl has been the worst offender with that and I have scratched the chrome on almost all my Pearl hardware fussing with their clamps.
DIY remedy? Hose clamps. Been using them for decades, too. Very easy to use, with all kinds of sizes, something for every rod and pipe in a drum set. The screw head/tightening mechanism can be placed in memory positions for easy recall. Inexpensive and they work forever.
DIY remedy? Hose clamps. Been using them for decades, too. Very easy to use, with all kinds of sizes, something for every rod and pipe in a drum set. The screw head/tightening mechanism can be placed in memory positions for easy recall. Inexpensive and they work forever.
Here's my current gong stand, made from two sections of a Pearl cymbal stand, the tripod and first pipe, an 8' galvanized pipe, elbow and short pipe twisted into a wood block with hooks to hold the gong straps. The 8' pipe passes through to the floor and has a leg tip on it. It barely touches the floor so the balance remains but, it takes some weight off the tripod, containing the swing of the gong when struck. Yeah, homemade mallet. Weather stripping wrapped very tightly around a large dowel, then covered with a brown sock in this case, and kept in place with some tightly wound elastic.
|
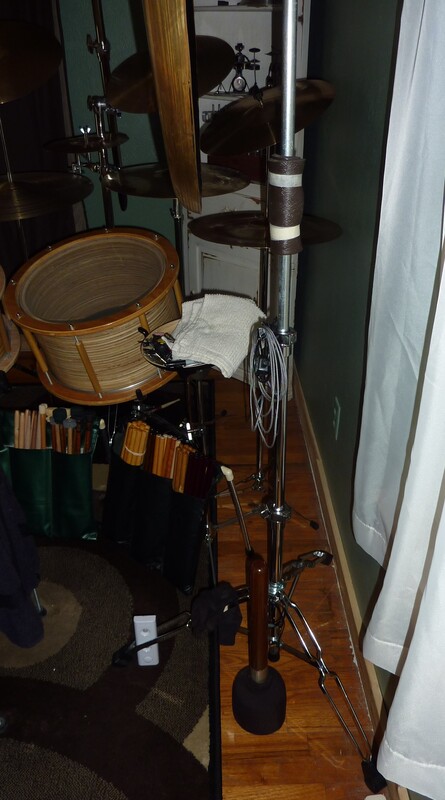
|
Sticks. I make my own now, from various wood specie dowels, which I shape on a bench sander then affix nylon tips with some sort of fast-curing glue. When the sticks break, I reuse the tips. I have made my own tips using nylon spacers and rounding off the ends on the sander. Lately I have been using nylon acorn nuts and taking off the flattened portions on the sander. This means I don't just press the tips on, I can screw them down.
I even made some special sticks for the Keep It True festival, in Germany. Covid changed all that. They are holding the festival but, only for vaccinated people and a smaller audience. No injection for me, knowing what I know two years into this event. But, the sticks were just something special to use and give away to anyone interested after the performance.
I even made some special sticks for the Keep It True festival, in Germany. Covid changed all that. They are holding the festival but, only for vaccinated people and a smaller audience. No injection for me, knowing what I know two years into this event. But, the sticks were just something special to use and give away to anyone interested after the performance.
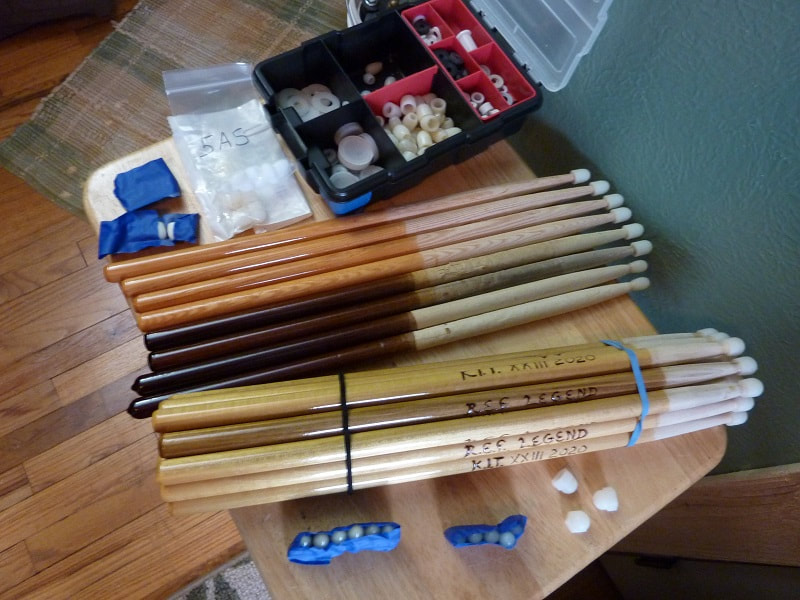
Since last year's recording tracks for the Henderson/Frigon Project, and recording the drum solo tracks and other things, my stick rack is nowhere near as full but, making a stick rack keeps things orderly, if nothing else.
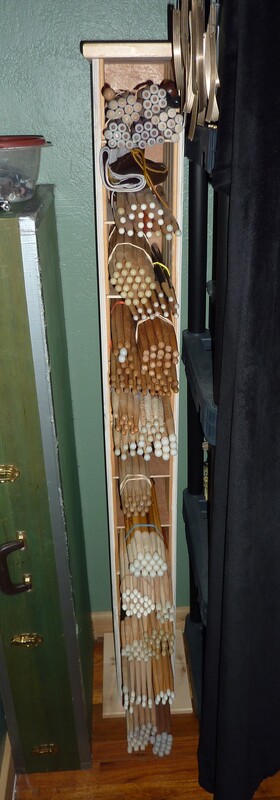
Time to close this page up for now, with some stick bags/pouches. Some pics will tell the story: a couple floor bags with PVC legs and elbows that come apart for travelling (my mom sewed those up for me three decades ago); an ever present snare pouch; and variations on the theme, from leather and Naugahyde; for sticks, brushes and everything in between.
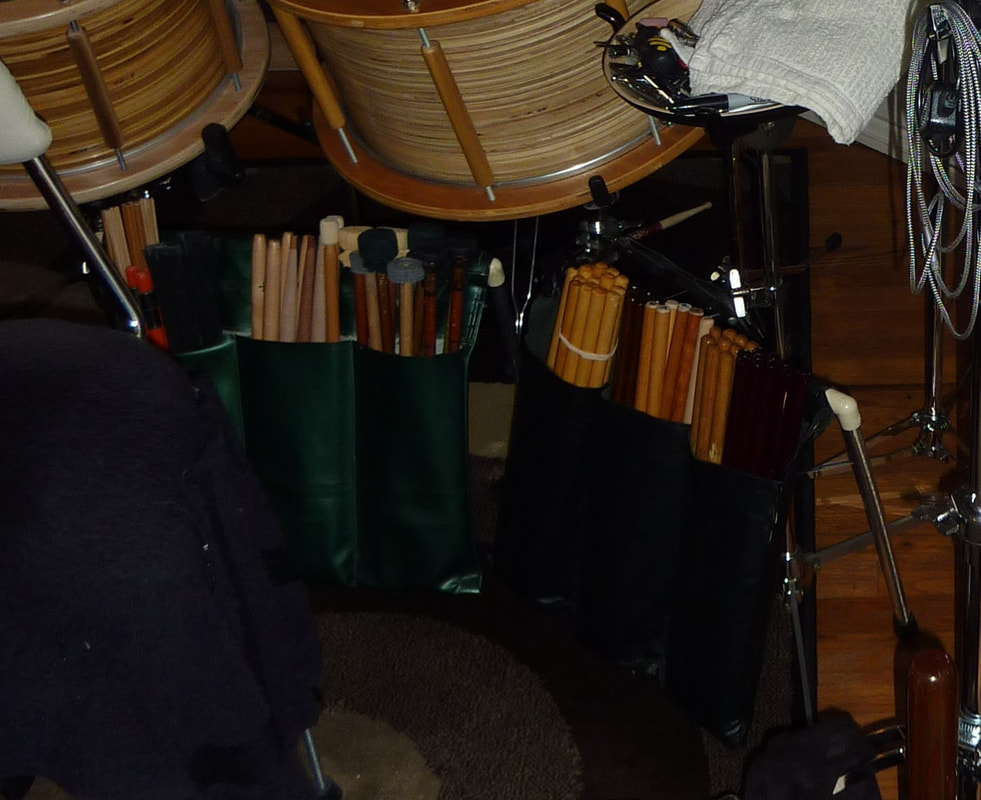
In that green pouch on the left are various "tools" I use. When you can make it yourself, why not?
Below, a couple different pairs of rods with 1/16" and 5/16" dowels. Aside from the Peter Erskine sticks with the hard cymbal felts affixed to them, the rest are just 1/2" dowels with variations of self-stick weather stripping wrapped around them, then covered with fabric or leather and held tight with elastic hair "scrunchies," is what my wife calls them. Scrunchies, elastic bands, zip ties. They all work to keep head coverings in place.
Aside from cymbal mallets the ones on the far right are my favorites for drums.
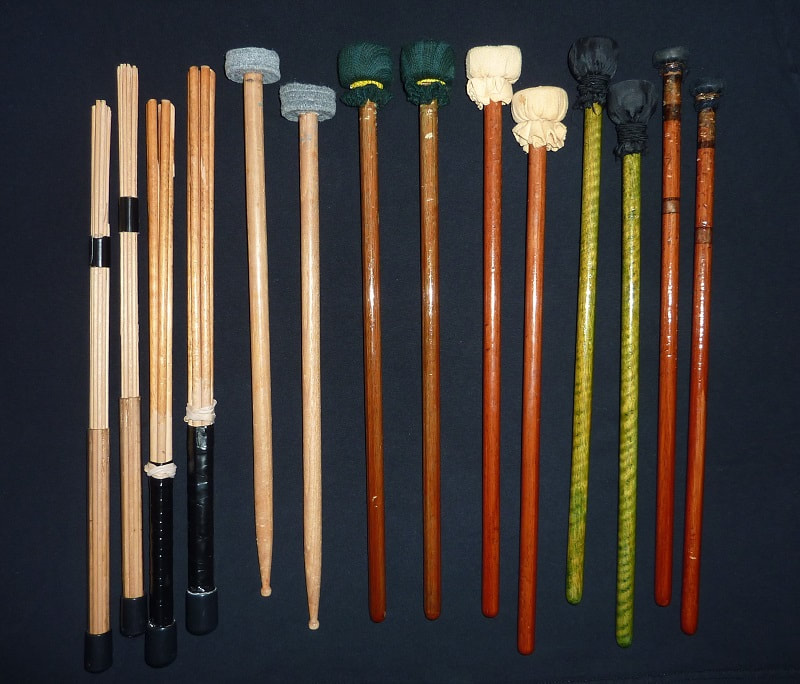
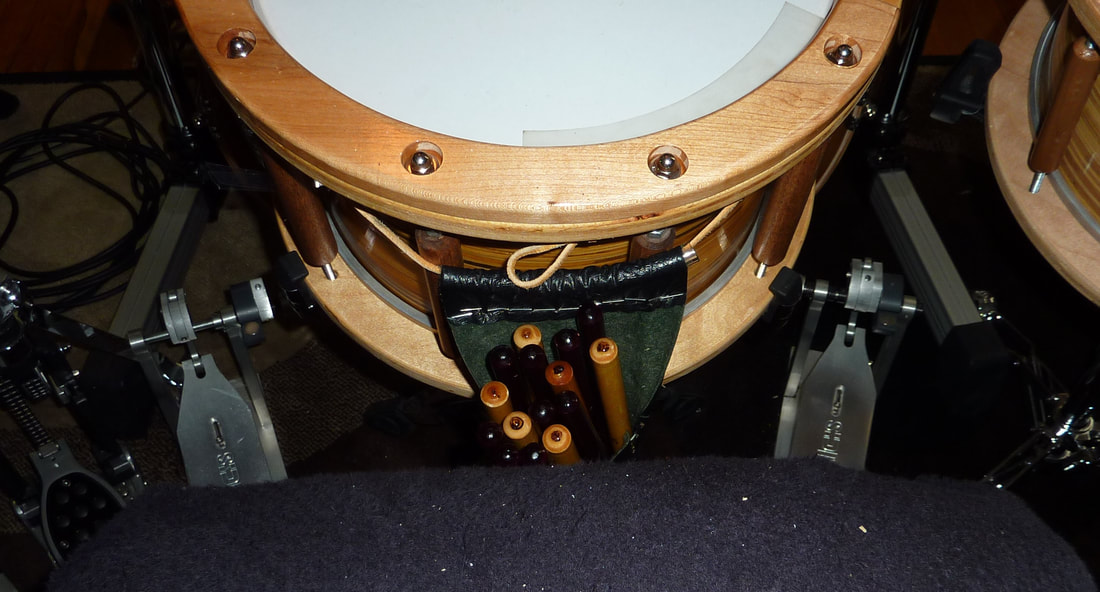
If I drop a stick, which I often do, I want something right there in front of me to grab another. I see drummers drop sticks and reach to their sides and down to a pouch on the floor, leaning against their floor tom. No thanks. The one above is really old, when I used to use staples to hold them together.
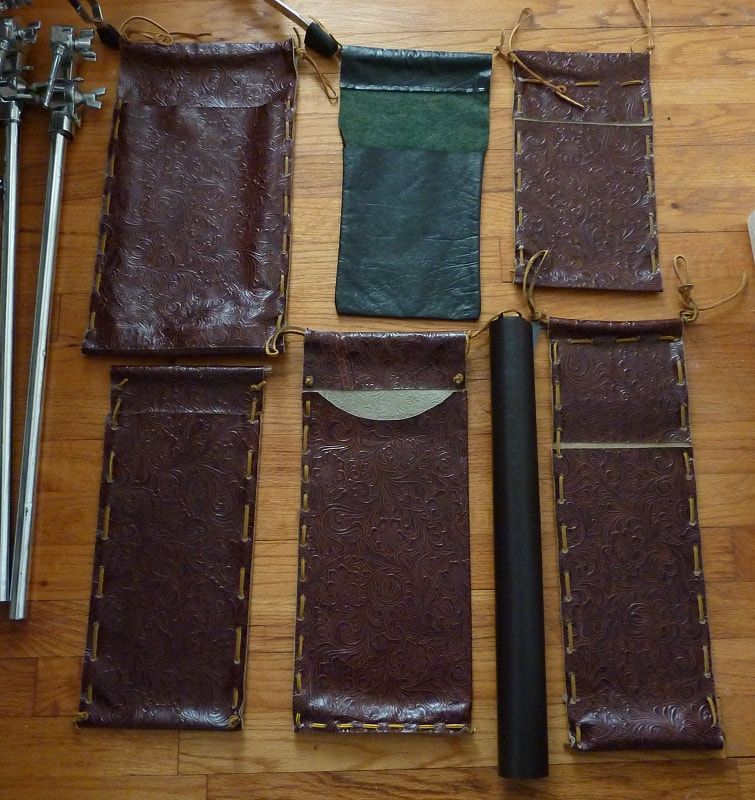
Stick pouches can be pretty expensive. I had leftover leather from covering the drums, and Naugahyde is pretty inexpensive. Leather shoe laces, 'Fastcap' dble-sided tape or spray glue, or some staples, hold things together.
I use vinyl tubing inside the loop and the leather shoe string passes though. The tube helps the pouch from collapsing under the weight of the sticks.
As things come to mind, I'll add more to this page. There's always a project going on.
I use vinyl tubing inside the loop and the leather shoe string passes though. The tube helps the pouch from collapsing under the weight of the sticks.
As things come to mind, I'll add more to this page. There's always a project going on.
Oh, I forgot one of the most important items of all: our foundation. What we sit on.
Back in the '70s, if you look closely at some of the pics, you'll notice a dining room chair with cut down legs and the back removed. I sat really low.
I never liked drum thrones. They are always too small and made drumming, literally painful for my back and way too much energy used for leg movement.
I forget where I was but, one day, sitting in an office chair, I noticed how comfortable it was. That sent me on a journey of office supply stores. My current chair I've had for 15 years, at least. Found it in an Office Max. I just redid the backrest (backrests are essential for me), took off the wheels - which I always do unless they offer essential extra height and lock in place - and put some carriage bolts in the sockets.
I found out sitting higher just made everything easier for my entire body. The 6" bolts just gave me extra height that works well for me. I just use some crutch tips to keep rugs from wearing out at those 5 points.
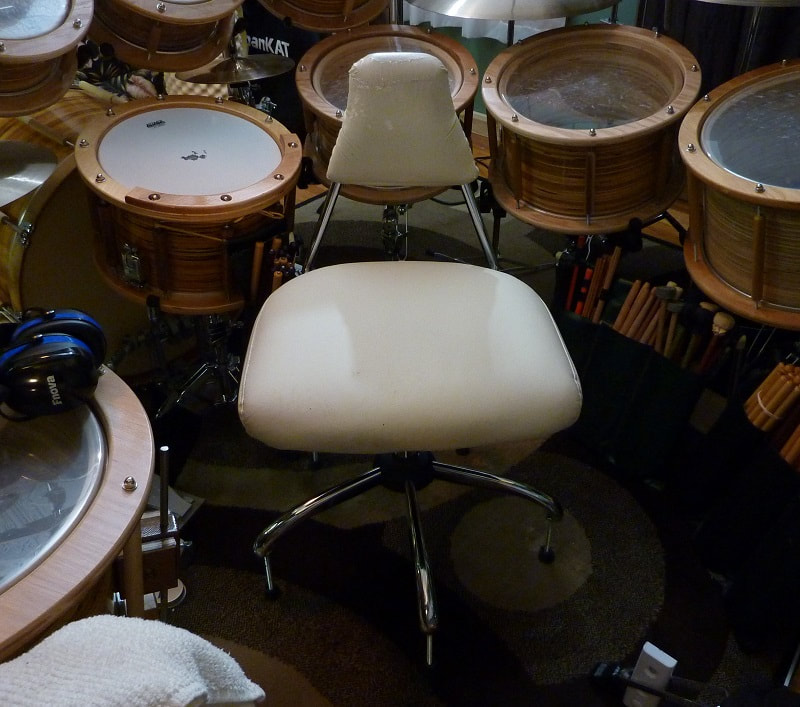
When the air lift finally loses compression, I buy a new chair. And the kind I get for playing is way less money than the top of the line thrones out there, today.
That backrest has seen a lot of use. The chair is incredibly comfortable.
Another option is renovating a standard throne, in this case a mid-line Gibraltar. I took the 13" seat off and made a 17" replacement. Makes all the difference in the world but, even a large 17" circle fails to provide total thigh support.
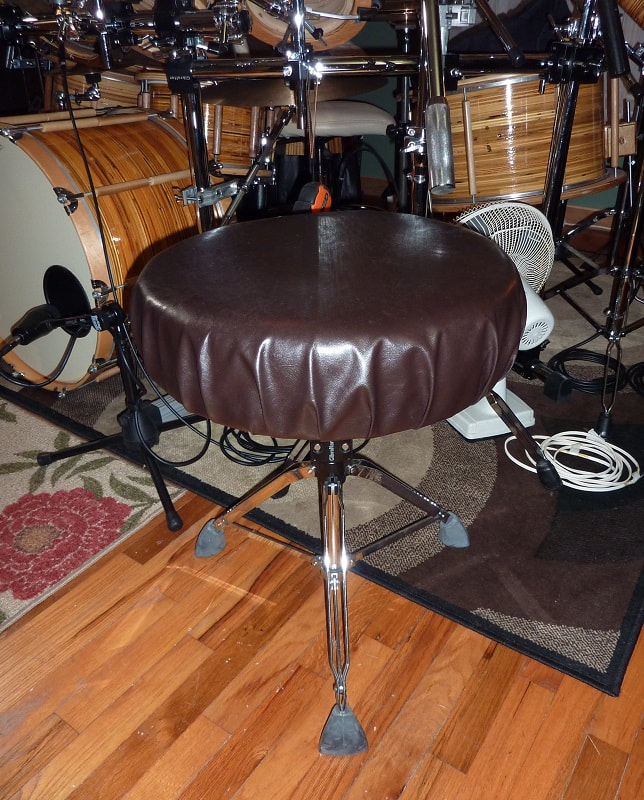
The new top is just a larger piece of plywood affixed to the original, then some chair foam that can be purchased online, which I spray glue in place, then some Naugahyde stapled down.
Chair foam is a personal thing. The most dense foam is longer lasting. But, it's firmness can vary and that is the personal choice.
This is another DIY chore an electric knife comes in real handy. If course, you can buy round foam and square foam or just about any other shape and in any size you need. I've used the Foam Factory - foambymail.com and others.
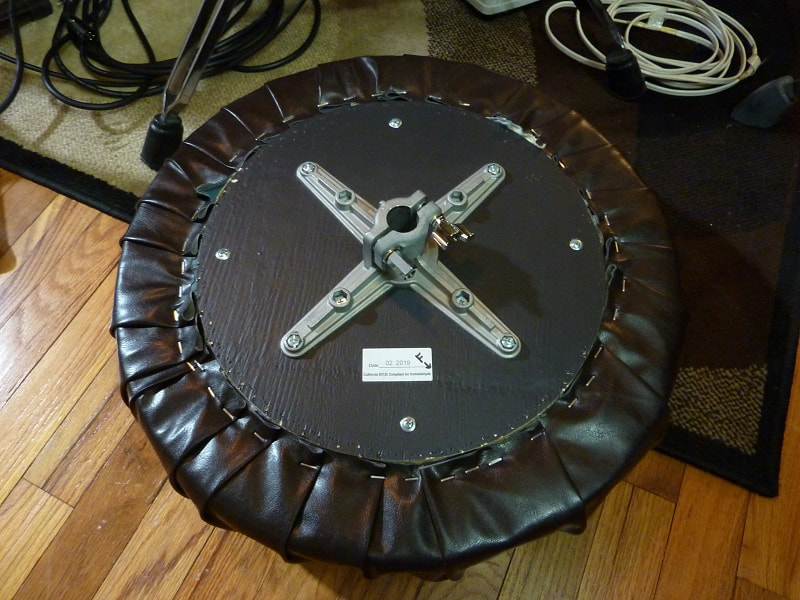
Those brackets can be purchased separately and you can make your own seat from scratch. Then all you need is a bottom tripod and the stud they attach to and I have seen many used thrones on ebay and Reverb that can be modified. In my case, I went ahead and made a seat the same dimensions as the office chair I'm now using; 19" wide, 18" deep. What I really need to do is figure out a way to make a DIY backrest but, until my office chair dies... actually, even if the pneumatic lift finally dies, I can always put a couple large hose clamps around the pipe and keep it in its highest position. I'd lose a little of that sitting on air feeling but, no big deal.
Here's the thing, for me. The Bike seat thrones, all thrones, for that matter, offer no support for your thighs. A 13" circle, or the big bike seats, all of them, despite how wide they might be, are not very deep. Bike seats are that way by design but, nowhere near the energy necessary to pump bicycle pedals and tires forward is necessary to play a set of drums. You have to really use energy to lift thigh muscles as you play. With a larger, deeper seat, the thighs are supported and much less energy is expended lifting your legs, mostly from your knees down and getting more ankle power involved. Plus, all the bike seats I have experienced have a padded ridge around the back which is designed to kind of push you forward. I hate that feeling.
Using a 13" seat, no matter how much foam or its density, my back will begin to burn in 5 minutes and in 30, I'll be in quite a bit of pain. If you have a bad back, as I have had almost all my life, since injuries back in my teen years, a truly comfortable seat is a must.
Newly designed seats come with a space in the middle for spinal comfort. Easily done making your own seat and the price difference? Wow. I was shocked the last time I looked at drum thrones and prices for top of the line models. The throne above is just a midrange Gibraltar model. The only reason I got it was to make a physical realization for my body using whatever rental throne ended up at the festival. I'd buy parts for a new seat and take them with me and construct the seat there. Then, Covid hit.
DIY to the rescue every time, though.
I've got some new projects coming up and I'll share new things as they get made.
*********************************
*********************************
So, I'm at the local hardware store and he has added some new hardwood boards against the back wall. What seeth mine eyes but, Purpleheart!!! Also, another gorgeous wood, which turned out to be Padauk. Methinks two new snare drum shells are in order. Bought a couple boards and was nervous about making shells because I haven't made any for quite some years now but, worked up the ambition to get started and went to it.
You would not believe the orange saw dust all over the shop. Padauk is a little toxic, as well. Found that out before I masked up. Scratchy throat and runny nose.
Both woods have natural iridescence. The cellular structure of wood is almost like that of butterfly wings. Light reflects in cool ways.
Now, while I do not have a lathe and have never rounded out the inside of stave shells, I have sanded the outsides round. This time I decided to leave the outsides flat, as well. One is 24 staves, my usual, and one is 32, which I've never tried before, and had some issues but, nothing insurmountable, and I'm not about to waste the money on hardwood boards. Each board was around $30. But, hey, a new snare shell for $30? Are you kidding me? When custom snare drums cost $500 to well over $1000? DIY wins out every time. I'll take mistakes and slight imperfections and get the same quality sound.
I left them 3/4" thick. They're both pretty heavy. Purpleheart is around 1800 on the Janka scale and Padauk around 1700. Maple and Birch are around 1400, so the shells are more dense. Imagine working with Australian Buloke, at 5000, and Lignum Vitae, at 4500. If I'm not mistaken they will sink when placed in water. That is some severe density, right there. I'm going to have to get a new router bit to put the edges on. The ones I have are okay for softwood but, will burn like crazy on woods as hard as these two. I cannot imagine working with woods as hard as many way up on the top of the scale. My favorite snare drum has been the Ironwood shell. That's over 3000, and was a little rough on tooling but, not as bad as I thought. 5000? That's another story.
I decided to just wax and buff these shells. No special finish products. Simple and works fine. I wanted to use some Tung oil but, found the bottle after I already put the wax on. Oh, well. Next time.
6.5 and 7x13. The routered channels on the Purpleheart are actually there to cover up a mistake I made. Frank Zimmerman, the guy who taught me carpentry, back in Connecticut, always told me, "Raymond, it ain't the mistakes. It's how you fix them that counts." I think I may add one more channel in the center. I've never done this before and was quite nervous doing it but, while not perfect, it came out pretty good, all things considered with an old bit and other DIY stuff to do it on the router table. There are incredible works of art out there that woodworkers have made, when it comes to custom snare shells.
Some Black hardware I have will go on the Padauk. It's all stuff I've had for a long time. Simple but, it works. And the Purpleheart is going to have some radical ideas administered. I'll show you what I mean when finished.
I'll show them on my YT channel when I'm done, added to the series on drum shells. I already know they'll sound fine. A drum does not have to be perfectly round to sound good. It isn't the shell. It's the seated and tensioned heads that are the most important thing to drum sound. Seat the heads correctly, the shell will do it's part.
I had made a Purpleheart snare drum around 20 years ago. It's pictured on the Drum Shells page. I really liked that snare drum and wish I didn't sell it but, with DIY, it's always doable again.
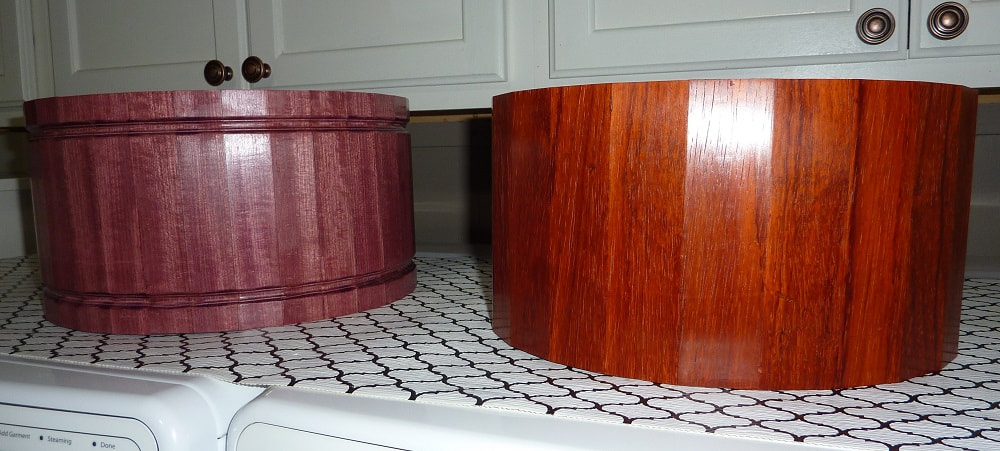
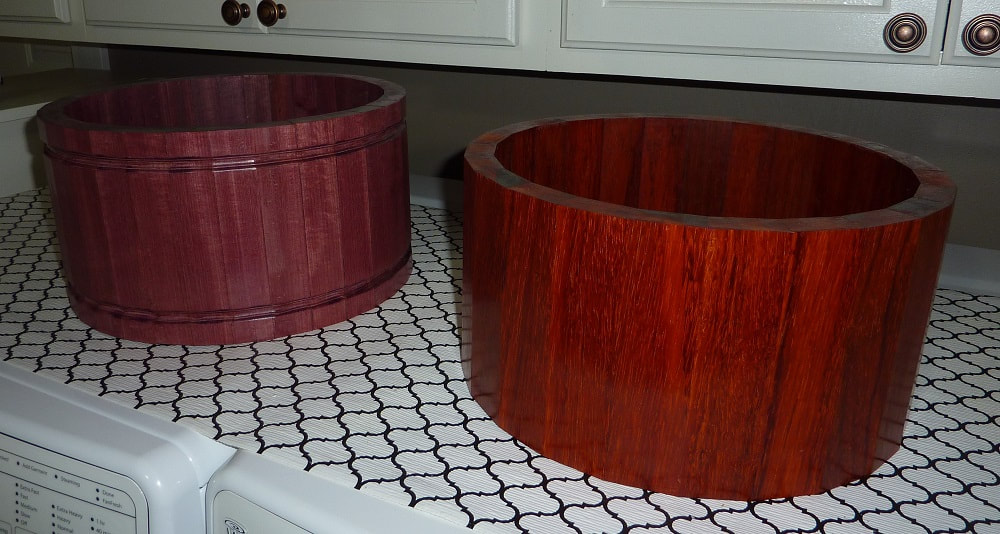
Actually, when I began the bearing edges, I noticed the shells are closer to 7/8" thick. I'm excited to finish up the Purpleheart. The Padauk is just about done. I'll post the pics this week.
******************************
DONE!
******************************
DONE!
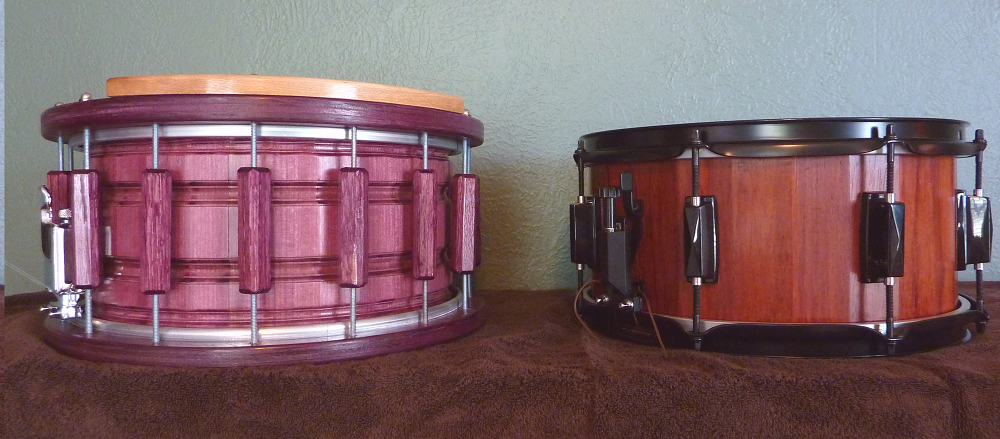
Looking at a picture of these two drums, the Padauk seems like a toy. Even though I made a lot of mistakes, the Purpleheart ended up very involved and complex looking, which I was going for. They both sound great, though I only had one throw-off for each drum and I'll add a second sometime later. I like my wires fairly tight and they just don't drop down far enough on the tom setting with one throw-off.
They both look pretty cool, though. While I dyed the plywood hoops and Oak decorative dowels, that really is the color of Purpleheart wood. If it's exposed to the sun it will turn more brown. More info on the Drum Shell page.
They both look pretty cool, though. While I dyed the plywood hoops and Oak decorative dowels, that really is the color of Purpleheart wood. If it's exposed to the sun it will turn more brown. More info on the Drum Shell page.
*****************************
544. Another Appeal to D.I.Y. - April 19, 2022
I'm surfing and think I'll do a simple search "the finest drums." I used a few different search engines, and went to the image page of each or just read down through the hit list. What did I see?
In the order I saw pics or hits:
Ludwig, DW, Tama, Pearl, Taye, Canopus, PDP, Dixon, Yamaha, Sonor, Craviotto, Liberty, C&C, Gretsch, Premier, Noble & Cooley, Oriollo, Tamburo, Rogers, Barton, Mapex, Pork Pie, Sleishman, Eastar, British Drum Co., SD (Super Drums), ddrum, HD Custom, Groove Percussion, Monolith, Masshoff, RS, Loyal, Q, Valley Custom...
I quit at that point. That list seems to cover the big manufacturers and some custom/boutique makers, as well as Asian companies making drums for student/beginner lines and lines better than that, as well, and other names in that category came up but, they may be the finest drums for students or players looking for good drum sets to play. They are not the "finest drums." I didn't include them on the list. I know other names are out there but, they were not on the search lists, as far as I went with each one.
I knew I would not see what I was looking for... anything associated with D.I.Y. drums.
Being a diehard DIYer and making drums from component parts or from scratch (save for functioning. plated metal parts and heads), for around 40 years, going back into the 1970s, I know what a DIYer can do and what DIY drums sound like. They sound as fine as anything out there. They might not look as fine, depending on the time one puts into fine finishing but, they sound the same.
I was thinking of all the mistakes I made on the recent Purpleheart and Padauk snare drums. I definitely need to change the throw-off on the Padauk. It just isn't made well. Functions but, for the Padauk I want something better and merchants carry boatloads of them. I don't go in for really expensive throw-offs because I just don't drop the snares often enough to warrant the high cost. That said, throw-offs need to function in some aspect of smoothness and adjustability. I bought cheap and got cheap and for the original purpose... a drum from, probably 20 years ago, it was okay. It's been sitting for a long time, brought back into use when I made the PVC snare. I changed all that hardware to brass and the black stuff was, once again, sitting around. The lugs, hoops and tension rods are fine.
Anyway, I made mistakes that either had to be corrected or just let go of (cosmetics). I knew I had some high gloss Tung oil around and couldn't find it, so, I just decided to wax the shells. Worked okay. Satin luster. I'd have rather had high gloss luster. Then I found the oil. Bummer. Remove the wax? No thanks.
Looking at the drums, if they didn't know I make my own, anyone might think I purchased them as custom items, especially the Purpleheart, which is admittedly, as an experiment, pretty wild looking, as snare drums go.
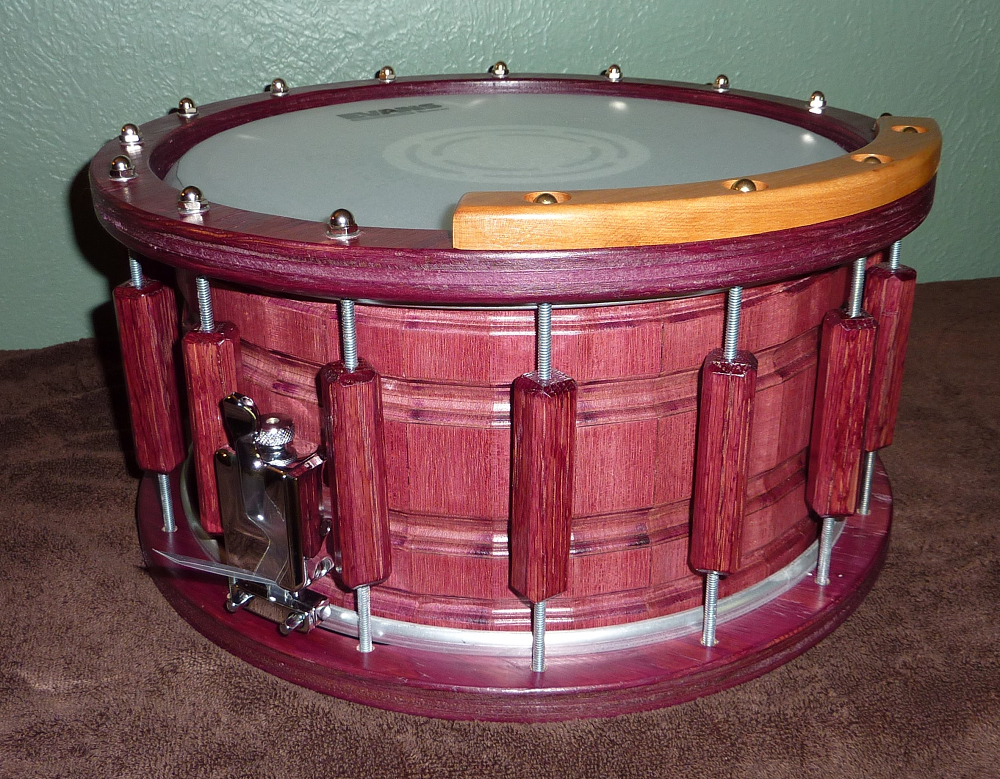
Yes, I am a novice woodworker. Most of that is just periphery to carpentry and I'm no expert carpenter, either. I make just as many mistakes doing that, as well because I don't do either full-time. I forget more than I remember.
Just the same, if someone gets all the component parts from any of the various merchants out there they can make a snare drum or set of drums that will sound just a good as anything, ANYTHING out there. That is a fact owing to the simplicity of what drums are. They won't look as nice and have no surface protection (dust, dirt, spills, etc.) but, you could leave the shells dry, no finish, no covering or wrap, and they will sound fine; as fine as anything made by manufacturers or, custom makers that pay attention to more details than typical manufactured, assembly line drums.
Drums are not rocket science. I say that all the time. The routered channels in the Purpleheart. As I mentioned elsewhere, they were added to cover mistakes made during planing the staves. I was nervous, not having done it before but, I set up my trusty homemade router table to accommodate the need and away I went and though my old bit did some burning, it adds to the overall complexity of the cosmetic look of the thing. Then, with a little confidence, I changed the bit and added the other two channels in the middle. More burning (40 year old, used bits) but, a nicer, more consistent, even result.
No, I would suggest a beginner DIYer try that unless they are already into woodworking and tools but, if you have or buy a drill and appropriate size bits, and get a pie chart or, layout chart from Drum Foundry, you can layout typical series of lugs for any size drum available by manufacturers and put your lugs on the shell.
The all important bearing edges? You can have those put on by many merchants for an added fee or, once again, purchase a router, a bit or two, and install it to some hardboard, like MDF and make your own table; practice making cuts on some scrap wood, and you can easily put bearing edges on a drum. The roller wheel on the bit makes it all pretty simple.
It is a fact that back in the 90s, when DIY drums exploded, most boutique drum companies that sprang up, literally hundreds of them, were just guys that saw how easy it is to make standard drums. Those with woodworking experience got into stave and block shells. I keep saying I'm going to make a full set of stave drums, not just a snare but, haven't done it yet. I enjoy the drums I have enough to just have the idea sit on a back shelf. I mean, making drums out of typical shells, plywood rings or a tabletop/plywood sheet drum set? Who needs staves?
That said, DIY is the land of imagination and experimenting. You aren't going to find that with companies having to meet stock limits and manufacturing schedules.
Admittedly, many players are just not interested in making their own drums because they aren't tinkerers like that. But, those who are? You can make your own set of drums. Put a wrap on them and you have a professional look. Wrapping drums is not difficult either. You have to be careful but, it's simple.
I saw a pic today of a DW 6 pc kit. Eight thousand dollars. Even with the inflation of prices for component parts and veneer/wraps I could make... at least 3, 4, maybe 5, 6pc. drum sets for that amount of money. Three or four for the price of one? I can think of no reasons why not.
If you are interested, this website will inform you of just about any and every step involved. Check it out:
http://pdgood.us/drumshed/
I have helped out a lot of players that communicate with me from YouTube videos I've posted on my channel. I'm happy to supply any info I can from my own experience.
A lot of players, young and old, would love to do it but, just do not think they can. Think again. It's a shell, some finishing, some lugs, heads, hoops, and tension rods, claws for kicks, and various mounting options for each drum - stands, spurs, legs, etc. That's it.
For kids, maybe your moms or dads, siblings or extended family members can get involved. There are so many how to videos on YT, I could list them all day long. The info is out there.
There is nothing like playing an instrument you make yourself. It's a very satisfying thing.
Plan and execute. You can do it.
New Project.
I'm sitting here, doing some editing and I just thought of a new project. This should be pretty cool. I'm finally going to build an entire stave drum set but, it's going to be the epitome of 'modern rustic.'
I'm going to hit all three pages - Thoughts, Drum Shells and D.I.Y.
Stay tuned. :-)
I'm going to hit all three pages - Thoughts, Drum Shells and D.I.Y.
Stay tuned. :-)
Before I Get to That
I'm in the midst of finishing up three snare drum shells. Texas is a very humid place. Lately, lots of rain and storms and the air is thick with humidity, as the ground is saturated and can't hold any more water in the clay-based soils here. The yard is literally a loaded sponge. You can feel the water moving under your feet, making everything a muddy mess in a minute.
When the atmosphere is like this, it can really affect finish product results. If any layer of moisture is on a shell and either oil or even water-based products are used, odd things can happen. Adhesion just does not take place and fogging, crackling, pitting, bubbles... it can be quite frustrating.
One shell became so frustrating I just nixed it, covered it with veneer and began again. This is the reason I use a hair dryer to set up coats, and even warm and dry the surface of the shell before applying finishes. Nothing hot; just a little air to warm things up or set up a finish so nothing runs when I hang it up. Sometimes, with final coats I may not use the dryer and just spin the shell on my hands a few dozen times one way, then switch and spin again and go back and forth until the movement of air on the shell sets up the coat to a tack so I can just hang it up for curing.
Hair dryers are great but, they can also contain dust particles. Always point a dryer away from the shell at first, to send dust particles in another direction.
For those who have dust-free environments and spray their finishes on, you're fortunate. I have never had such a situation to work in. In some environments incredible amounts of work is done to make and keep spray booths and rooms dust-free. I remember reading an article about Sonor. They had/have a finishing room that has a half inch of water on the floor to keep dust from being activated into the air.
I'll tell you this about the finest finishes on Earth. Once drums leave the factory and end up at your house, you will have dust on them. You will dust them in any number of ways, and you will scratch those finishes with micro particles in the dust, silicates and such. Especially is that the case if you live in the Southwest USA or any dirt/sand-laden, windy area of the globe. A mirror finish is nice. Real life says, Watch me. I'm coming for you and you cannot escape.
For me, once I can see details of my face when I hold a drum up at the right angle to the light, I'm done. In some cases I would rather see the actual grain of the woods or veneers and not have that "glass table top" look.
For DIY drum builders/makers, for me, finishing is the most time consuming and difficult. Lots of finishes exist, from stains, dyes and paints, to waxes to oils, to poly products; both oil and water-based, etc., and each has a place and its "issues."
My favorite has always been a high gloss Tung oil, applied with a sponge brush. Satin finishes are much easier to apply because you really can't mess them up. There's no mirror gloss look to them. I may place 10-12 coats of oil on a drum or other finish product before I get the gloss I want. With satin, nope. It's a protective finish with a little luster, done. C&C drums, one of the premier custom companies out there, only seem to use satin finishes. I cannot recall ever seeing a high gloss finish on C&C drums unless it was a high gloss paint or wrap finish. Of course, the company makes drums that have a retro/vintage look to them, so it works well. Personally, satin finishes, while really nice, just have never totally floated my boat so, I go for high gloss. Well, my aim for satisfying and practical high gloss. I just can't see spending the time for a mirror finish only to have the dust devils get involved. You can take your finger and move it in a mirror finish and watch the scratch take place. That's why car companies use various waxes to protect the clear coat. They are too easy to scratch. It's no different with drums, even though drums are not exposed to the weather and environments automobiles are.
Because I like figured wood veneers more than typical flat cut Maple or Birch, once I got into that, finishing a regular Maple drum just got moved aside and I never looked back. This drum that just will not take a finish, is a Maple shell, a shade of green dye. Not anymore.
The answer to any of these issues is drum wrap, of course. Glue it on, peel off the protective layer and voila! Beautiful drums. Do not think those wraps cannot be scratched by dust, though. Dust is a never ending enemy of mirror finishes. Unless you like stuff like satin flames, which I do but, just never bought any to wrap a drum set. If I only played a four or five piece set, I'd think more about wraps but, with big sets like I use, veneer is a lot less, square foot to square foot. Wraps keep climbing in expense, too, though there are a lot of companies creating computer generated, vinyl wraps that are really nice looking, including very realistic wood veneer wraps, as well as custom designs.
Regardless of any issues that can arise, don't be turned away from making your own drum set from component parts because you are afraid to finish them. That's one thing about DIY. You make a mistake, you can sand it or scrape it (I use scrapers a lot), and just go again.
The current three shells I'm working with all have had their issues but, two are just about done and the third, the Maple that just would not cooperate and has Mahogany veneer on it now (which actually looks spectacular instead of the Maple), will get finished and hardware installed.
I have way too many snare drums and I'll be selling them at some point. Some are personal favorites for me and others are... not so treasured. I can let them go, although, ultimately they are like a family that represents variations, like humanity. I'd like to be able to have them set up in some artistic fashion but, have never really had the room to do so. Such is life, which is calling. I've got some sanding to do.
Later...
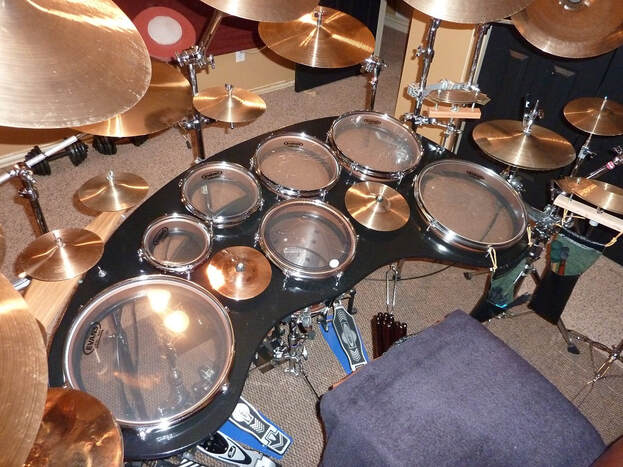
Shells, Shells, and More Shells
There is one sure thing about finishing drum shells. You are sure to develop character. I'm working on seven shells right now. Two should have been done, I should have left them alone but, just thought I'd add one more coat, and catastrophe struck. You can call it crackling, alligator skin, whatever but, I hit the moisture monster and got bit. I cannot emphasize the nature of humidity when finishing.
My wife hates the smell of some finish products I use. Using water-based Poly helps but, you can get faked out by it, thinking another coat will adhere just fine without any sanding. Nope. For the rest of the oil-based Poly I opened a window and put a fan in it and pushed out the fumes developing in the room - nowhere near her use of fingernail polishes she uses, that can drop you to the floor walking into one of those finger and toenail polish places. Between the remover and the lacquers they use... - but, even just when she does it at home I have to get out of the house.
Anyway, in opening the window I changed the atmospheric conditions in the room and that affected the surface of the shell. Thankfully I did not touch the other shells. They'll all be sanded and finished, window closed (go shopping Dear), and the building will begin.
When you see yourself in the reflection of the shine, having watched the shell go from naked to each stage of reflection, I always think of the Faith, the Christian experience of God taking us where we are and shining us up, as it were, to reflect the character of Christ. Messing up a coat... yeah, character is certainly tested. Time, materials, and energy to redo things is always character building. This one drum was already on its second go-round. Now, a third. Hopefully I don't have to remove all the coats I applied so far, again. My scraper blades are down to nubs.
Character. That's the thing.
Sanding Rice
I wanted to show you, if you have not experienced it before or yet, a sanding issue. I brought up the 'shell from hell' last time and it all happened again. Well, actually, I did not get down to the bones last go round.
First, here's my simple set-up for sanding. Just a Black and Decker Workmate, opened up, an old area rug laid down, and the shell sits nicely in the gap.
First, here's my simple set-up for sanding. Just a Black and Decker Workmate, opened up, an old area rug laid down, and the shell sits nicely in the gap.
The shell is a stacked plywood ring shell. I had the rings, only 1/4" thick, owning to the amount of material between rings that the router bit removes, size down to size. It all glued up fine and is plenty rigid for a shell.
Plywood, I never try to get a really nice finish on my plywood drums because of what butt end plywood is: layers of various placed veneers and soft spots are every other layer. End cuts of anything drinks in a lot of liquid. That's where the problems begin. The soft spots much worse. In this case, I also decided to dye the shell, and you can see the variations of hard and soft spots by the light and dark shading. Hard/lighter. Soft/darker.
Remember, I did this once, maybe around 6-8 coats. It looked pretty nice and I should have left it alone, did bearing edges, lugs, strainers, done. But, nope. I had to try one more coat.
Now, this is round #4 and given the shell, what it is, what it cost me (basically nothing), if it were not for the time expended on this, I'd just put a wrap on it but, I wanted to show people what a more serious example of plywood drums can look like. Remember, I'm making 5 new snare drums I want to compare them on my YT channel. Three are done. One more today (which I DID leave alone), and it should look really cool when it's all together. That leaves this menace.
I scraped it down, twice, and sanded out scraping marks. Smooth as can be. Put very thin layers of water-based Poly and they just were not looking right when dry. Fourth time. Sanded it just now.
I live in Texas. Hot and humid. Lots of moisture in the air. You may think being inside makes a big difference. It does not. To show the problem of moisture look at the next shot.
When a finish is dry it comes off as dust. If you begin to see these tiny rice-like particles, your finish is rolling off, the sand paper is just rolling it up into tiny rice particles. Mind you, I sanded this shell and let it sit for three weeks to make sure it was dry before I tried the last line of coats. Three weeks, and I see this, using 400 grit, too. Not a lot of friction. Where is this coming from?
The more I sanded, the worse it got and just when it seemed to end I break through the previous layer and it starts all over again and looks like the happy couple leaving the wedding reception.
The more I sanded, the worse it got and just when it seemed to end I break through the previous layer and it starts all over again and looks like the happy couple leaving the wedding reception.

One sweaty hour later (and it's only 64 degrees outside), three squares of paper used up, after sanding through each layer and hitting moisture, it finally produced just some slight dust.
You say to yourself, this is not possible. Possible. Big time, in humid climates. A microscopic thin layer of moisture can cause this problem and each succeeding layer compounds the issue.
I took the drum inside the house, vacuumed it off, then I put the hair dryer on it for awhile to warm it up and evaporate any moisture. Put the finish on and it looked spectacular. I put the hair dryer to it, to tack it up and thought, "Man, if it looks like this when it dries I'll be a happy man." Then, in all the soft spots I saw it changing. Then the entire finish began to lose its deep shine and mirror-like reflection.
It may be the actual can of finish. Something is not right. Once you use water-based, you're stuck. You can put water-based over oil-based but, not oil over water.
Here's a couple more pics. Bear in mind, my reflection was almost mirror-like when I began to tack up the coat. Then before my eyes it began to get hazy.
Here's a closeup. Look at the area around the light reflections. See the streaks, crackling and tiny lines? The entire shell looks like that. It just shows up in detail wherever the light reflections strike the shell.
I'm not giving up. I'll lightly sand tomorrow, than try another coat and see what it does. If it does the same, I'll scrape it all down again, right to the wood, and use a different product. It could just be the dye and some chemical reaction, especially at the soft spots. Maybe, if this does not work, I'll just wax the shell and buff it out and what it will be, is what it will be.
**Okay, took the shell out and lightly sanded it this morning. Put the finish on. Not too bad. Not great but, I am not messing around with it anymore. It's been very cool and dry here this past week but, summer is about to hit again, 90s and humid so, I'm quitting while I'm ahead.
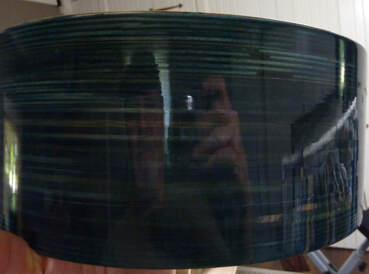
|
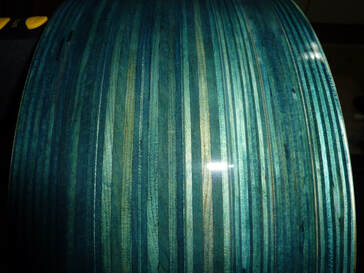
|
So there's a little bit of saga for what finishing can involve. I know, tell me about it. Wrap it! Spray! Spray! Spray! But, as many shops and manufacturers spray their shells, that involves equipment and environments I can't supply and there are issues involved with spraying, as well, which I tried back in the 90's. Today's chemical finishes and spraying equipment are better than ever. I'd certainly use it if I could. In this case, plywood butt ends are NOT the best surface to try and finish. Spraying would not help.
When this cures, drum #5 will be ready for assembly and I'll show them all on my YT channel, soon. It will be an interesting comparison.
I have to admit the plywood is fascinating to me. I have another technique I want to try that came from making the bird houses. (Thought/OpEd page 6, #565). These drums will look more wild than anything I have yet seen. Kind of a knife-handle look, if you've seen layered/laminated handles, shaped and dyed, or dyed and shaped, as the case may be.
Always something new to try.
********************************************
Okay, here's a couple pics of the drum put together (no flash/with flash). It got even more "satin" looking as the finish continued to dry. Very strange but, it sounds good, and on my drum sets, snare drums can't be seen anyway, least of all by me looking down at the batter head. Which is the case for all drummers, really. We get all into the way drums look and sitting behind them, hardly see the shell walls, save for the bass drum; unless you angle drums flat or away from your sightline.
In the case of this snare drum, it's a mystery to me. All the drums I have used that can of poly on, look high gloss. This drum did, until I put that last coat on, took it off, thrice, and still, I get a satin look. Very strange, indeed.
Also, the tension rod splay is weird, too, seeing the drum is not 13 7/8 like most drums, and companies began putting shell protectors on all attached parts. That means, with this drum right at 14," the hoops are larger than they used to be to deal with all the extra height created by various pad materials underneath lugs and other parts. Things should line up perfectly. They obviously don't and with bridge lugs like I used, which I had from a previous set 20 years ago, that's a lot of detailed cutting. I'll probably do it though. Just need to find the right material. I never buy those things. DIY all the time.
I think the drum looks pretty cool. Being as light as it is, I even went with 1.6 hoops, and being a 14" drum, I like the sound and more importantly, the feel of it. Unusual for me, playing 13" drums for so many years now.
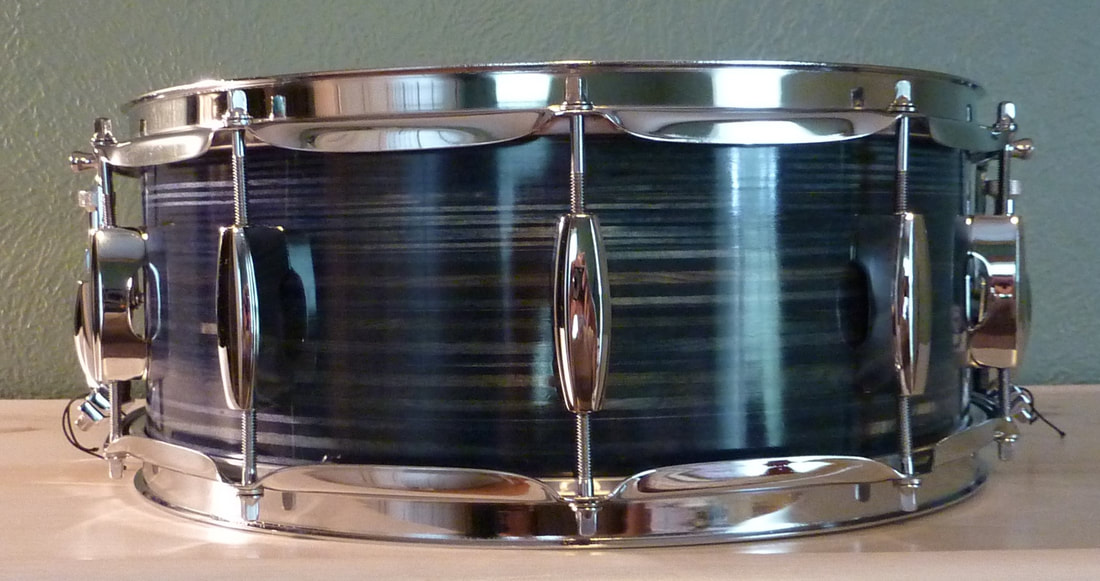
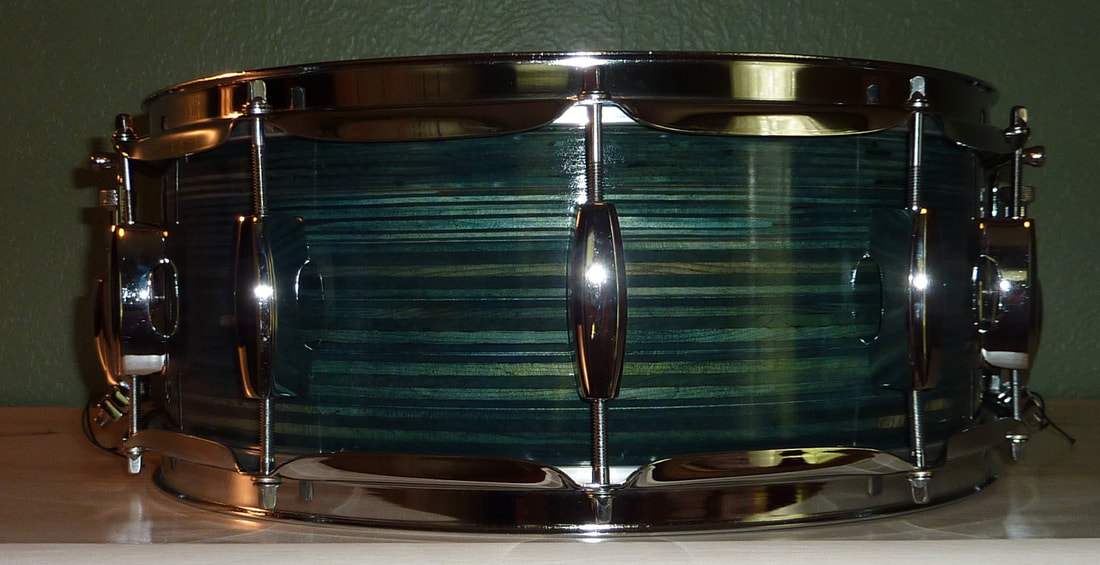
And a pic of all 5 snares, two you have seen already. I hope to make a comparison video of them today or tomorrow.
Top left clockwise:
6.5 x 13; 7/8" Padauk, staves left flat, wax finish.
4x13; 1/2" PVC w/oak veneer inside and out, dyed a deep red (took me awhile to get that shade).
3.75 x 14; 1/4" Keller w/Mahogany veneer.
5.5 x 14; 1/4" stacked plywood rings, dyed.
6.5 x 13; 7/8" Purpleheart, staves left flat, wax finish, plywood hoops, 16 dual tension points w/decorative oak dowels dyed the same as the PH.
I love the fact the PH looks radically different than the others, which I was going for.
I'll post a link to the video when it's up, for those interested.
https://www.youtube.com/watch?v=6n4kNd5aBJo
I'm going to upload an addendum video today showing just the shells, their bearing edges and beds. I'm also going to do a comparison review of them on the Drum Shells page on the site.
I'll post a link to the video when it's up, for those interested.
https://www.youtube.com/watch?v=6n4kNd5aBJo
I'm going to upload an addendum video today showing just the shells, their bearing edges and beds. I'm also going to do a comparison review of them on the Drum Shells page on the site.
So, Here's the Next Gig/Experiment
If you have been to my YT channel, REFondrums, and watched the series on drum shells, sound and hype, you remember me starting with three Keller shells - 10" Maple, Birch, and what they call Mahogany, which is just Poplar with very, super-thin veneers of Mahogany on the outside and inside of the shell.
https://www.youtube.com/watch?v=xnmLVURn6hk
I began that series 4 years ago, and those shells got cut down in subsequent videos and I figured I'd make popcorn snare drums out of them and sell them. Nope. They have sat in my shop for 4 years and I finally decided to do something with them - make a 5pc kit out of them, and two other drums. One, the $10 tom I showed in the 2nd video of the series, and two, an old Griffin popcorn snare drum I bought off Amazon for the shell, which cost less than buying just a Keller shell from a merchant. I have no idea what the shell is. Basswood or something like Pine, whatever grows in China. It's very light.
So, it's 5pc. kit of 6x10" drums.
Clockwise:
The $10 tom in it's frame.
The Griffin snare drum covered inside and out with the galvanized flashing from the previous 14" tom experiment
The Mahogany shell
The Maple Shell
The Birch shell.
All different shell materials. I left them free floating with the plywood hoop and threaded rod/Tee nut idea. Left the shells natural and dyed the hoops in a mix of things sitting in tiny containers, that came out a seriously dark Brownish Purple, and I sprayed the rods Bronze.
I put Oak veneer on the $10 tom, inside and out. Just a couple very old spur brackets and a couple bent steel rods for spurs. The pedal will hook up to 90 degree deck-building bracket screwed to the frame.
The toms sound as expected. Single-ply clear heads. The snare drum, as well. Heavy pop and crack, and because I didn't have any 10" snare heads, I took an old tom head and sanded it down to thin it out. Works okay.
The "bass" drum, being so small and shallow, is all attack, especially with just a couple clear, single-ply heads on it, which I frosted inside and out. Thickened up a touch. And I put a head patch on the batter side, figuring beaters would destroy it right quick.
I'm going to set it up tomorrow and make a video and add it to the shell series. Having already made a video of one "mystery drum set," (#14), this one should add some fun for #23. The third one will, as well. And a fourth, if I can take the heat in the shop. It's 100 degrees already, here in Texas. In the shop, add 5 or 10 degrees.
No offense to Texans but, I hate Texas.
I moved the dining table and set it up there to shoot the video. Lots of fun to play, save for the lack of true thump from the mini-kick, and a definite call to take a 16" or 18" shell piece that also has been in a box for a decade, and make a larger kick with the same hoop/frame idea.
Hear how it sounds at my YouTube channel:
https://www.youtube.com/watch?v=f-HXnC40clo
Hear how it sounds at my YouTube channel:
https://www.youtube.com/watch?v=f-HXnC40clo
************************************************************
The current stave drum project is closing up but, because I'm using the plywood hoop gig, I had to make some, and took some pics to show you a little of the process from plywood sheet to final hoops.
In this case, starting with a 4x8 sheet, I cut out 22" disks (21 7/8"), to add rings for a 22 and 20" bass drums I have 10" of depth for. Now, 16".
Find your center point, per disk, drill your hole to set the circle cutter pivot into, and depending on your material, take your plunge router and increase depth per rotation. I usually go around 3/16" to 1/4" per cut. You can take out a full 3/4" but, it's a lot slower and you wear out the bits faster. Lots of heat build-up from friction. Tremendous amount of dust and chips flying all over the place.
Because I already have a 16x24 bass drum, I didn't cut out 24" disks. I will use all the extra plywood for some misc. projects, like birdhouses.
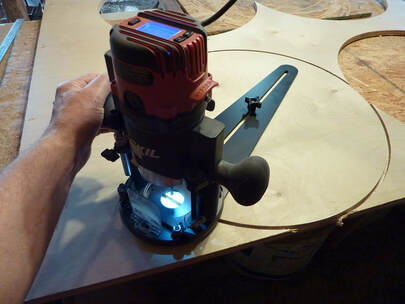
When you have your largest disks, time to cut out the concentric rings. Remember. Account your bit width.
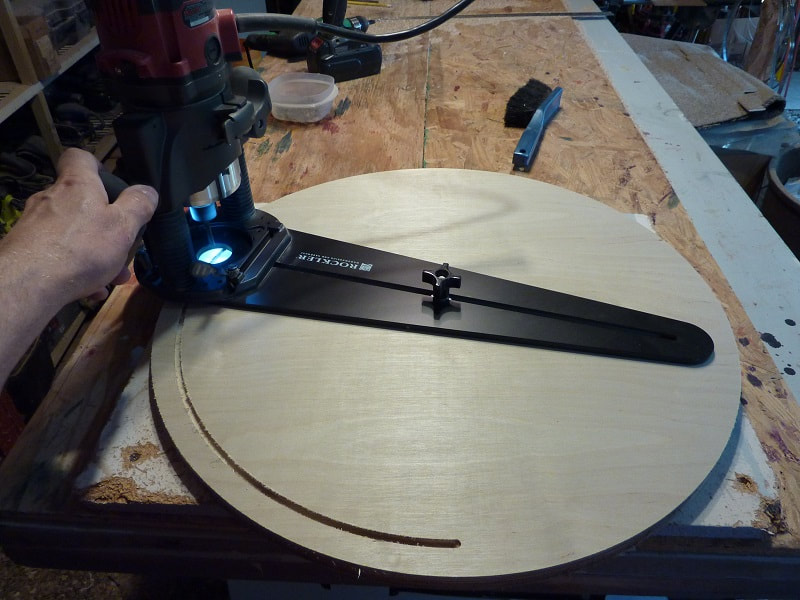
|
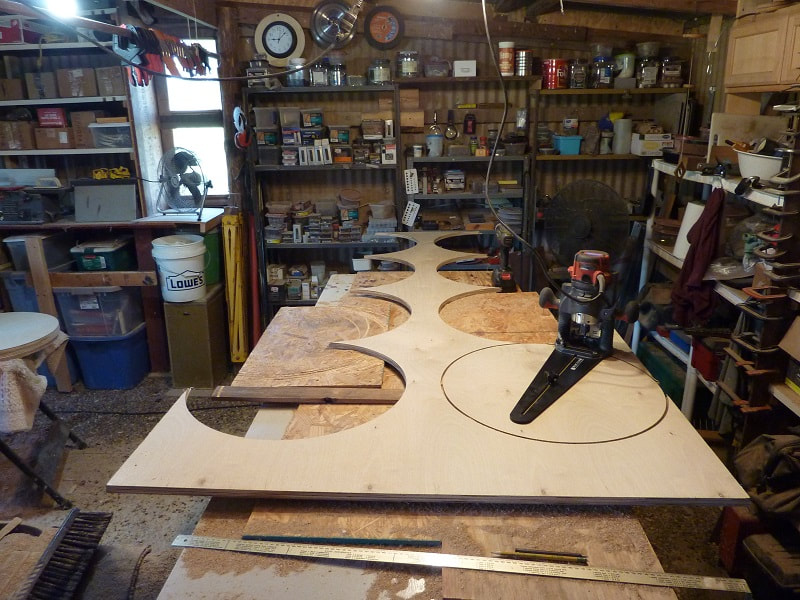
The finished hoops pictured here, 10, 12 and 14" still need finishing and drilling holes.
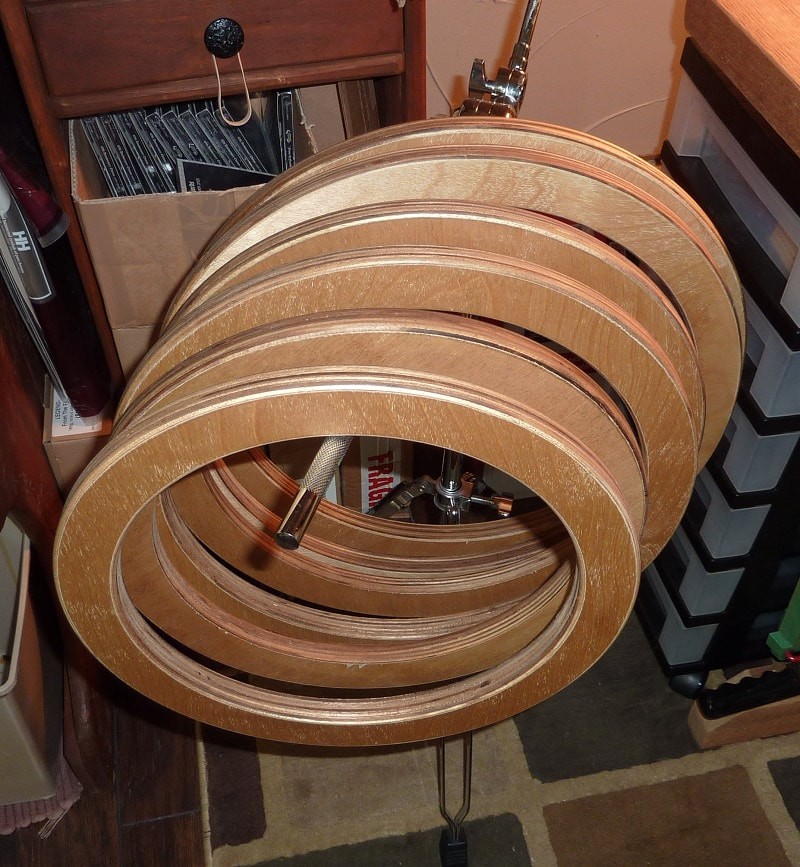
|
Admittedly, cabinet grade plywood will not hold up to rim shots. I don't really get into that, on toms. On snare drums I make the hardwood hoop protectors you see in pics of snare drums.
It may seem odd but, I have grown so used to the dual-tension system with the threaded rods and tee-nuts, and because my other set, the Leather set, has Maple hoops, I have almost forgotten about chrome hoops, unless they end up on a snare drum.
Some people state, with good reason, I should call it a single-tension system. I get that. It just seems to come too close to making things seem like a concert tom. But, yes, "dual-tension" could obviously mean two individual points of tension. I guess calling it a single, dual-point tension system? Yeah, no. Too confusing.
**************************************************************************************************
Parts for the new set are ready to be put together. Some pics and process. Look at the shells carefully. Two different types of siding material: an OSB/Waferboard-type, and a composite compressed fiberboard-type. You'll notice nothing is rounded off. All staves are left flat, inside and out. You will also notice the bass drum is not close to round. One of my band clamps failed and pushed in some staves under tension. I sliced the joint open and re-glued and got things better but, still out of round. Sound difference? Nope.
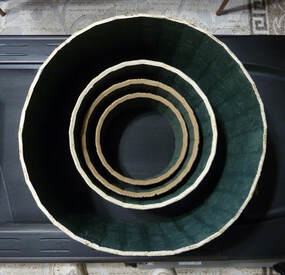
Have you ever heard of Trixon drums? Made in Germany, back in the 60's and 70's. Check them out.
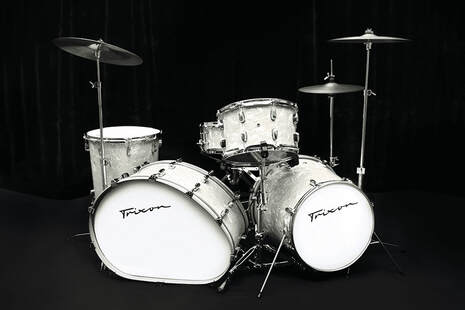
You have to admit, weird looking? The idea was to have one kick with enough space for two pedals to be hooked up. Obviously special heads were manufactured. The drum sounded like any other bass drum. They also made conical drums, and had one of the first "rack" systems of the R&R era. Trixon is back, too. There's a demand.
|
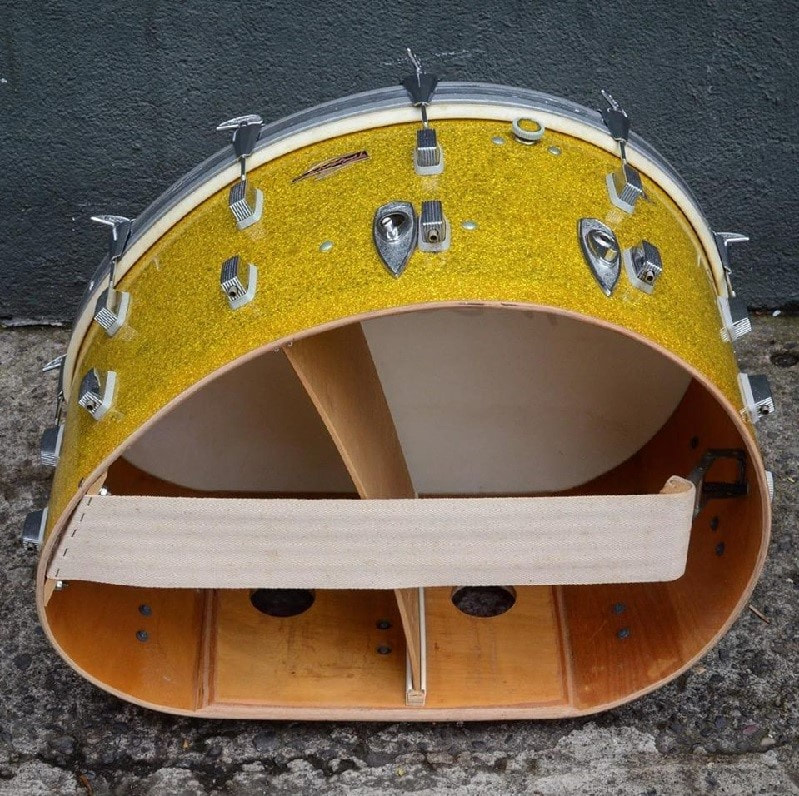
They bring a high price on the Vintage market.
|
Notice the interior b.d. design. ANYBODY that tells you a drum must be perfectly round to sound good is ignorant of the simple principle: the sound of a drum is mainly from the tensioned membranes across the cylinder; drum heads. If the head can be seated correctly on a bearing edge, it will do its job, regardless of the imperfections of roundness of the cylinder. Trixon proves it. Any drum I make or that anyone else makes that is not perfectly round, proves it. If I shell is so out of round you cannot easily fit the drum head on, that's one thing. If the head seats okay, the drum will sound okay.
One of the great setbacks for me is never having a shop I can finish things in. Way too much dust, especially in Texas where dirt is in the air, constantly. So, I use the space I have. In this case, a corner of the renovated garage.
I tried a DIY finish; a wipe-on Poly: half polyurethane and half mineral spirits. Worked really well. Had some lint issues but, this kit is so rustic I didn't worry about it. Wiped it on the hoops and the decorative dowels. Three coats, done.
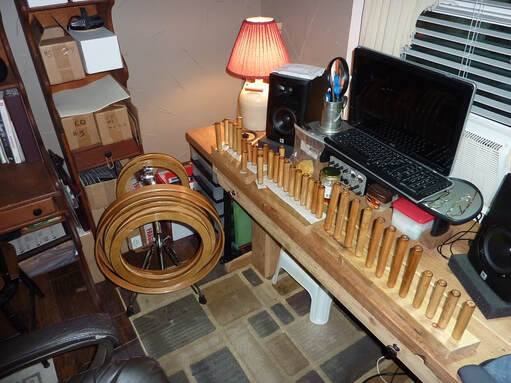
Next was drilling out the holes in the hoops. If you do this, there's nothing easier than a Drum Foundry Layout mat.
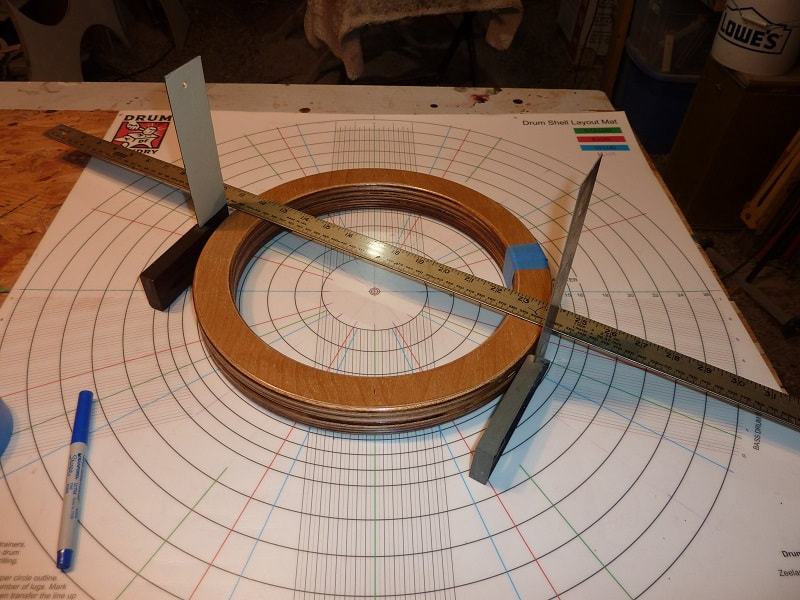
Some blue tape to hold the hoops together. Then lay them down in place correctly. Take a couple squares and place them on the layout lines for however many holes required, for 6,8,10 or 12 (or design you own spots for 5 or like my Purpleheart snare, 16). Take a straight edge and place it against the squares and eyeball your middle and place a small line on the hoop. Then measure for the exact middle of the hoop and mark it along the first line you make. + marks the spot.
I'd love to have a standing drill press but, a bench top has sufficed for years. I use two handles clamps and place tape on the gripper pads so the finish on the hoops is not marred in any way. You can do this before you finish the hoops but, it's always possible some finish material will run through the holes to the other side and it's Mess City.
Then over to drill press. You could clamp them down. I just press down hard with my left hand to hold the two hoops in place. I have to readjust the clamps once, to be able to get at all the holes. That's it. Use a backer board underneath so you don't blow it the bottom of your hole.
You can use a hand drill. I've done it. You just have to be sure to keep the drum plumb or level, depending on how you drill the hoops.
Once the holes are drilled, whatever way you want, mark a spot on the hoops at one hole so when you put them in place you are lining up the exact holes you drilled together. No matter how definitive I get with marking and drilling, drills like to move traveling through wood grain. If you're a woodworker, you know that well. Mix up the hoop holes and you may find your threaded rods are not matching hoop to hoop correctly. Mark your hoops. I may take a magic marker and mark the inside of two holes or place a couple dots where the hoops meet. Trust me. You'll save a lot of headaches later.
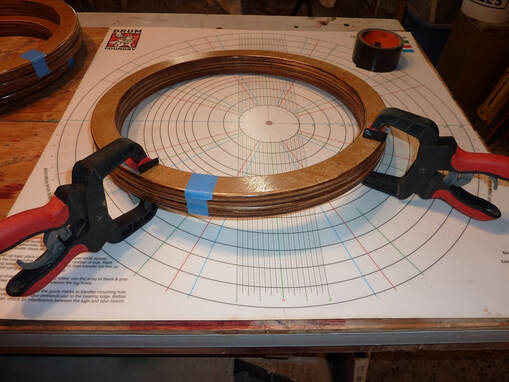
****************************************************
Here's the new set, a 5pc. made of staves of two different materials. They sound better than I knew they would.

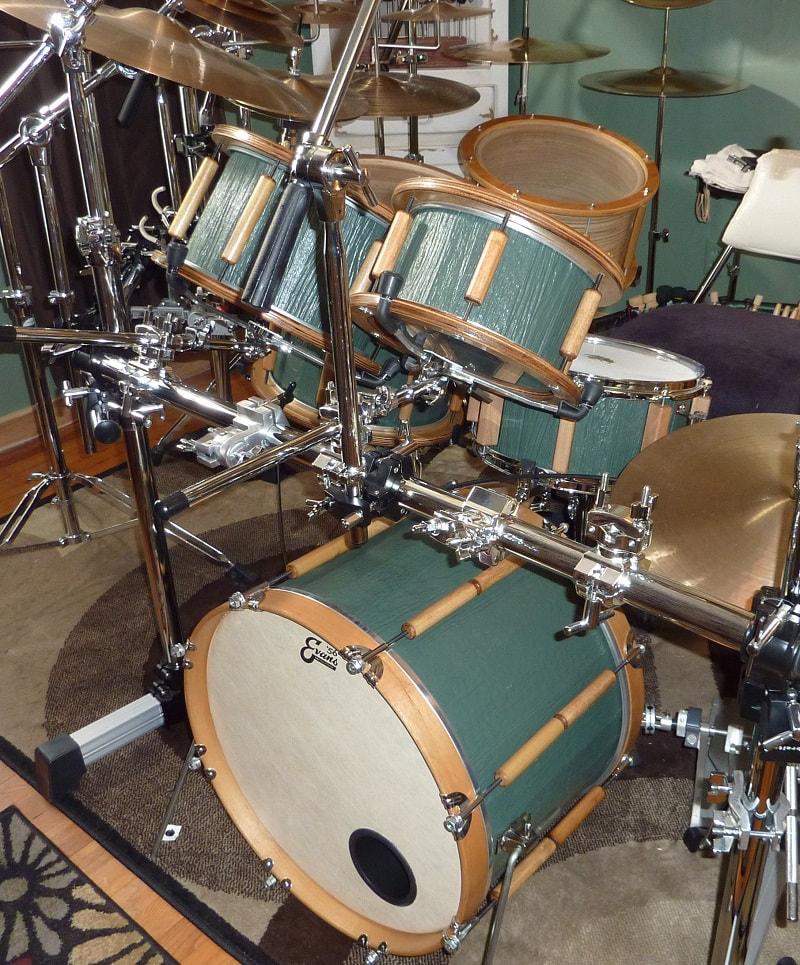
I'm rearranging my big set so, I just set up the new kit in the empty space. Check out the faux grain of this stuff, knots and all. It's really cool.
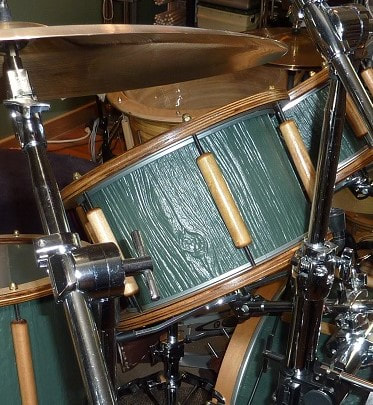
My daughter, Hannah, is visiting. She used to do professional photography. She didn't bring her DSL but, her I-phone takes incredible pictures. Much better than my camera or phone. I asked her to take a picture of my snare drums, which is below. It's been shrunk and modified for placement here and lost some detail.
I made all of them but, the last two down the end on the left: a DW black nickel over brass and a Tama steel. The one next to that is not a shell I made. That's the 3/16" thick aluminum made for me by a friend who worked in an aircraft plant.
You might look at those drums and think you could never do that. You'd be surprised what you can do if you do any woodworking/carpentry or even if you just use a drill and a Dremel tool. The rest can be purchased from various merchants online who will make over a shell for finish and assembly for you but, believe it or not, there's actually nothing you cannot do to make a snare drum with a drill and bits and a Dremel tool for working a typical plywood shell from Keller or Eames, etc.. I've done it. It's satisfying playing a drum(s) you make yourself.
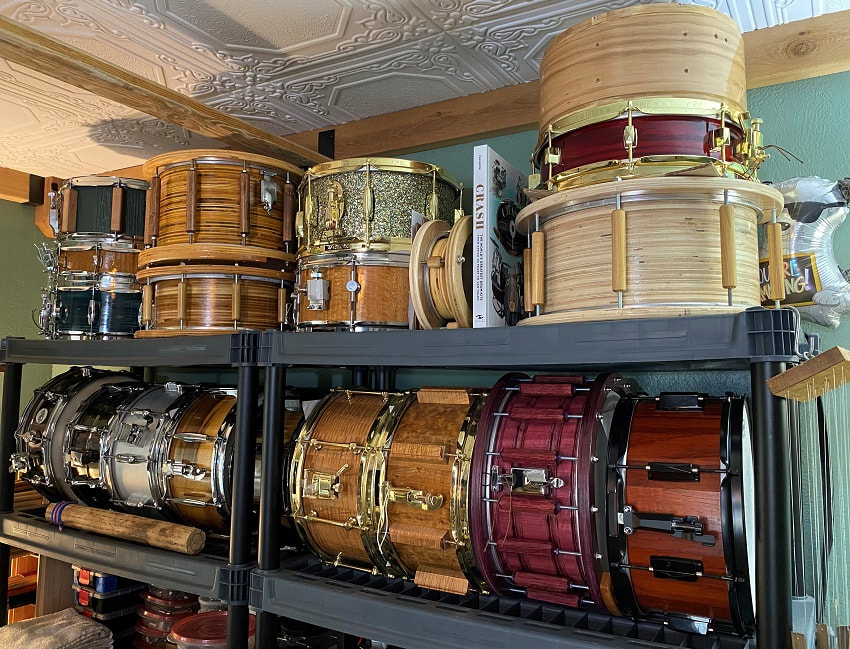
A menagerie of experimental drums
Over the years in my videos about hype in the drum manufacturing industry about drum shells, people have commented that the lack of true recording equipment in the presentations loses weight of evidence.
In coming up with the idea for a fourth recording, this time called "Solos for Concept Drum Sets," I'm putting all these various "non-drums" and drums of lesser rank in the consumer market to the recording system and putting together, what I hope will be a truly enlightening aural experience for the listener.
I'm still working on new drums but, here's a pic of where things are at:
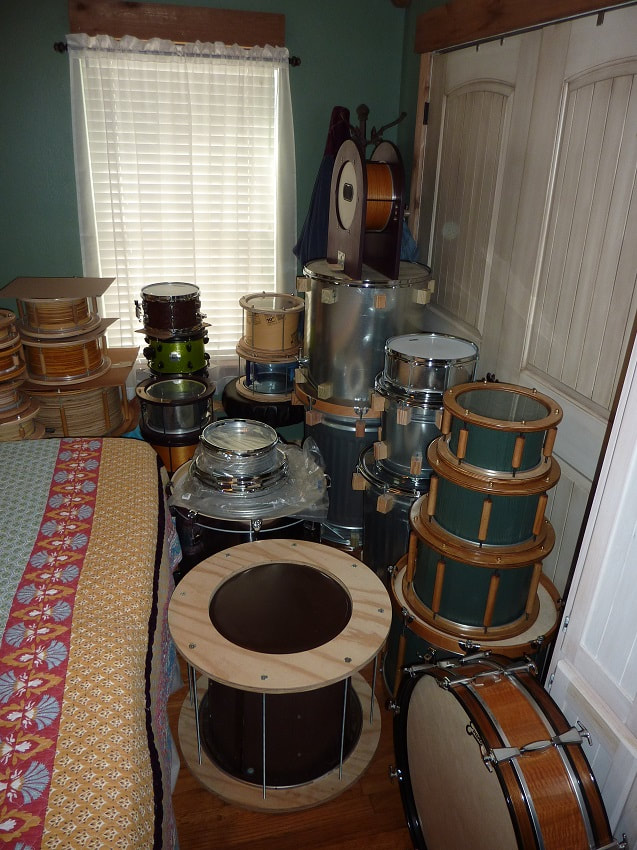
Some of these you'll recognize, others not but, I am expecting them all to shine when I begin soloing on them one at a time. John Mayes is looking forward to receiving the files when I'm done.
Recording #4 has been held up by not finding the box of shells I used on the last tabletop prototype rig. I looked in various places, more than once, all week long. I give up. Some day they'll show up in some container I never thought I'd put them in for one reason or another. I did find a bunch of other things in old boxes sitting there for going on 7 years, rain damaged and all. I bought a couple pairs of joggers, seriously light, to drum with. Packed them away when we moved, never saw them again until the other day.
Anyway, the previous shells were Keller pieces left over from other projects. I just decided to make new shells. And with that, plywood rings to go on the plywood table. I cut my rings and glued them up in a couple days.
People ask me why I don't make drums to sell. The next pictures amply show why -
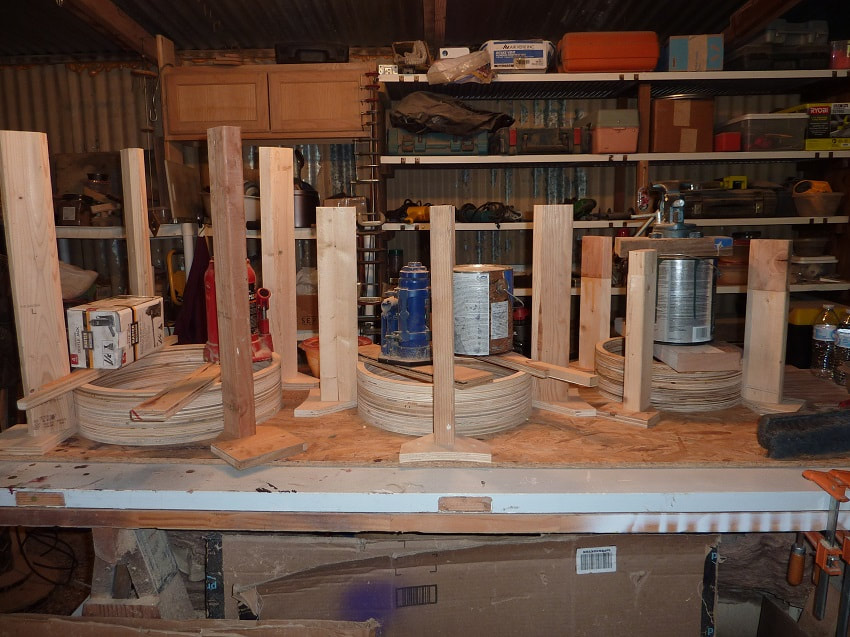
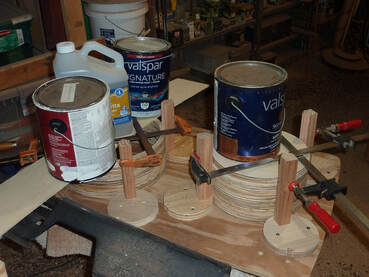
|
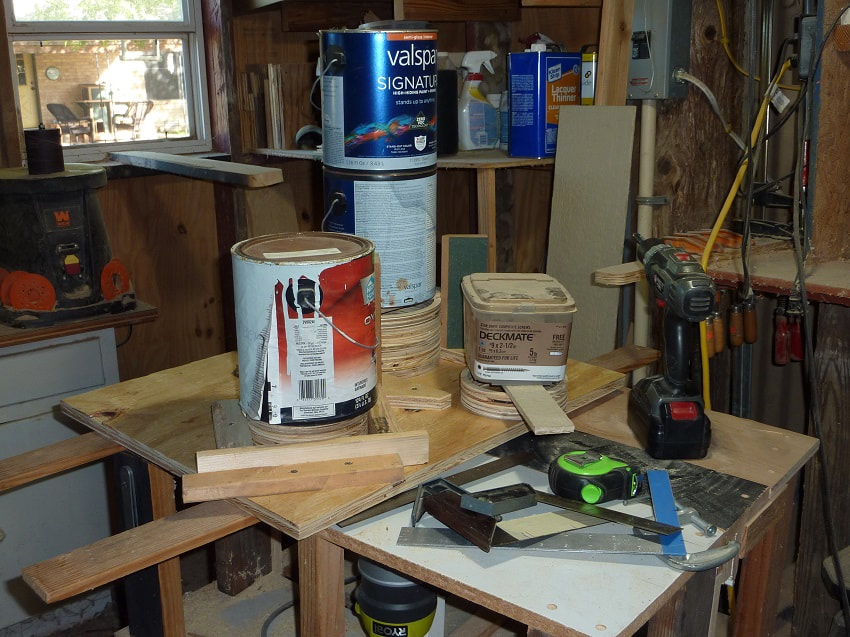
|
It's just a simple matter of not having a decent shop to work in, with proper tools and all the rest. It's like some third-world sweat shop, literally, when the sun beats down on it. Uncomfortably, if not intolerably cold in the dead of winter, as well.
Of course, the stacked plywood ring drum shells are patented. Couldn't make and sell those, anyway but, as you can see, I made some jigs to hold things plumb as they glue up, then use anything with some weight to press down on the rings while things dry. It's a zoo. I hate it but, I work with what I have and make it all work.
The table has been sitting in storage for a good 4 or 5 years. It held up well, though suffered a few square inches of water damage on the underside. Leaky roof in torrential rains in places I didn't know about.
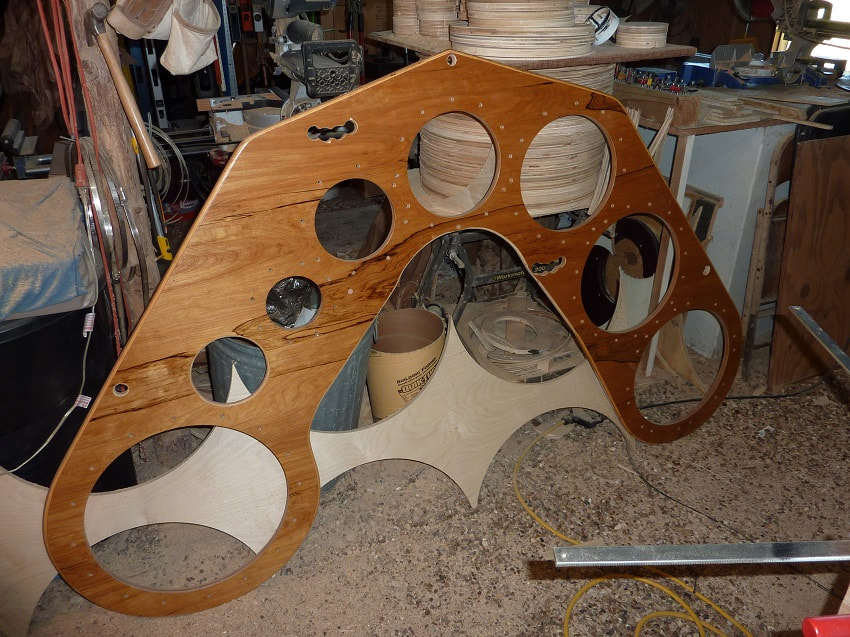
Yeah, that's just a stone floor I work on, covered with saw dust. It was a loafing shed for animals and I closed it in when we moved here, and that's my "shop."
You can see I cut out the place for the snare drum. The weight caused the 10" tom to sound kind of sour and muted. No resonance. Now it sounds fine. 6,8,10,12,14,16 and an 18" to my left, plus a hole to send up the hi-hat stand through, and some cut outs for my hands to grab and lift the thing up, and the three holes for the rods that hold it in place on a rack. It's pretty heavy when everything is put together.
I wanted to make a new set, using wood hoops but, plywood prices are nuts and I made these rings from scraps, including some rough construction grade plywood. Not that you can notice with the flat surfaces glued together. The outer ring composition shows some variation but, that would be the case regardless, even when I use all cabinet grade plywood. I like the variations, anyway.
The idea is simple. The "shells" are made 1.5," two rings, and 3," four rings, to sit either above or below the table. For toms, the 3" are on top and for "floor" toms, the 3" below just to create the image of a drop for the natural positions of those drums in a typical set. Or, I can leave the plane the same. Doesn't make any real difference in how the sticks glide around.
I need to scrape glue droplets off and sand the shells with various sanders, then some sanding sealer, then some finish material, in this case something new I tried and really like: Helmsman finish for use on boats. Man, what a high gloss. Goes on easily. Congeals well. Really nice stuff and no strong odors like other oil based finishes. It does have an odor but, not really strong enough to bother my own head or my wife's.
Hopefully by the end of the week I'll be ready to record.
